您的当前位置:首页 > WhatsApp > ### How to Set Up Quick Phrases Using Google Assistant on Your Pixel DeviceLearn the hassle-free steps to personalize your Google Assistant experience and enable Quick Phrases on your trusty Pixel! 正文

### How to Set Up Quick Phrases Using Google Assistant on Your Pixel DeviceLearn the hassle-free steps to personalize your Google Assistant experience and enable Quick Phrases on your trusty Pixel!

时间:2024-09-21 16:31:47 来源:网络整理 编辑:WhatsApp

核心提示

ExploreGoogleAssistant’sunseenwonderslikeaudiomessagesandWhatsAppcalls!Uncovertheexclusive'QuickPhra

Explore Google Assistant’s unseen wonders like audio messages and WhatsApp calls! Uncover the exclusive 'Quick Phrases' feature on Pixel devices. Invoke assistance and perform actions beyond the traditional "Hey Google"! Delve into setting up Quick Phrases on your Pixel and discover the Extreme Battery Saver feature.

Decoding the Quick Phrases Feature of Google Assistant

Effortless automation lies within the Quick Phrase feature of Google Assistant. It streamlines your interaction by skipping the wake-word, enhancing efficiency. Let’s dive into a practical scenario: Set an alarm, and instead of, 'Hey Google, cancel the alarm', a simple 'Stop' or 'Snooze' suffices! Manage calls by stating 'Answer', 'Decline', or 'Silence'. It’s that smooth on all Pixel models (Pixel 6 and up), in multiple languages, and accessible through Google Assistant settings. Plus, manage your routine hands-free with Google Nest Hub Max!

Use these personalized phrases:

**Stop

**

**Snooze

**

**Answer

**

**Decline

**

**Silence

**

Quick Phrases are compatible across the Pixel series and help simplify daily tasks without needing to reach for your phone.

Activating Quick Phrases on your Pixel Device - Your Guide

Either through Google Assistant or your device settings, configuring Quick Phrases is a breeze.

Quick Start Method 1: Through Google Assistant

1. Speak, "Hey Google, open Assistant Settings", to access the settings directly.

1.Hey Google, open Assistant Settings

2. Navigate to 'Quick Phrases' and configure away.

2.Quick Phrases

3. Toggle on 'Alarms, timers, and incoming calls' for instant action.

3.Alarms, timers, and incoming calls

4. Enable 'Continued Conversation' for 'Phone' to fully engage Google Assistant.

4.Continued ConversationPhone

Convenience Awaits Method 2: Through Settings App

Here’s the alternative pathway to Quick Phrases:

1. Head to the Settings app, tap 'Google', and proceed to 'Settings for Google apps'.

1.Google

2. Tap on 'Search, Assistant, and Voice options' followed by 'Google Assistant'.

2.Search, Assistant, and Voice optionsGoogle Assistant

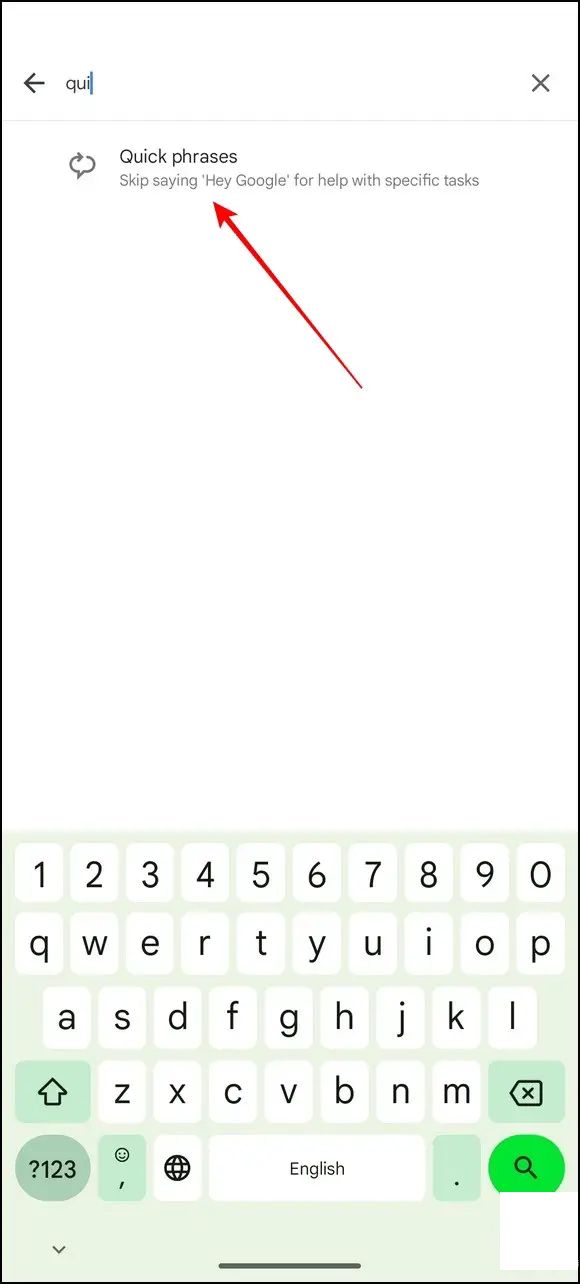
3. Tap 'Quick Phrases' from the search bar to reveal the options.

3.Quick Phrases

5. Turn on the quick phrases that cater to your daily needs.

5.turn on

Frequent Questions Answered

Q: Activation of Quick Phrases on my Pixel Device

A: Just follow the instructions detailed in this guide to set up Quick Phrases on your Pixel device.

A:

Q: Why isn’t Google Assistant Quick Phrases visible on my Phone?

A: The Quick Phrase feature is exclusively available on Pixel devices (Pixel 6 and higher). It is currently not supported on other Android phones.

A:

Embrace the Pixel's Potential with Google Assistant

That's an overview of the quick-phrase feature in Google Assistant for Pixel devices. Share this enlightenment with loved ones and see more helpful tips below:

What else could fascinate you?

  • Personalize your Pixel’s sound profile
  • Get to know the myriad uses of Google Pixel 7 & 7 Pro
  • Widen your smartphone safety net with Crash Detection
  • Master photo editing with the Google Pixel 7 Series
  • For more insights, dive into our Google News, join our Telegram Group, and explore our YouTube Channel.

    上一篇:### Recharging Your Mobile Number with the Facebook AppAre you looking to add more talk time or data to your mobile number using the convenience of the Facebook app? Follow these easy steps to recharge and exceed your communication needs:---**Step-by-Step Guide to Recharge Your Mobile Number via the Facebook App**1. **Open the Facebook App**: Ensure the latest version of the Facebook app is installed on your mobile device. Launch the app to access your profile page.2. **Access the App Settings**: Tap on the three horizontal lines in the top right corner of the app to open the menu. Scroll down and select 'Settings & Privacy,' then choose 'Settings.'3. **Navigate to Payments Settings**: In the 'Settings' menu, look for the ' Payments' section and tap on it. Here, you will find all payment and recharge-related options.4. **Select Mobile Recharge**: Under the Payments menu, select 'Mobile Recharge.' This is where you can manage and view your recharge history as well.5. **Choose Your Mobile Network and Country**: In the recharge section, select the mobile network that provides your mobile service. You will also need to choose the correct country to ensure the recharge is processed accurately.6. **Enter Your Mobile Number**: Enter the mobile number you wish to recharge. Double-check that the number is accurate to avoid any inconvenience or loss of service.7. **Choose Recharge Amount**: Browse through the available recharge options and select the amount that fits your needs. You can typically pick different plans depending on the data and balance increments.8. **Confirm the Transaction**: Once you’ve selected the recharge plan, review the details carefully, including the amount and internet pack, if applicable. Confirm the transaction by tapping on 'Pay' or a similar confirmation button.9. **Complete Recharge**: The Finance app or service you linked with Facebook will prompt you for payment authorization. Follow their instructions to complete the recharge payment. 10. **Verify Recharge Status**: After completing the payment, a confirmation message will be sent to your mobile number. This message should verify that your recharge has been processed successfully.---By following these straightforward steps, you can quickly recharge your mobile number using the Facebook app—adding more value to your mobile experience without any hassle.