您的当前位置:首页 > TG > Certainly! Here's a revised version of your copy:"The Asus Fonepad 7 and MeMoPad 8 are newly launched in India with a starting price of 10,999 INR." 正文

Certainly! Here's a revised version of your copy:"The Asus Fonepad 7 and MeMoPad 8 are newly launched in India with a starting price of 10,999 INR."

时间:2024-09-24 03:10:32 来源:网络整理 编辑:TG

核心提示

台灣科技巨頭華碩(Asus)在印度市場推出多款新平板電腦。最新上市的產品包括強檔的華碩Fonepad7和高級的華碩MeMOPad8,分別定價為10,999和19,999印度盧比。像係列手機一樣,這兩款

台灣科技巨頭華碩(Asus)在印度市場推出多款新平板電腦。最新上市的產品包括強檔的 華碩Fonepad 7 和高級的 華碩MeMOPad 8,分別定價為10,999和19,999印度盧比。像係列手機一樣,這兩款平板電腦專業於線上購物平台Flipkart進行銷售。

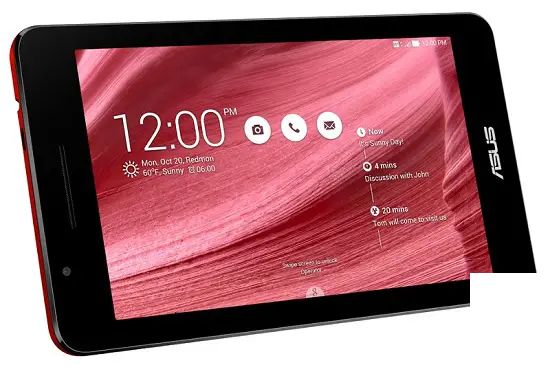
華碩Fonepad 7與華碩MeMOPad 8均搭載了英特爾Atom晶片組,並運行基於 Android 4.4 KitKat操作系統和搭载 Zen UI的平板。

詳細來看規格,華碩Fonepad 7配備一塊標準的 7英寸顯示屏,1920×1200解析度,並配備強大的四核心1.83 GHz晶片組,內置2 GB運存。此外,這款平板提供16 GB內置存儲,並可通過micro SD卡擴展至80 GB。

平板背部配備了一個強大的主摄像机,前置攝像頭則是專為自拍而設計的強大功能,可進行視頻會議。該平板提供雙SIM功能、3G通话、Wi-Fi、GPS和Bluetooh等多種連接選項。另外,搭載了強有力的4,350 mAh電池,可持續使用達9小時。

華碩MeMOPad 8擁有一塊精緻的8英寸顯示屏,1920×1200分辨率,非凡的視覺享受,並採用耐刮蹭的康宁大猩猩玻璃。該平板搭載強大的四核心晶片組和2 GB運存,提供16 GB內置存儲和5 GB免费的華碩網絡存儲空間。

此外,MeMOPad 8配有一個强大的后置摄像机和一個前置自拍摄像机,提供 LTE、Wi-Fi、NFC和蓝牙等多種互聯功能。該平板配置一個大容量的強力電池,驅動整個設備超過9小時的長時間使用。

關鍵規格

上一篇:### Recharging Your Mobile Number with the Facebook AppAre you looking to add more talk time or data to your mobile number using the convenience of the Facebook app? Follow these easy steps to recharge and exceed your communication needs:---**Step-by-Step Guide to Recharge Your Mobile Number via the Facebook App**1. **Open the Facebook App**: Ensure the latest version of the Facebook app is installed on your mobile device. Launch the app to access your profile page.2. **Access the App Settings**: Tap on the three horizontal lines in the top right corner of the app to open the menu. Scroll down and select 'Settings & Privacy,' then choose 'Settings.'3. **Navigate to Payments Settings**: In the 'Settings' menu, look for the ' Payments' section and tap on it. Here, you will find all payment and recharge-related options.4. **Select Mobile Recharge**: Under the Payments menu, select 'Mobile Recharge.' This is where you can manage and view your recharge history as well.5. **Choose Your Mobile Network and Country**: In the recharge section, select the mobile network that provides your mobile service. You will also need to choose the correct country to ensure the recharge is processed accurately.6. **Enter Your Mobile Number**: Enter the mobile number you wish to recharge. Double-check that the number is accurate to avoid any inconvenience or loss of service.7. **Choose Recharge Amount**: Browse through the available recharge options and select the amount that fits your needs. You can typically pick different plans depending on the data and balance increments.8. **Confirm the Transaction**: Once you’ve selected the recharge plan, review the details carefully, including the amount and internet pack, if applicable. Confirm the transaction by tapping on 'Pay' or a similar confirmation button.9. **Complete Recharge**: The Finance app or service you linked with Facebook will prompt you for payment authorization. Follow their instructions to complete the recharge payment. 10. **Verify Recharge Status**: After completing the payment, a confirmation message will be sent to your mobile number. This message should verify that your recharge has been processed successfully.---By following these straightforward steps, you can quickly recharge your mobile number using the Facebook app—adding more value to your mobile experience without any hassle.
下一篇:### How to Auto-Translate Chrome Web Pages for PC and Mobile DevicesLooking to easily translate content on web pages directly within the Google Chrome browser on your computer or mobile device? This guide will walk you through the simple steps to activate automatic translation on both your PC and mobile browsers.---#### Auto-Translate Chrome Web Pages on PC1. **Access Chrome Settings:** - Open Google Chrome on your PC. - Click on the three dots in the upper right corner to open the menu. - Select “Settings” from the dropdown list.2. **Navigate to the Advanced Section:** - Scroll down or use the search bar and type in “Language.”3. **Enable Translation:** - Under the “Languages” section, click on “Translate spoken and written languages automatically.” - Toggle the switch to enable automatic translation. Chrome may ask for permission to access your language preferences and text content on web pages, so be sure to give the necessary permissions.4. **Select Your Preferred Languages:** - Click on “Language” in the settings menu. - In the list of languages, select “Add languages.” - Choose the languages you want Chrome to automatically translate from and to.5. **Start Browsing:** - Open a web page as normal. - Chrome will automatically translate French or other foreign language text into your chosen target language.---#### Auto-Translate Chrome Web Pages on Mobile DevicesThe process is similar for mobile users:1. **Open Chrome on Your Mobile Device:** - Launch the Google Chrome app on your smartphone or tablet.2. **Go to Settings:** - Tap on the three dots in the upper right corner to access the menu. - Choose “Settings” from the menu.3. **Access Language Settings:** - In the settings menu, scroll to find “Languages” or “Languages & input.”4. **Turn on Translation:** - Look for an option related to automatic translation and toggle it on. - If prompted, grant permission for Chrome to access the text content on your webpages.5. **Set Your Language Preferences:** - Go to the language settings and add the languages you wish Chrome to automatically translate.6. **Browsing with Translation:** - Browse any web page. - Chrome will then show the translations automatically, either in_place as you read, or after you select the translate button on the webpage.---By following these steps, you can now enjoy seamless automatic translation for web pages in Chrome, regardless of whether you're using a PC or a mobile device.