您的当前位置:首页 > Telegram Channel > ### Recharging Your Mobile Number with the Facebook AppAre you looking to add more talk time or data to your mobile number using the convenience of the Facebook app? Follow these easy steps to recharge and exceed your communication needs:---**Step-by-Step Guide to Recharge Your Mobile Number via the Facebook App**1. **Open the Facebook App**: Ensure the latest version of the Facebook app is installed on your mobile device. Launch the app to access your profile page.2. **Access the App Settings**: Tap on the three horizontal lines in the top right corner of the app to open the menu. Scroll down and select 'Settings & Privacy,' then choose 'Settings.'3. **Navigate to Payments Settings**: In the 'Settings' menu, look for the ' Payments' section and tap on it. Here, you will find all payment and recharge-related options.4. **Select Mobile Recharge**: Under the Payments menu, select 'Mobile Recharge.' This is where you can manage and view your recharge history as well.5. **Choose Your Mobile Network and Country**: In the recharge section, select the mobile network that provides your mobile service. You will also need to choose the correct country to ensure the recharge is processed accurately.6. **Enter Your Mobile Number**: Enter the mobile number you wish to recharge. Double-check that the number is accurate to avoid any inconvenience or loss of service.7. **Choose Recharge Amount**: Browse through the available recharge options and select the amount that fits your needs. You can typically pick different plans depending on the data and balance increments.8. **Confirm the Transaction**: Once you’ve selected the recharge plan, review the details carefully, including the amount and internet pack, if applicable. Confirm the transaction by tapping on 'Pay' or a similar confirmation button.9. **Complete Recharge**: The Finance app or service you linked with Facebook will prompt you for payment authorization. Follow their instructions to complete the recharge payment. 10. **Verify Recharge Status**: After completing the payment, a confirmation message will be sent to your mobile number. This message should verify that your recharge has been processed successfully.---By following these straightforward steps, you can quickly recharge your mobile number using the Facebook app—adding more value to your mobile experience without any hassle. 正文

### Recharging Your Mobile Number with the Facebook AppAre you looking to add more talk time or data to your mobile number using the convenience of the Facebook app? Follow these easy steps to recharge and exceed your communication needs:---**Step-by-Step Guide to Recharge Your Mobile Number via the Facebook App**1. **Open the Facebook App**: Ensure the latest version of the Facebook app is installed on your mobile device. Launch the app to access your profile page.2. **Access the App Settings**: Tap on the three horizontal lines in the top right corner of the app to open the menu. Scroll down and select 'Settings & Privacy,' then choose 'Settings.'3. **Navigate to Payments Settings**: In the 'Settings' menu, look for the ' Payments' section and tap on it. Here, you will find all payment and recharge-related options.4. **Select Mobile Recharge**: Under the Payments menu, select 'Mobile Recharge.' This is where you can manage and view your recharge history as well.5. **Choose Your Mobile Network and Country**: In the recharge section, select the mobile network that provides your mobile service. You will also need to choose the correct country to ensure the recharge is processed accurately.6. **Enter Your Mobile Number**: Enter the mobile number you wish to recharge. Double-check that the number is accurate to avoid any inconvenience or loss of service.7. **Choose Recharge Amount**: Browse through the available recharge options and select the amount that fits your needs. You can typically pick different plans depending on the data and balance increments.8. **Confirm the Transaction**: Once you’ve selected the recharge plan, review the details carefully, including the amount and internet pack, if applicable. Confirm the transaction by tapping on 'Pay' or a similar confirmation button.9. **Complete Recharge**: The Finance app or service you linked with Facebook will prompt you for payment authorization. Follow their instructions to complete the recharge payment. 10. **Verify Recharge Status**: After completing the payment, a confirmation message will be sent to your mobile number. This message should verify that your recharge has been processed successfully.---By following these straightforward steps, you can quickly recharge your mobile number using the Facebook app—adding more value to your mobile experience without any hassle.

时间:2024-09-24 09:40:34 来源:网络整理 编辑:Telegram Channel

核心提示

JointheenhancedFacebookexperienceaswefocusonbolsteringyouraccount'sdefensesandimprovingaccesstoperso

Join the enhanced Facebook experience as we focus on bolstering your account's defenses and improving access to personal settings. Enjoy a革新式界面,其中包含了全新、充满活力的图标。待发现的一系列独特功能,可能正是你未曾期待但在社交应用中的宝贵之选。

激昂更新!Facebook在设置菜单中引入了便捷的手机充值选项。如你所见,它实现了关键词所述功能:助你轻松为充斥着通话与数据流的预付费手机补充能源。覆盖印度主流网络,并提供多样套餐,供你选优充值。

三步轻松在Facebook应用内充值手机

  • 首位:更新到最新版Facebook应用,可通过Play Store完成此操作,随后进入我的应用与游戏查阅。
  • Play Store我的应用与游戏
  • 查找可用的更新并安装。
  • 更新完毕后,打开应用,向右滑至最边缘的面板,发现“手机充值”按键。
    facebook recharge
  • 手机充值
  • 点击选项,输入手机号码开始充值之旅。
  • 应用将自动识别运营商和区域。
  • 选择充值金额或浏览语音和流量套餐选择。
  • 前往支付页面,完成支付,充值即成。
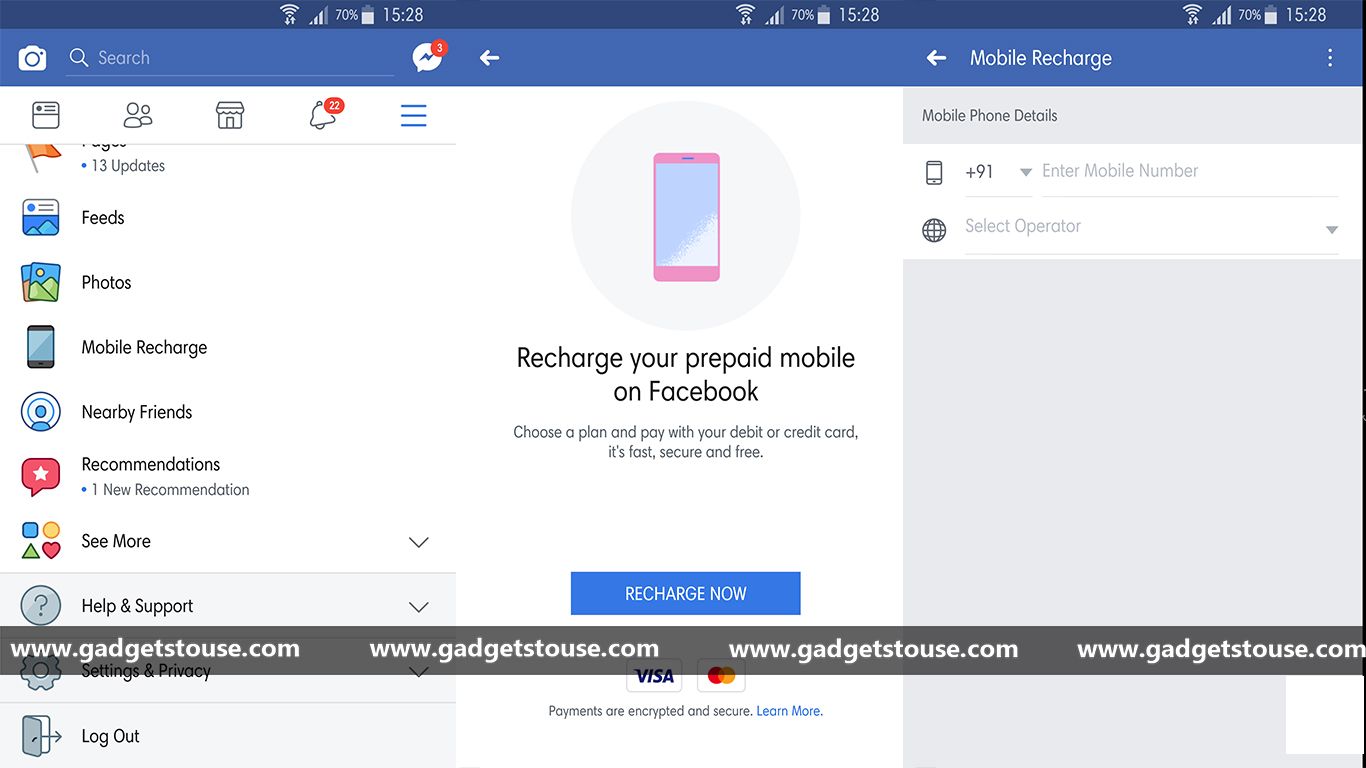
  • 请注意,Facebook应用目前仅支持借记卡和信用卡支付,请确保准备一张卡片。虽然未来可能会有更多的付款方式,例如UPI和电子钱包,但目前我们无法确认确切详情。

    上一篇:Title: Moto E vs. Unite 2: The Ultimate Buying Guide — Which is Right for You and Why?In this thorough comparison, we weigh the pros and cons of the Moto E and the Unite 2 to help you make an informed decision about which budget smartphone is the best fit for your needs.**Examing the Moto E: Your Affordable Starter**Pros:- **Cost-Effective**: The Moto E offers exceptional value for money, making it an excellent choice for those on a budget.- **Simplicity**: With its straightforward interface, the Moto E provides a user-friendly experience without overwhelming features.- **Battery Life**: The Moto E boasts a long-lasting battery, ensuring you stay connected throughout the day.Cons:- **Performance**: While it won’t compromise on affordability, the Moto E may fall short in terms of performance compared to higher-end devices.- **Limited Storage**: The Moto E typically comes with limited internal storage. However, expandable microSD slots are often available for additional storage options.- **Camera Quality**: The camera on the Moto E is adequate for basic usage but may not live up to the standards of higher-end models.**Understanding the Unite 2: A Mixed Bag**Pros:- **Multi-Link Compatibility**: The Unite 2 offers advanced connectivity options that are particularly beneficial for frequent travel or work in diverse environments.- **Sturdy Build**: Known for its durability, the Unite 2 is a solid choice for those who need a smartphone that can withstand the occasional drop or rough handling.- **Decent Specifications**: The Unite 2 shares many middle-of-the-road specs that ensure a decent overall performance without breaking the bank.Cons:- **Moderate Pricing**: Despite falling into the budget category, the Unite 2 might not justify its price tag when compared to some of the more feature-rich mid-range competitors.- **Network Limitations**: The availability of the Unite 2’s connectivity options can depend on your location, potentially leading to limitations or additional cost for certain networks.- **Camera**: Similar to the Moto E, while the camera is better than entry-level, users looking for high-quality imaging capabilities may be left wanting.**Why Choose One Over the Other?**Deciding between the Moto E and the Unite 2 hinges on your personal preferences and specific needs.- If simplicity, affordability, and long battery life are your top priorities, the Moto E might be the winner.- For those who require robust build quality, diverse connectivity options, or just a bit more performance at a budget-conscious price point, the Unite 2 could be the better choice.When making your decision, consider your usage patterns, importance of camera quality, and the types of tasks you plan to perform. Your choice should align with what matters most to you — and your wallet.