您的当前位置:首页 > Telegram > Sure, here is a revised version of the title for better clarity and engagement:"10 Speedy Solutions to Resolve Chrome Image Loading Issues on Your PC" 正文

Sure, here is a revised version of the title for better clarity and engagement:"10 Speedy Solutions to Resolve Chrome Image Loading Issues on Your PC"

时间:2024-09-24 01:06:09 来源:网络整理 编辑:Telegram

核心提示

NavigatingthroughthedigitallandscapewithGoogleChromeoftenbringsforththecommonplightofimageloadingdil

Navigating through the digital landscape with Google Chrome often brings forth the common plight of image loading dilemmas. Such occurrences can stem from unforeseen origins. This piece unveils expedient solutions to troubleshoot this visuals-grasp predicament within Google Chrome, especially on personal computers.

Also, Don’t Miss Out | 7 Secret Techniques for Google Chrome Pro Usage

Also, Don’t Miss Out | 7 Secret Techniques for Google Chrome Pro Usage

Secret Remedies for Image Loading Blues in Google Chrome on PCs

Confront the Mystery in Private Browsing

Unraveling the enigma of image loading starts by isolating it. Check if the conundrum arises within your private browsing serum. Many have erased this mystery by exploring the ethereal dimension of incognito. Here’s your incognito initiation on Google Chrome.

  • Unveil Google Chrome’s shroud on your PC desktop.
  • Set sail with New Incognito Window upon the digital seas.
  • New Incognito Window
  • Alternatively, zip directly into incognito with the Ctrl+Shift+N mystic combo.
  • Ctrl+Shift+N

    Cross-Check the Issue with Alternative Browsers

    The image enigma could be a Chrome-only phenomenon. Test the waters with browsers like Firefox or Opera to see if they present clearer visuals.

  • Plant Firefox as your internet companion on PC terrain.
  • Set sail with Opera as your web navigator for PC superiorities.
  • If these browsers clarify your vision on the desired site, then Chrome might be in need of an update or a tech tune-up.

    Empower Image Display for Every Website

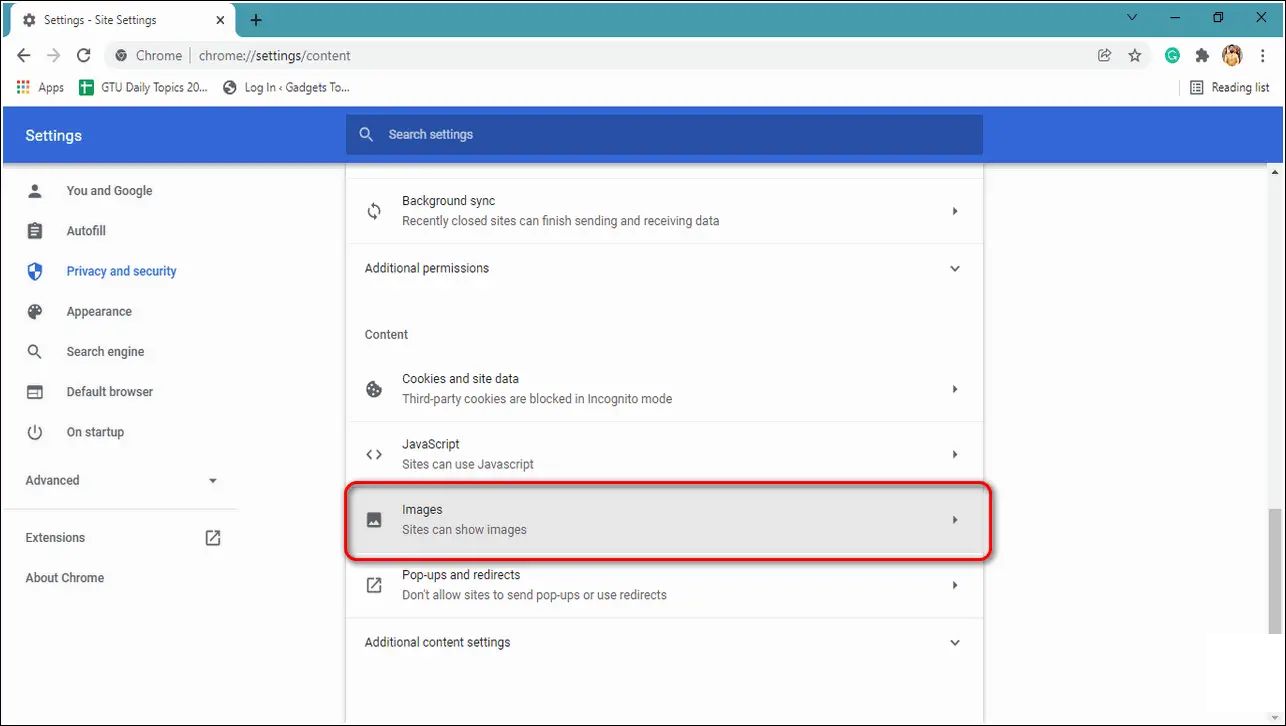
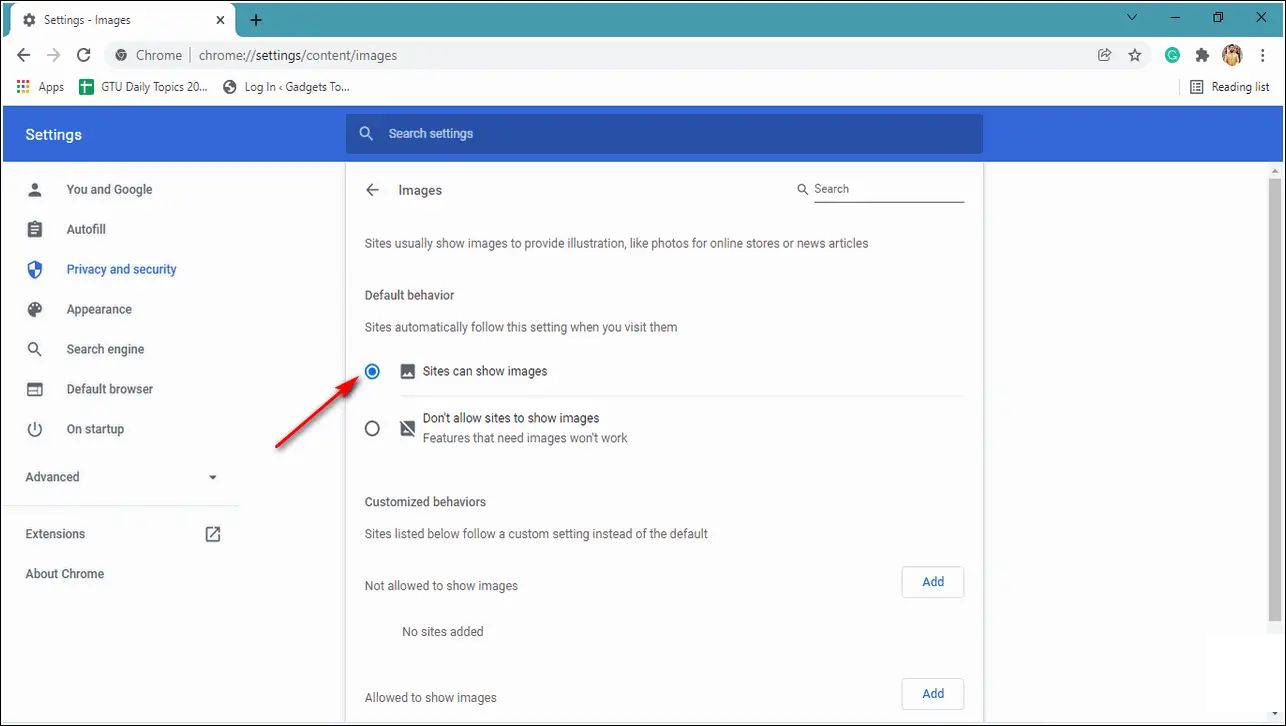
    Not showing images could be due to missing permissions. Assure Google Chrome has the go-ahead to broadcast these visuals. Here’s your cue to adjust the settings swiftly.

  • Upon a Chrome PC, codify ‘Google Chrome’ into existence.
  • Unlock Settings where dreams unfold.
  • Settings
  • Drift through to Privacy and Security and reveal Site Settings.
  • Privacy and Security Site Settings
  • Find the Images entry and cast your subconscious eye upon it.
  • Images
  • Grant the realm Sites can show Images its permission.
  • Sites can show Images

    Activate Javascript for All Sites

    A JavaScript wizardry can sometimes keep images in the closet. Make sure the spell is cast for all sites to bestow the images upon you. Follow these spells for an instant fix.

  • Conjure up Google Chrome and beam your gaze to the tri-dot icon in the ethereal corner.
  • three-dot icon
  • Utter the incantation ‘Settings’ and release.
  • Settings
  • Reveal Privacy and Security and call forth Site Settings.
  • Privacy and Security Site Settings
  • Properly cast the ‘Javascript’ spell and click forth.
  • Javascript
  • Confirm the spell is set for ‘Sites can use Javascript’.
  • Sites can use Javascript

    Banish Cache Cult

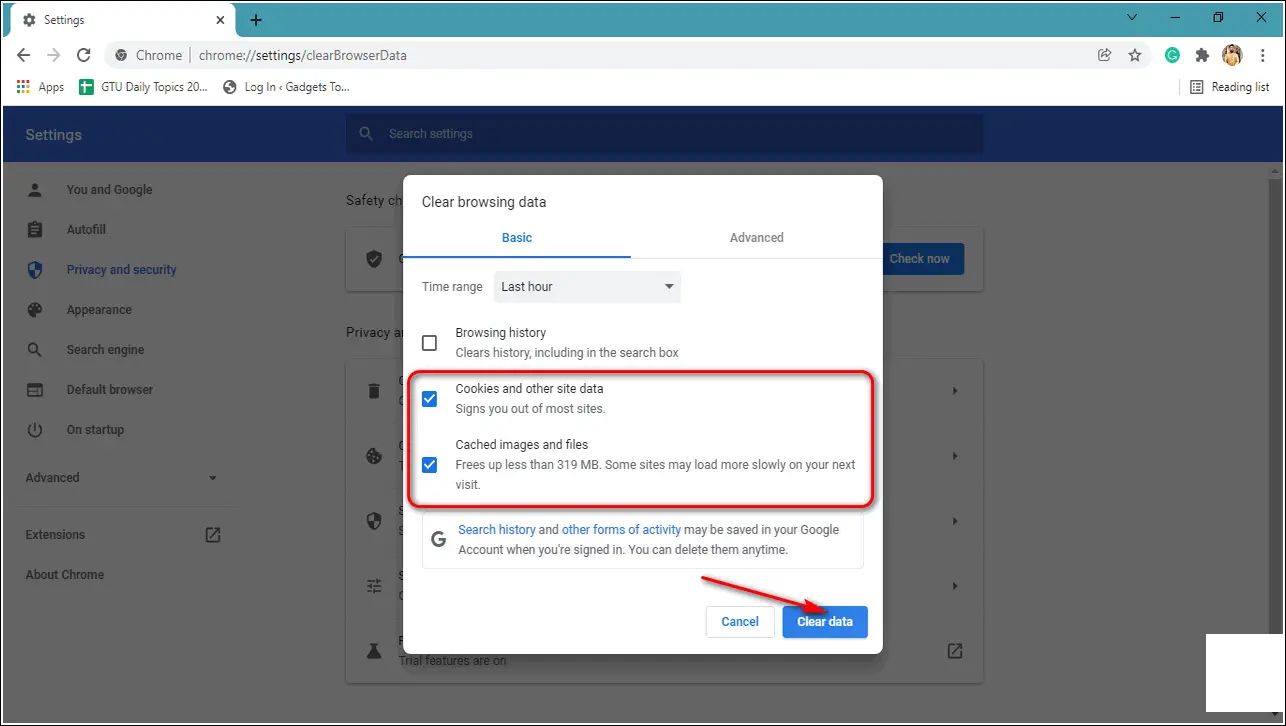
    Cache files are the digital amnesiacs of speed, potentially cluttering up the memory clipboard. Bestow a fresh start by banishing these cache Neros.

  • Unveil Google Chrome and单位 on the tri-dot icon at the summit of the screen.
  • three-dot icon
  • Invoke ‘Settings’ and step into a guided tour.
  • Settings
  • Navigation directly to Privacy and Security and clear the path to clear browsing data.
  • Privacy and Security clear browsing data
  • Magic your memories with ‘Cookies’ and ‘Cached images and files’.
  • Cookies Cached images and files
  • Eunuch the bundle with the Clear Data button for a bureaucratic purging.
  • Clear Data button

    Curse All Extensions and Revive the Page

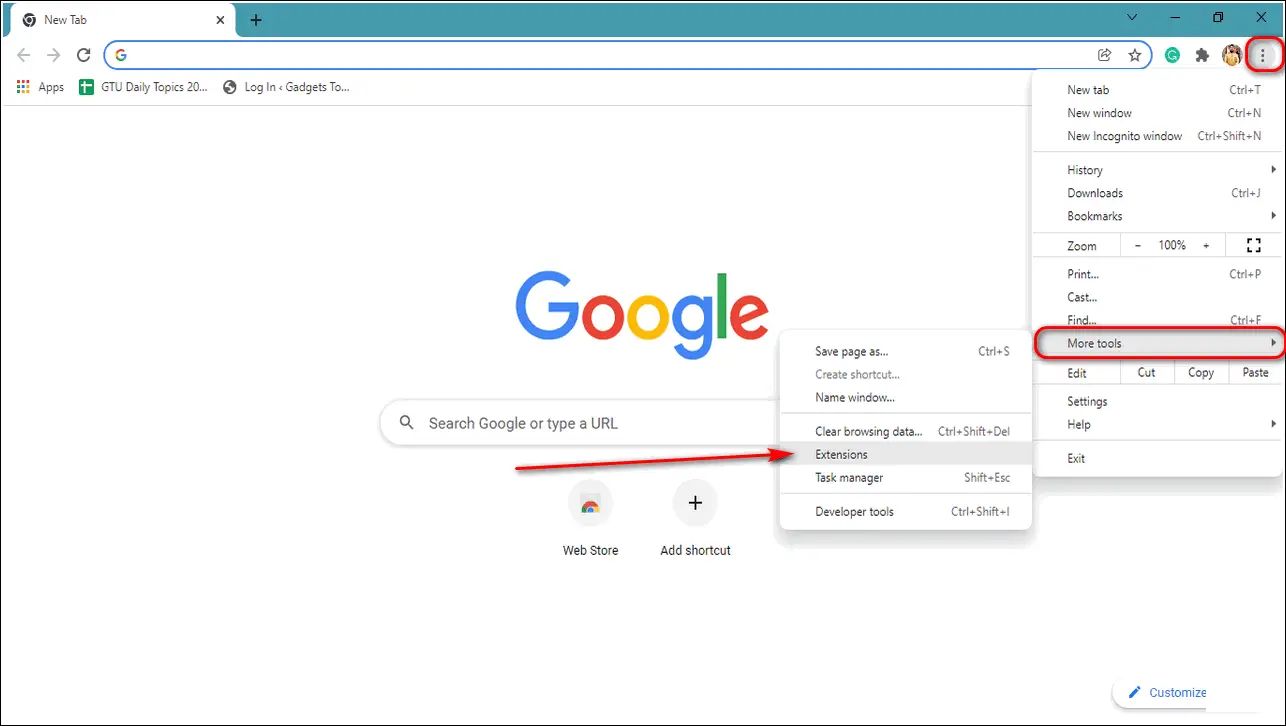
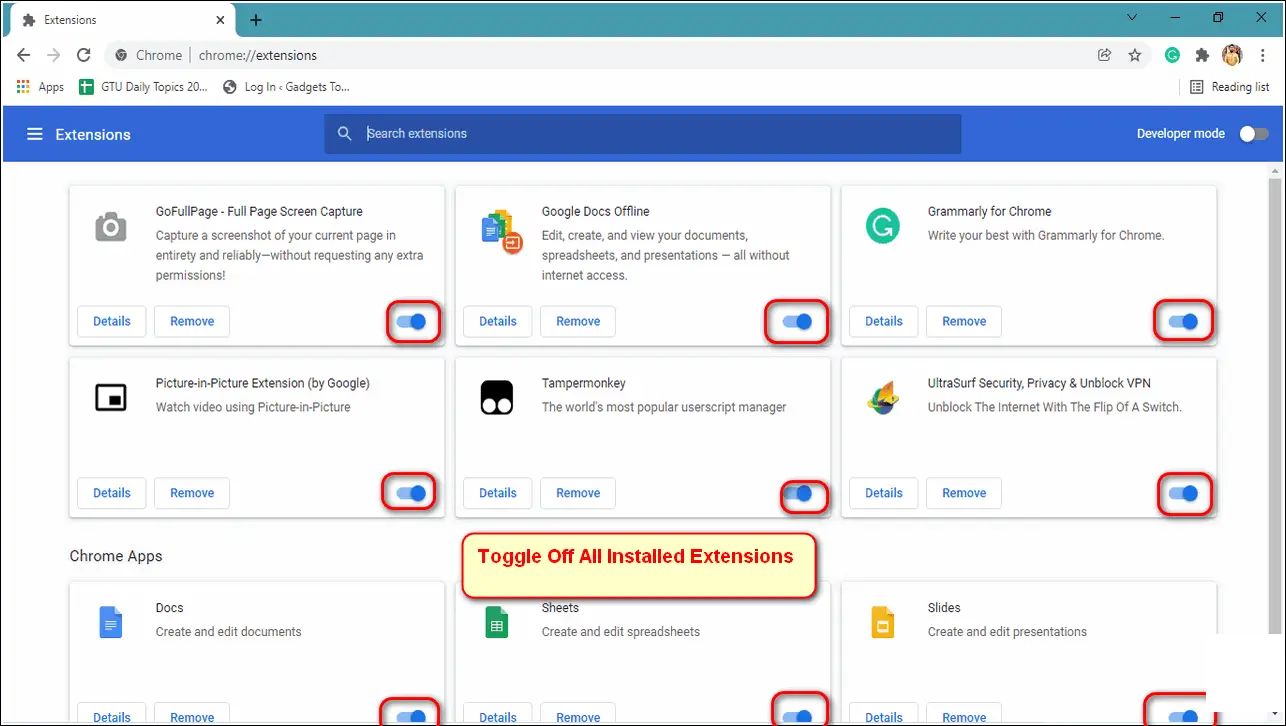
    Extensions are the sorcerers in your digital堡 at times. Unravel the fate of images by cursing them away and then rejuvenating the page.

  • Core through the tri-dot icon, shall you choose to sporadically exist.
  • Summon wands of More tools and conjure up Extensions for a closer glance.
  • More tools Extensions
  • Extinction begins as you turn off each extension; then is the page to be reborn.
  • Manually toggle off reload the page

    Halt Hardware Acceleration

    Beneath Chrome’s hood, a Hardware Acceleration feature looms, speeding imagePath to a crawl sometimes. Disable the engine to see if it’s spell-work affecting your visual feast.

  • Do the tri-dot invocation in the main[frame] of Chrome’s UI.
  • three-dot icon
  • Brighten Advanced features and investigate the System beyond.
  • Advanced features System
  • Behead the Hardware Acceleration with a magical toggle.
  • Toggle off

    Foresee Chrome’s Future Updates

    If the UI of images is not as intended, it may signal a saboteur among the browser’s circuits. Google serves Chrome with a regular tech chef, so savor updates for the unexpected images’ issue.

  • Wand to the tri-dot emblem andbble to the realms of Help.
  • Help
  • Commune with the universe of About Google Chrome.
  • About Google Chrome
  • Chrome will then scan the cosmos for updates, naughty or nice.
  • updates

    RenKO Nama Chrome

    Chrome annotates certain digital footprints locally to create swifter storytelling and storage where errors might snipe at image display. Rename the folder, and Chrome will tend to a new one, illuminating anew.

  • On your 台下 computer, activate the Run window with the mystical Windows+R incantation.
  • Run window
  • Instruct your fingers to chant ‘ %localappdata% ‘ and then find a place to press Enter.
  • %localappdata%
  • Seek the‘ Google Folder’ beacon and brave its’t wonder.
  • Google Folder
  • March to the ‘Chrome/Userdata’ gathering and spot the Default folder.
  • Chrome/Userdata Default
  • Rename the original Default folder if you wish to.
  • Default folder
  • Reboot the void-wielding Google Chrome for an array of new possibilities.
  • Relaunch

    Wand alongside Google Public DNSidl

    charm images into being with the right DNS. Shift to Google’s fantastical domain, and your browsing might acquire newfound clarity and security.

  • Chant Control Panel and make Contact Panel]:= it’s Mind awake.
  • Control Panel
  • Consort with internet’s love, inside the bowels of< ‘Network and Internet‘.
  • Network and Internet
  • Confront the< strong>Network Sharing Center and acknowledge your Internet’s name.
  • Network Sharing Center
  • Name your link with a single click and manifest the‘ Properties’ CD for insertion.
  • Properties
  • Navigate to the strong>Internet Protocol Version 4 (TCP/IPv4) strong> and reveal your inner IT wizard with a double-click.
  • Internet Protocol Version 4 (TCP/IPv4)
  • Instruct your DNS in the sacred ritual of <‘strong>Use the following DNS server Address‘.
  • Use the following DNS server Address 8.8.8.8 strong> and the Secondary DNS to 8.8.4.4 for the grand finale. 8.8.8.8 8.8.4.4
    上一篇:### Mastering Gemini Advanced: A Step-By-Step Guide for Gmail, Drive, and Google DocsWelcome to your comprehensive guide on harnessing the full potential of Gemini Advanced, an innovative tool designed to enhance your productivity across Gmail, Google Drive, and Google Docs. Learn how to seamlessly incorporate this robust software into your daily workflow to streamline your email communication, organize your documents, and boost your overall efficiency.#### Step-by-Step Tutorial: Integrating Gemini AdvancedFollow these easy-to-follow instructions to get started with Gemini Advanced:#### 1. Setting Up Gemini Advanced- **Download and Install:** Begin by visiting Gemini Advanced’s official website, where you can download the application specific to your operating system (Windows or Mac). - Navigate to the download page. - Select your operating system. - Click “Download” and follow the installation wizard's prompts.- **Access Your Account:** Upon installation, launch Gemini Advanced and sign in using your Google account credentials. This will grant permission for the app to access your Gmail, Drive, and Docs accounts.#### 2. Configuring Gemini Advanced in Gmail- **Launch Gmail:** Open your Gmail account on your computer.- **Install Gmail Add-On:** Click on the齿轮 icon on the upper right corner of your Gmail interface to access the “Get add-ons” area. - Search for “Gemini Advanced” in the add-on store. - Click “Add to Gmail.”- **Grant Access:** Follow the prompts to grant Gemini Advanced the necessary permissions to access your email communications.#### 3. Gemini Advanced in Google Drive- **Sync with Google Drive:** Ensure that Gemini Advanced is enabled for Google Drive by checking the “Google Drive” tab within the app's settings.- **Manage Files Efficiently:** With Gemini, you can organize your files more efficiently by renaming them, moving them to different folders, or deleting them directly from Gmail by right-clicking on the email attachment and selecting Gemini Advanced’s menu options.#### 4. Utilizing Gemini Advanced in Google Docs- **Open Docs from Gmail:** When you receive an email with a Google Doc attachment, you can open and edit it directly through Gemini Advanced, without leaving your email interface.- **Enhance Document Collaboration:** Gemini Advanced can simplify collaborative editing by providing access to real-time co-authoring capabilities, version control, and change tracking in Google Docs.#### 5. Streamlining Your Workflow- **Automate Tasks:** One of the strengths of Gemini Advanced is its ability to automate repetitive tasks. Customize your workflows to automate email categorization, reminders, and document organization.- **Monitor Usage:** Gemini Advanced's built-in analytics allows you to see how you’re using the tool and provide insights on how to further optimize your productivity.By following these steps, you'll be well on your way to using Gemini Advanced as a foundational tool in your Gmail, Drive, and Google Docs arsenal. Start enjoying the streamlined and efficient management of your digital workflows today!
    下一篇:### Activate Google Live Caption on Android 10Introducing the Google Live Caption Feature: Transform Your Android 10 ExperienceEnhance your Android 10 device's accessibility with the innovative Google Live Caption feature. Here's a step-by-step guide to enable live captioning on your phone or tablet.### Step-by-Step Instructions**1. Navigate to the Accessibility Settings:** - Slide down from the top of your screen to access the Quick Settings menu. - Tap on the Accessibility or Turn on/off accessibility button. - Click See all accessibility services.**2. Access the Live Caption Settings:** - Scroll down to find Live Caption. - Activate the switch to toggle the feature on.**3. Customize Your Live Caption Settings (Optional but Recommended):**_Keyword Notes: Add any additional customization options that are available for advanced functionality or personal preference._ - **Language:** To ensure accurate captions, select the appropriate language for live captioning. - **Turn on Description:** If you need visual descriptions of sounds for improved accessibility, enable this feature. - **Deactivate Hardware Buttons:** You can choose to silence your tablet's button sounds when Live Caption is active to avoid getting mixed up with captions. - **Choose or Set Default App:** Enable Live Caption to auto-start in specific apps by selecting them or enabling all apps.**4. Enjoy the Enhanced Experience:** - Once Live Caption is enabled, you can enjoy real-time captions in a variety of apps, from YouTube to Google Meet. - For Los Angeles Lakers games, your Android 10 device will transcribe the play-by-play and commentary while the game is live, ensuring you never miss a moment.### Additional Tips- Ensure your smartphone or tablet is running Android 10 to utilize this feature.- Keep your system updated to the latest version for seamless interoperability with the Live Caption feature.- When using Live Caption, turn your volume to zero if you’re not interested in the audio aspect and want to focus solely on the captions.The Google Live Caption feature is a game-changer that promises to make content more inclusive for everyone. Don't miss out on this wonderful addition to the Android 10 experience.