您的当前位置:首页 > TikTok > ### Introducing Facebook Gaming App; Get Ready to Stream Live from Your Mobile Device!Elevate your gaming experience to a new level with the newly launched Facebook Gaming App. Whether you're an aspiring streamer or just want to share your gaming adventures with friends, here’s everything you need to know to start live streaming from your smartphone.#### Step-by-Step Guide to Live Streaming with Facebook Gaming App1. **Download the Facebook Gaming App:** - Head to your app store on iOS or Android, search for “Facebook Gaming,” and download the app. 2. **Log in or Create an Account:** - If you already have a Facebook account, sign in using those credentials. - If not, create a new Facebook account to start streaming on your mobile device. 3. **Set Up Your Stream:** - Open the app, and navigate to the live stream feature. - Allow the app to access your camera and microphone to get started. 4. **Customize Your Stream:** - Personalize your stream with fun filters, effects, and overlays. - Add a custom title to catch viewers’ attention, and cover image to represent your brand or gaming persona.5. **Start Broadcasting:** - Once your settings are in place, tap on the “Go Live” button. - Choose whether to use video or go for an audio-only stream, then hit “Start Streaming.”6. **Interact with Viewers:** - While live, engage with your audience by using the chat feature to answer questions, acknowledge likes, and react to comments in real-time. - Encourage your friends to drop in and chat.7. **End Your Stream:** - When you’re ready to wrap up, tap on the “End Stream” button in the app. - Facebook will save your live video so you can share it later, or choose to delete it after the session.#### Join the Gaming Community TodayWith the Facebook Gaming App, there’s never been a better time to share your passion for gaming. Whether you stream casual gameplay, pro-level tournaments, or let your followers in on your game hours, the Facebook Gaming App makes it easy to engage with a global gaming audience. So, grab your smartphone, and get ready to amplify your gaming experience live! 正文
时间:2024-09-24 02:45:50 来源:网络整理 编辑:TikTok
Long-anticipated,FacebookGaming’sstreamingplatformisheretochallengeTwitchandYouTubeGaming.Nowaccessi
Long-anticipated, Facebook Gaming’s streaming platform is here to challenge Twitch and YouTube Gaming. Now accessible via the Google Play Store app, iOS users are eagerly awaiting its arrival. In its nascent stage, the app does exhibit some quirks, but with patience, it shows promising potential.
Although Facebook Gaming may never unseat Twitch’s throne, it offers a unique game streaming experience alongside the popular platform. The app enables Android users to stream their mobile gaming sessions directly to their Facebook accounts.
Stream your gaming adventures live with Facebook Gaming, and they're automatically saved and posted to your timeline as engaging video content. Ideal for those looking to expand their following on Facebook. Looking to get started? Here’s a concise guide to streaming from your Android phone to Facebook Gaming.


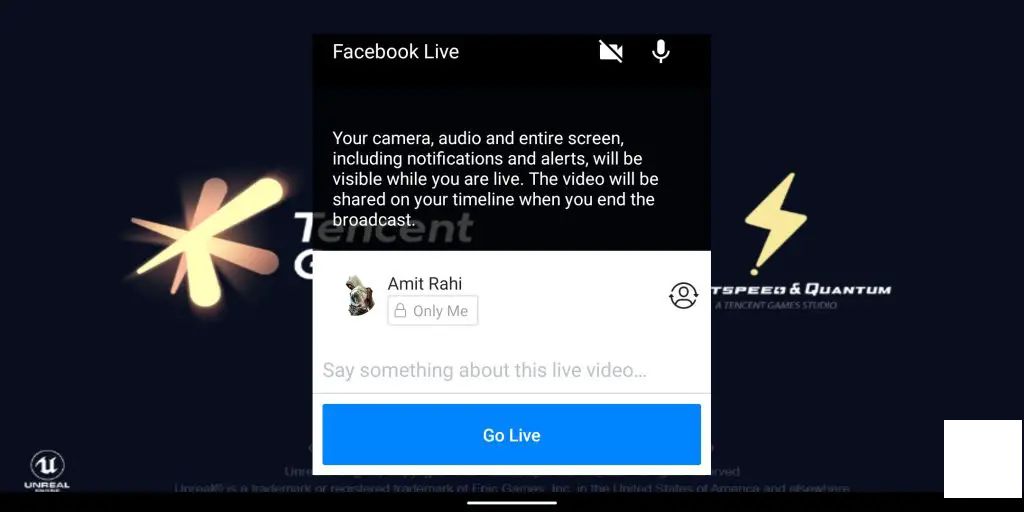

Your Gaming is live with the Facebook Live overlay visible. To conclude your stream, tap the floating upload button, granting the option to post it to your timeline for everyone to see.
And that's it! You've just streamed your mobile game live on Facebook Gaming. While the iOS version is yet to grace our devices, we replicate our hope that it will join thevibe soon, enveloping a broader audience into the Facebook Gaming community.
For Microsoft Flight Simulator: Is Your PC Game-Ready?2024-09-24 03:13
[GRATIS] Unleash Android 12: Mastering Toggles, Material UI Cards, and Essential Features Installation2024-09-24 03:12
**Micromax Canvas HD Plus A190: A Comprehensive Quick Review, Price Analysis, and Comparison2024-09-24 02:43
**Remove China Apps:** Unveiling the Top 15 Chinese Apps & Their Indian and U.S. Alternatives2024-09-24 01:53
Certainly! Here's the revised copy:**HTC Announces U12+ with a 6-inch QHD+ Display and Enhanced Dual Rear and Front Cameras2024-09-24 01:22
Introducing the Swipe Ultimate Windows 8.1 Hybrid Device – Now Available for Just INR 19,999!2024-09-24 03:10
Introducing the Nokia Lumia 1320, Featuring a 6-Inch HD Display, Now Available at Just Rs. 23,9992024-09-24 02:27
Xiaomi's Amazfit Bip Smartwatch Makes Its Debut in the U.S.: Comprehensive Overview of Pricing, Features, and More2024-09-24 01:42