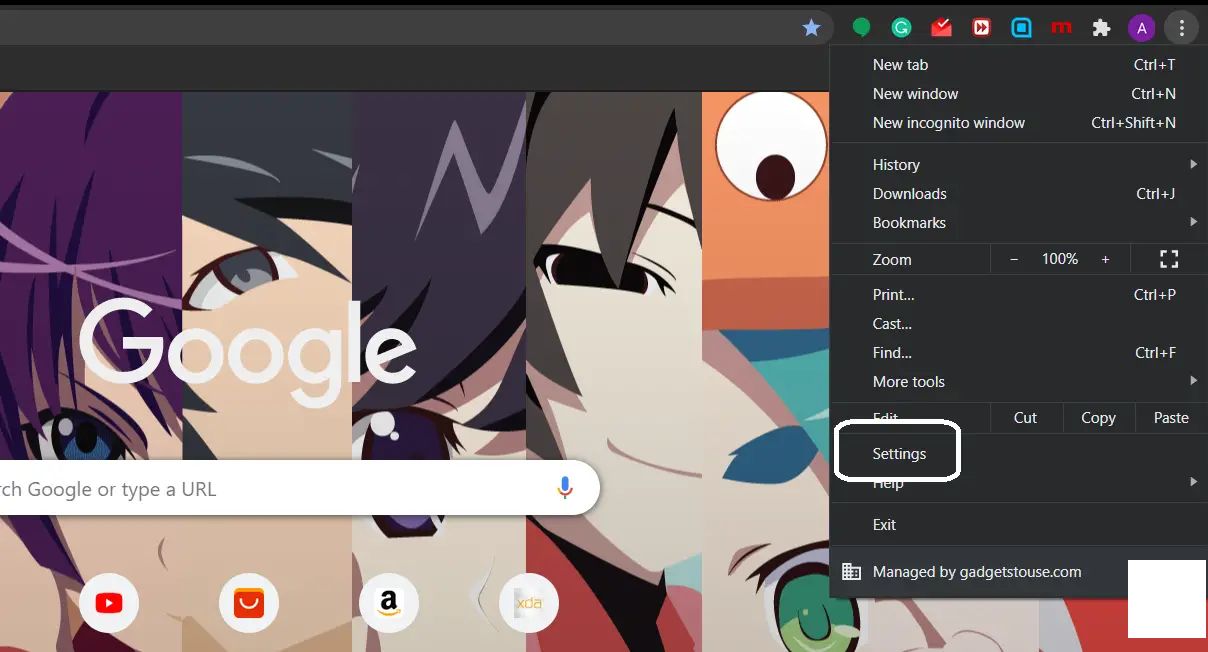
您的当前位置:首页 > Telegram Group > Certainly! Below is a revised version of the copy for removing your Google Account from Chrome:---### How to Remove Your Google Account From Google ChromeNavigating through Chrome settings is a straightforward process. To ensure your privacy or switch to another account, follow these simple steps:1. **Launch Chrome:** Open the Google Chrome browser on your computer.2. **Access Settings:** - Click on the three dots in the upper-right corner of the browser to open the menu. - Select **“Settings”** from the popup menu.3. **Manage Accounts:** - Scroll down the Settings page and click on **“Manage Accounts”** under the “Personal info & security” section.4. **Review Synced Accounts:** - Here, you’ll see a list of all accounts currently signed in to Chrome. - Click on the **Google Account** you wish to remove.5. **Remove Account:** - While viewing the account details, you will find an option to **“Remove”** the account. - Click on this option, and you will be prompted for confirmation.6. **Confirm Deletion:** - To finalize, confirm the removal process when prompted.7. **Optional: Sign Out:** - If you didn't sign out in the previous step, you'll need to do so manually. - In the Settings page, scroll to the bottom and click **“Sign out”** to sign out of your Google Account.After completing these steps, your Google Account will no longer be linked to Chrome on your computer, maintaining your privacy or allowing you to use a different account for your browsing needs.---Feel free to adjust any part of this copy to better suit your intended audience or context! 正文

Certainly! Below is a revised version of the copy for removing your Google Account from Chrome:---### How to Remove Your Google Account From Google ChromeNavigating through Chrome settings is a straightforward process. To ensure your privacy or switch to another account, follow these simple steps:1. **Launch Chrome:** Open the Google Chrome browser on your computer.2. **Access Settings:** - Click on the three dots in the upper-right corner of the browser to open the menu. - Select **“Settings”** from the popup menu.3. **Manage Accounts:** - Scroll down the Settings page and click on **“Manage Accounts”** under the “Personal info & security” section.4. **Review Synced Accounts:** - Here, you’ll see a list of all accounts currently signed in to Chrome. - Click on the **Google Account** you wish to remove.5. **Remove Account:** - While viewing the account details, you will find an option to **“Remove”** the account. - Click on this option, and you will be prompted for confirmation.6. **Confirm Deletion:** - To finalize, confirm the removal process when prompted.7. **Optional: Sign Out:** - If you didn't sign out in the previous step, you'll need to do so manually. - In the Settings page, scroll to the bottom and click **“Sign out”** to sign out of your Google Account.After completing these steps, your Google Account will no longer be linked to Chrome on your computer, maintaining your privacy or allowing you to use a different account for your browsing needs.---Feel free to adjust any part of this copy to better suit your intended audience or context!

时间:2024-09-24 03:26:11 来源:网络整理 编辑:Telegram Group

核心提示

UnlockseamlesssyncacrossdeviceswithGoogleChrome,harnessingyourGoogleaccounttosynchronizeyourbrowsing

Unlock seamless sync across devices with Google Chrome, harnessing your Google account to synchronize your browsing journey, including cherished passwords. Enjoy continuity without hurdles—everywhere.

In this digest, discover the art of severing your Google account bonds from Chrome. Plus, delve into the process of erasing every trace of your Chrome legacy stored on Google's digital shelves.

Journey Begins: Terminate Your Chrome's Google Account Attachment

  • Initiate your voyage directly from the Start menu by venturing into the realm of Google Chrome.
  • Unveil the three dots menu to reveal the Settings cutoff, the gateway to control.
  • Ascend to the You and Google)
  • _click the Turn off button and embrace Clear and Continue for a fresh start.
  • The union dissolved,Chrome洗涤旧迹,重焕生机.
  • Remember, this action alters only Chrome's tie to Google, not the treasure trove of data Google has gathered during your Chromeidelic history. Emancipate your digital shard from Google's sphere by traversing to the-eminent Google Account Dashboard. Tap into the rescue by toggling the Reset Sync button after logging in with your alliance credentials.

    Conquer your digital sovereignty once you've讲的和平撇清与Google Chrome的往事,unleash Google Chrome anew with a pristine account—unpolluted by past echoes.

    Culmination: Bid Adieu to Chess Pieces Piece by Piece

    This concludes your Chrome account deconstruction or data's untimely severance. For additional savvy insights, stay abreast of on social沙发,guardien 的 wisdom on digital shores.

    上一篇:### How to Pause and Resume Voice Recording in WhatsAppWhether you're aiming for pristine voice quality or need to edit bits of a conversation, mastering the pause and resume functions in WhatsApp voice recording is a valuable skill. Here’s a step-by-step guide to help you seamlessly manage your voice messages.#### How to Pause Voice Recording in WhatsApp1. **Open WhatsApp:** - Start by opening the WhatsApp application on your device.2. **Select the Voice Icon:** - Within a chat, tap on the ‘microphone’ icon to initiate the recording.3. **Begin Recording:** - Once the recording has started, you will see a voice icon followed by a waveform or a visual timer indicating the length of your recording.4. **Pause the Recording:** - To pause the recording, simply press the pause button. You might see a more subtle or double square/circle symbol, depending on your phone’s interface and the version of WhatsApp installed.5. **Paused Recording Indication:** - Once paused, the pause button often turns into a play/record button, indicating the recording status. The waveform may indicate a pause homogenously across the recording progress bar.#### How to Resume Voice Recording in WhatsApp1. **Restart the Recording (if necessary):** - If the pause was accidental or you want to discard the part before the pause, you might need to restart the recording. Just tap the microphone icon again to start over. - If you wish to resume the previous recording, without interruption, proceed to the next step.2. **Resume the Recording:** - To resume, tap the record button (which might now show as a play/pause icon, depending on your device and WhatsApp version). - If you’re not seeing the play/pause icon immediately, make sure the recording remains paused for a few seconds – some versions of WhatsApp might need time to update the interface correctly. 3. **Check Resumed Recording:** - After resuming, check the waveform or duration indicator to confirm that the recording continues from the point where it was paused.#### Additional Tips for Effective Voice Recording in WhatsApp- **Sort Out Audio Quality:** Consider speaking in a quiet environment to minimize background noise.- **Use Headphones:** If available, headphones can help with the yourself and others' pleasant experience, particularly during interviews or important conversations.Now that you know how to pause and resume voice recordings in WhatsApp, you can easily manage your messages without any abrupt cuts in content. Happy recording!
    下一篇:### Efficiently Manage Your Android Phone's Music with Windows 11: Two User-Friendly Methods#### Method 1: Utilize the Windows Subsystem for Android**Integrate Your Phone’s Music Library into Windows with Ease***Streamline your music collection and manage your Android phone's music directly from your Windows 11 PC.* With the Windows Subsystem for Android, you can easily access your phone's music and related apps, allowing you to have greater control over your audio experience.1. **Enable the Windows Subsystem for Android on Your PC:** - Visit **Settings** on your Windows 11 PC. - Go to **System**, then select **Developer**. - Enable the **Virtualization** option to install the required components.2. **Download an Android Emulator:** - From the Microsoft Store, download one of the compatible Android emulators available (e.g., Amazon Appstore or Samsung Galaxy Store).3. **Access Your Phone’s Music:** - Use the downloaded emulator to connect your Android phone to your PC. - Download a stable music-playing app, like Google Play Music or any other music app you prefer. - Enjoy managing and controlling your Android phone’s music from Windows 11.#### Method 2: via Bluetooth Tethering**Seamlessly Play Music from Your Android Phone to Your Windows 11 PC***Play your favorite tracks without leaving your Windows 11 desktop.* By using Bluetooth tethering, you can stream music directly from your Android phone to your PC.1. **Connect Your Phone to Your PC via Bluetooth:** - On your Windows 11 PC, go to **Settings** > **Devices** > **Bluetooth & other devices** and turn on Bluetooth. - Pair your Android phone following the on-screen instructions provided by the Bluetooth settings on your phone.2. **Enable Bluetooth on Your Android Phone:** - Turn on Bluetooth from your phone’s settings to make it discoverable by your PC.3. **Play Music from Your Phone:** - With both devices connected, play the music on your Android phone as usual. - The audio will stream straight to your Windows 11 PC.Implement either of these methods to take full advantage of your Android phone’s music collection while working on your Windows 11 PC. Enjoy seamless, stress-free control over your audio library!