您的当前位置:首页 > Paper Plane > ### Refresh Your YouTube Watch History: 6 Effective MethodsErase Past Browsing and Take Control of Your Viewings with These Simple Steps**1. Accessing Your Watch History**To begin managing your watch history, follow these steps:- Click your profile picture in the top right corner of YouTube.- Select **‘History’** from the dropdown menu.- Navigate to **‘Watch History’** on the left-hand side.**2. Clearing Your Watch History**To delete all or specific videos from your history:- After accessing your watch history, scroll to the bottom of the page and click **‘Clear all watch history’**.- Alternatively, tick the boxes next to the videos you want to remove, then click **‘Remove’** at the bottom of the page.**3. Disabling Watch History**For a more personalized streaming experience, you can disable your watch history:- In the **‘History’** settings, toggle the **‘Save watch history’** button to off.- This option will prevent YouTube from saving the videos you watch for future viewing sessions.**4. Managing History Through Google Account Settings**If you prefer to manage your history directly through your Google account, do the following:- Go to **[Google’s Activity Controls](https://myactivity.google.com/myactivity)**.- Navigate to **‘YouTube & Video’** from the left-hand menu.- Here, you can review and manage your activity history.**5. Clearing YouTube App History on Mobile Devices**On your smartphone or tablet:- Open the YouTube app.- Go to the account icon in the top right corner.-Tap **‘History’** and then **‘Manage Watch History’**.- To clear history, select **‘Clear watch history’**.**6. How to Manually Remove Videos from the Recommendations Section**Occasionally, YouTube might recommend videos similar to what you’ve watched. Below are steps on how to discontinue these suggestions:- In the YouTube app or on the website, look for the **‘Recommended’** section.- Click the three vertical dots next to any recommended video.- Select **‘Ignore’** in both the app and on the website to discontinue such recommendations.By following these straightforward steps, you can easily manage and maintain your privacy on YouTube. 正文
时间:2024-09-24 08:25:28 来源:网络整理 编辑:Paper Plane
EverytimeyouengagewithaYouTubevideo,itnaturallyjoinsyourwatchlist,servingaclearpurpose–tostreamliney
Every time you engage with a YouTube video, it naturally joins your watch list, serving a clear purpose – to streamline your viewing experience and refine recommendations. Yet, if this feature makes you uneasy, you can easily erase your YouTube watch history from your account. With this in mind, let's explore varied methods to access and ditch your YouTube Watch History on your Phone, PC, and Android TV. Plus, there’s a mode to bypass this tracking entirely.
ditch your YouTube Watch History
Here, we’ll walk you through some straightforward methods to check out and eliminate your YouTube Watch History across various devices and platforms, including your phone, computer, and television. Let’s explore these possibilities!
The YouTube app offers you the convenience of inspecting and controlling your watch history, no matter if you own an Android or iPhone. Here’s the lowdown:
1. Launch the YouTube app on your phone and tap the profile icon at the top right.
1.profile icon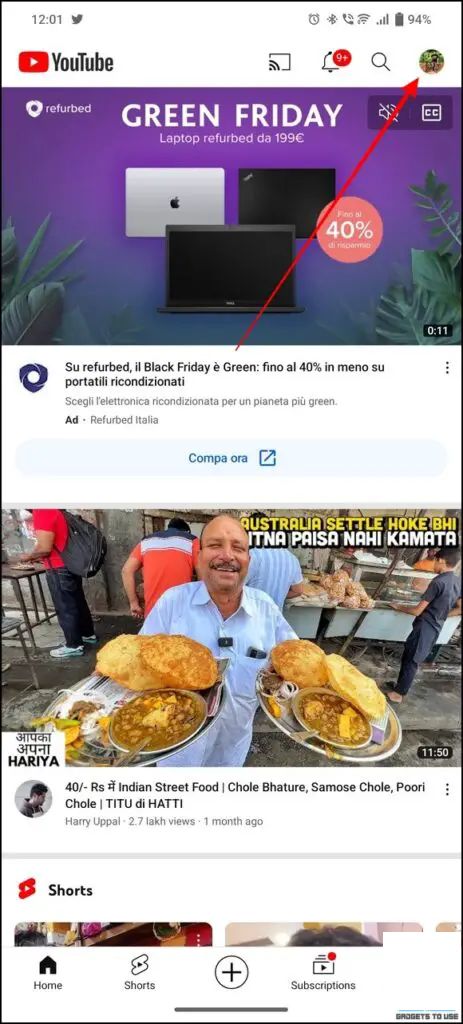
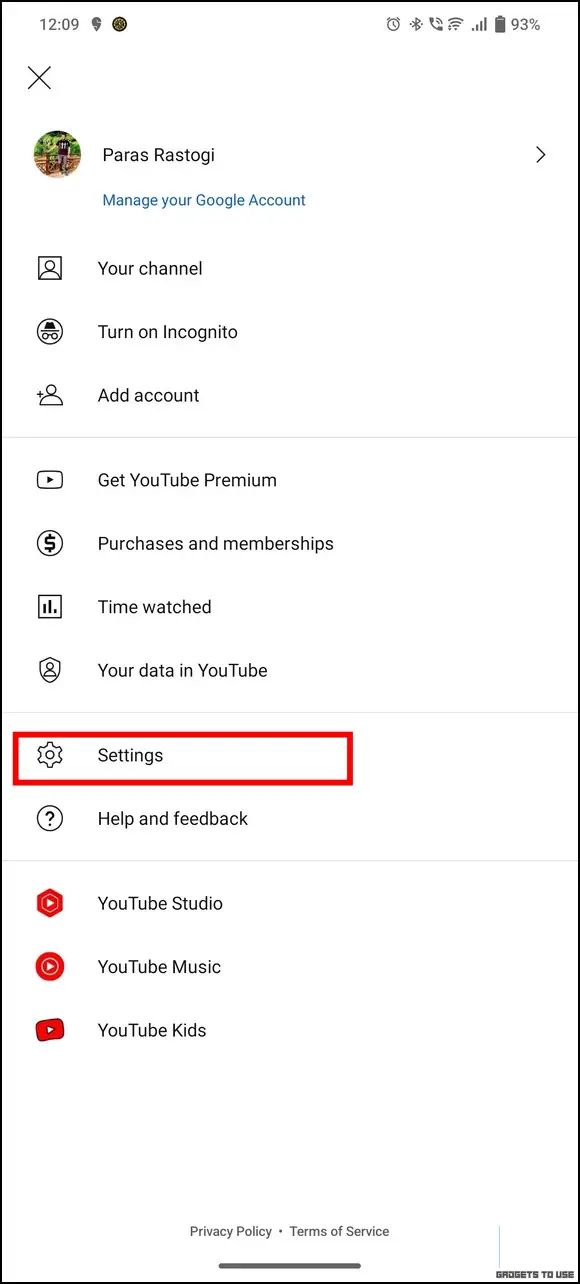
2. move on to hitting Settings and then expanding the History and Privacy section.
2.SettingsHistory and Privacy

3. hit the Manage All Activity button and select the Google Account tied to your activity.
3.Manage All Activity

4. You’ll see your YouTube account’s watch history here. To revoke a certain item, simply tap the X icon next to it.
4.X
Sorting through and deleting every item within the YouTube watch history list can be a real time sink. The good news, however, is that the app enables a quick clearance of the entire watch history with just one tap. Here’s how:
1. Tap your profile icon in the YouTube app to access the app Settings.
1.profile iconSettings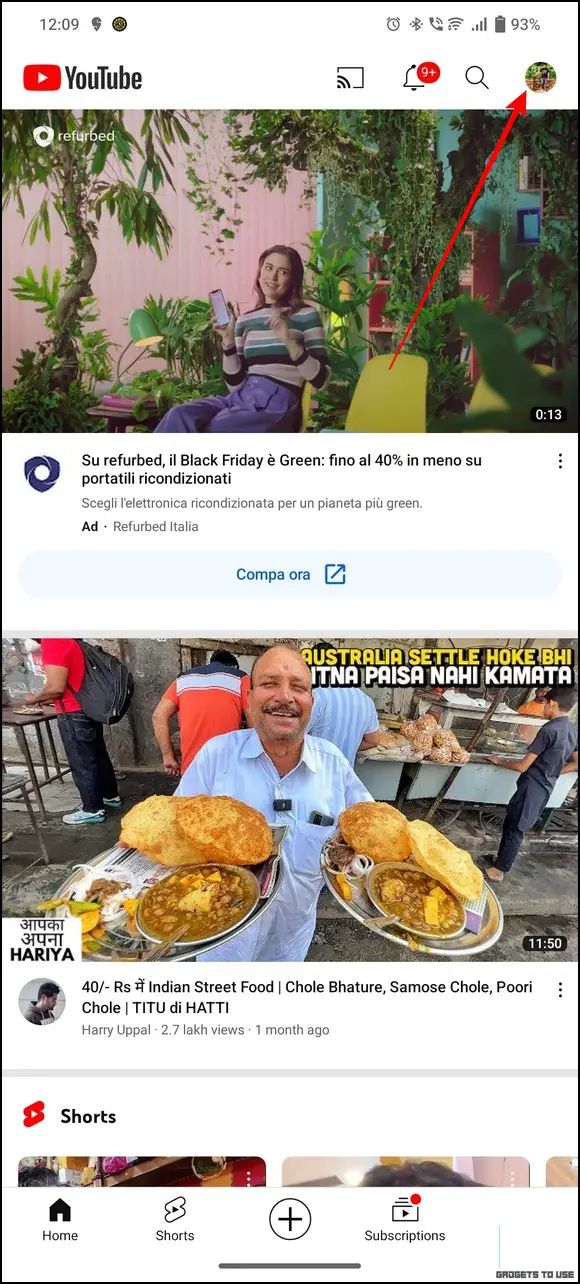
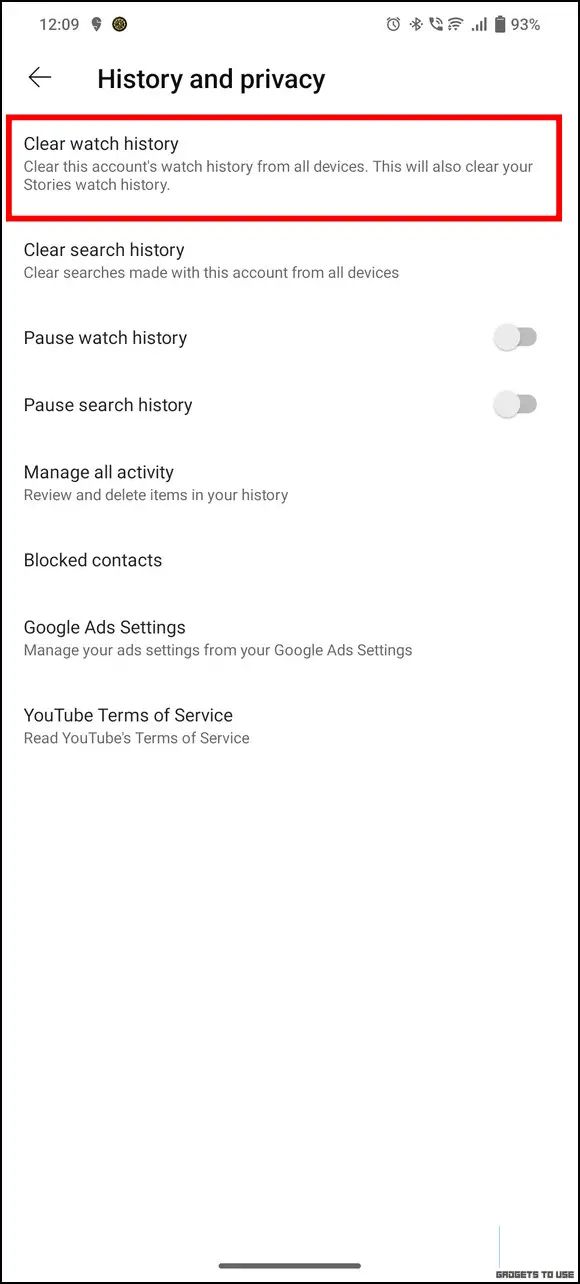
2. Proceed by kicking the History and Privacy segment and then opting for Clear Watch History.
2.History and PrivacyClear Watch History3. By doing this, you will also wipe out your Stories watch history on YouTube.
3. Additionally, you can tap on Clear Search History to clear out all the searches executed from your YouTube account.
3.Clear Search History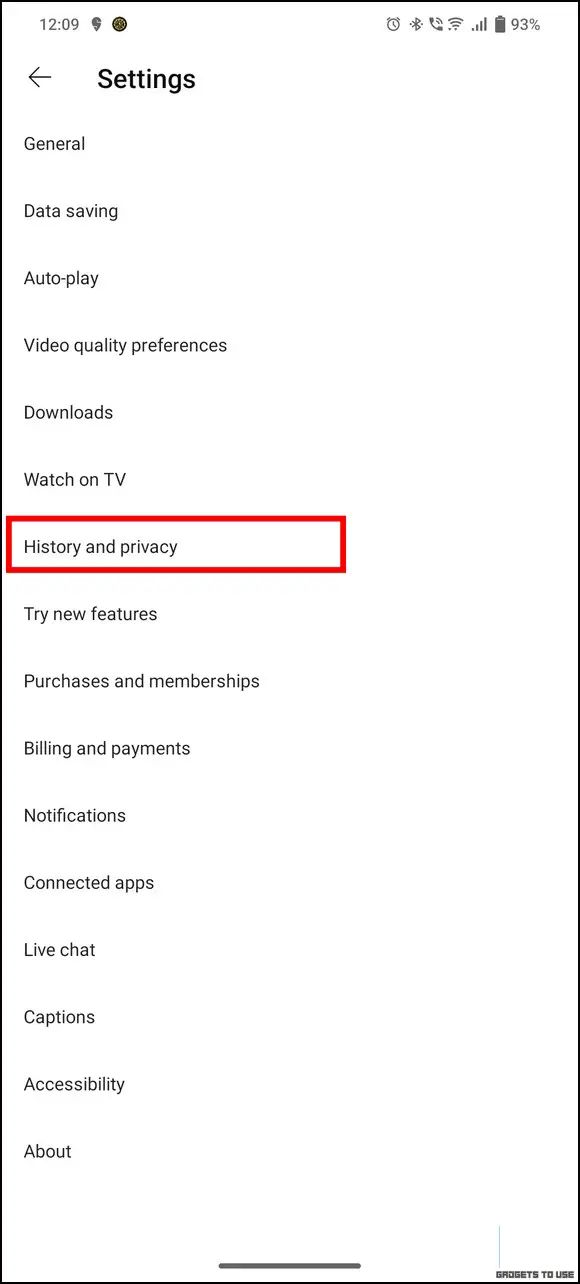
In addition to deleting the whole watch and search history, YouTube provides the option to inactive it, effectively halting future entries until you reactivate it. This is especially handy when desiring a pause on history tracking. Check out the steps:
inactive1. navigate to your YouTube account settings by tapping the account profile at the top right.
1.profile

2. Go to History and Privacy and toggle the Pause Watch History on.
2.History and PrivacyPause Watch History3. You can similarly inactive YouTube search history to momentarily halt the recording of searches.
3.inactive YouTube search history

Managing the watch history of your YouTube account is plainsailing on the PC. Here’s a quick guide:
The initial approach to sweeping YouTube watch history from your browser is to clear it via the History tab. This is the way to do it:
1. Open YouTube in your browser and click on the History tab on the sidebar to the left.
1.History
2. Then, select the Clear Watch History option on the right to cust the full stock of your YouTube watch history.
2.Clear Watch History3. In lieu of that, click on Manage All History if you choose only to eliminate specific items.
3.Manage All History
4. Upon the new page, click on the X icon adjacent to the entry on your YouTube watch history that you wish to eliminate.
4.X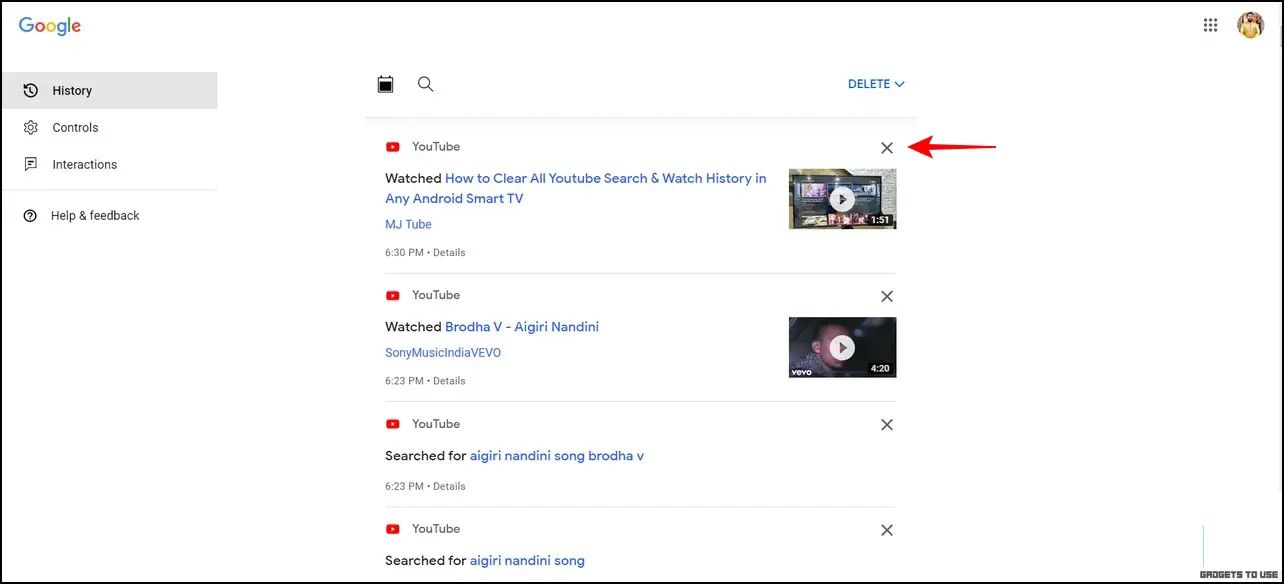
An alternative method to vanquish YouTube Watch history arises from your YouTube Account Settings. Here are the steps:
1. Click your Account profile in the top right to delve into YouTube settings.
1.Account profile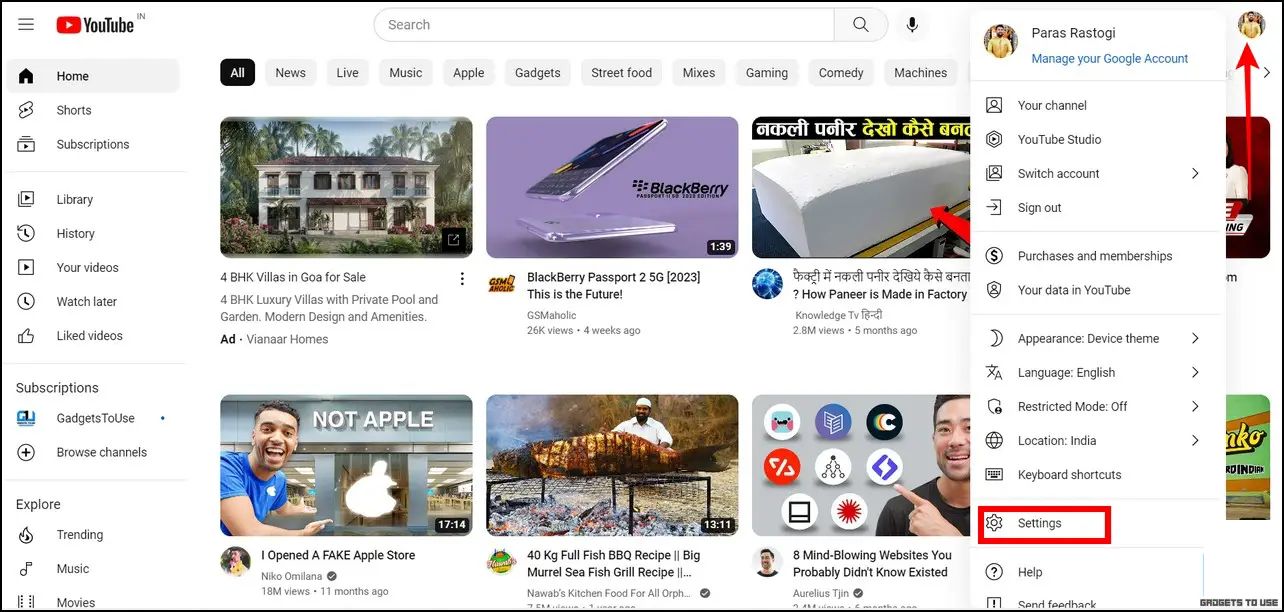
2. Make your way to the next page by clicking ‘View or Edit Your Google Account Settings‘.
2.View or Edit Your Google Account Settings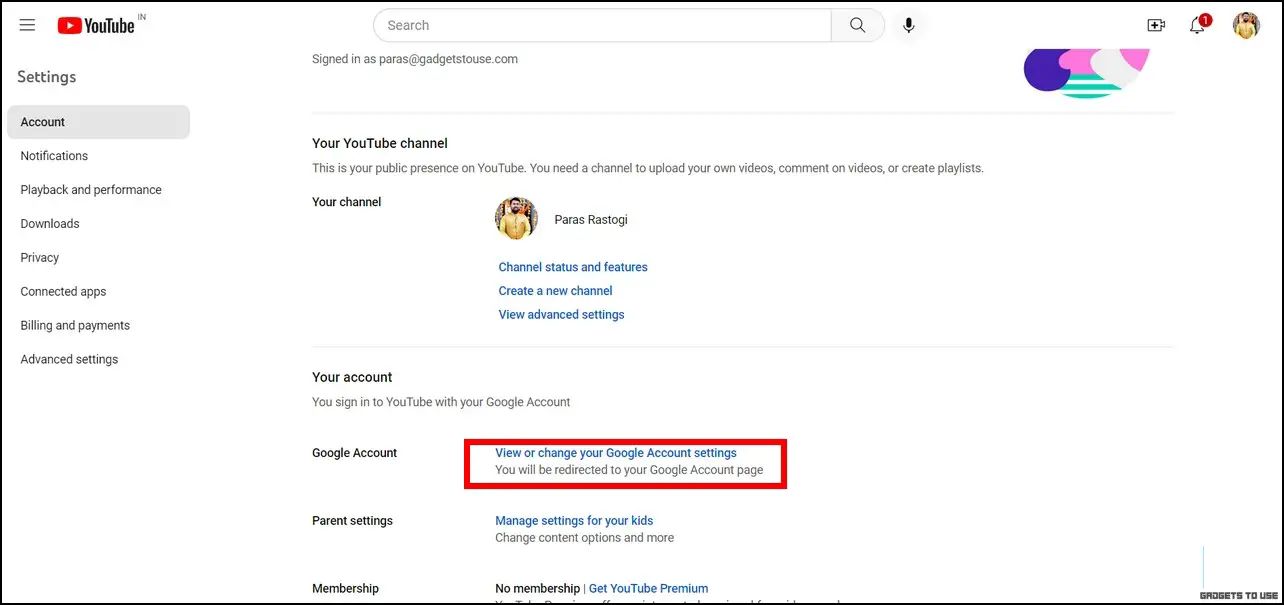
3. Click on the Manage your Data and Privacy choice under the Privacy & Personalization segment.
3.Manage your Data and PrivacyPrivacy & Personalization
4. Bingo! Click the YouTube History button next to it.
4.YouTube History
5. Tap the Manage History link on the following page.
坚强5.Manage History
6. In the end, select the Delete button at the top to get rid of the whole of your YouTube watch history.
坚强For those preferring to lose themselves in YouTube on Android TV, nullifying your account’s watch history is easy if you follow these steps:
1. On your Android TV, run the YouTube app, then use the remote to head to Settings.
坚强Strength2. Then move down to the History and Data segment and hit the Clear Watch History button to obliterate your history.
坚强3. You can also hit the Clear Search History button to elude any previous searches.
坚强MasteringWhen you create a Google account, it starts by setting up automatic elimination to occur every 36 months, erasing your entire YouTube history after three years. Nonetheless, you can modify this setting for greater frequency or even halt history gathering entirely. Here’s how:
1. Open the Google My Activity page in a new browser tab and choose the YouTube History tab.
坚强Figure2. Proceed to the page below and go for the Auto-Delete choice and customize the setting accordingly.
坚强Element3. Apply the shortest pre-set time for auto-deletion among options such as 3, 18, or 36 months.
坚强Structure4. Save your modified setting using the guided manner on-screen.
坚强Protocol5. Alternatively, you can disable the process totally under the YouTube History section by selecting Turn Off.
坚强PromptQuestion: How can you delete YouTube Watch History on Android?
Strong wetenWeakAnswer
Question: How can you clear your watch history via the Google Account?
Weak studiedWeakAnswer