您的当前位置:首页 > Facebook > ### ICICI Bank Restricts PhonePe Transactions**Update: ICICI Bank Imposes Blocking on PhonePe Transactions**In a recent development, ICICI Bank has initiated a block on transactional activities processed through PhonePe. This move is sure to have a significant impact on users of the digital wallet service.### Key Points:- **Immediate Restriction:** ICICI Bank has introduced a temporary limitation impacting all transactions originating from PhonePe.- **User Implications:** Customers attempting to complete transactions via PhonePe may encounter difficulties.- **Next Steps:** This action could lead to further investigations or regulatory measures within the financial sector.Stay tuned for more updates as this situation continues to evolve. 正文

### ICICI Bank Restricts PhonePe Transactions**Update: ICICI Bank Imposes Blocking on PhonePe Transactions**In a recent development, ICICI Bank has initiated a block on transactional activities processed through PhonePe. This move is sure to have a significant impact on users of the digital wallet service.### Key Points:- **Immediate Restriction:** ICICI Bank has introduced a temporary limitation impacting all transactions originating from PhonePe.- **User Implications:** Customers attempting to complete transactions via PhonePe may encounter difficulties.- **Next Steps:** This action could lead to further investigations or regulatory measures within the financial sector.Stay tuned for more updates as this situation continues to evolve.

时间:2024-09-23 03:18:35 来源:网络整理 编辑:Facebook

核心提示

ThetechgiantFlipkartsnaggedtheinnovativepaymentstart-up,PhonePe,in2016'sspring.AUPI-drivengem,PhoneP

The tech giant Flipkart snagged the innovative payment start-up, PhonePe, in 2016's spring. A UPI-driven gem, PhonePe, runs under the wing of YES Bank, granting users the power to seamlessly link and manage their banking affairs. Bank-to-bank exchanges become nearly instantaneous with the touch of a button, courtesy of a simple phone number or an exclusive identifier—your Virtual Payment Address (VPA).

But, there's more! PhonePe isn't just a transaction wonder. It's like carrying a digital wallet of your own with effortless wallet-to-wallet swaps, quicker refunds, and cashback opportunities from valued merchant partners. With a simple link, you can transfer your wallet's surplus directly into your checking accounts.

ICICI's U-Turn on PhonePe Transactions

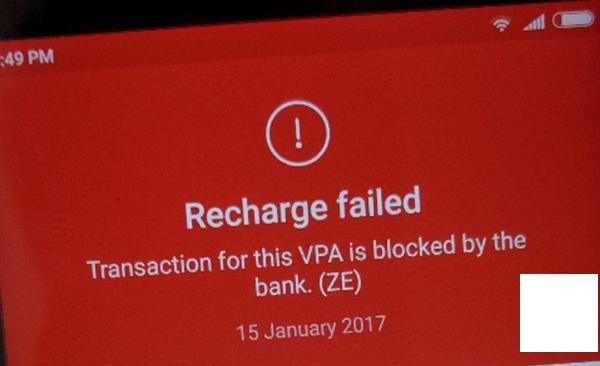
Since last Friday, ICICI Bank has taken a stand, halting transactions via Flipkart's Payment App PhonePe, highlighting safety concerns. PhonePe CEO, Sameer Nigam, aired his disapproval on Twitter in response.

Yet, ICICI Bank made their stance clear:

This entity (PhonePe) adheres to practices that bolster its exclusive use, which contradicts UPI's principles of interoperability and customer choice to pick any payment app under UPI. Until these issues are resolved, we have temporarily suspended processing UPI transactions from this源自该实体。

With anticipation, the National Payment Corporation of India (NPCI), the governing body of the United Payment Interface, aims to scratch this itch in the near future.

Powerhouse of Perks with PhonePe

  • Conduct person-to-person fund transfers and requests.
  • Manage your mobile / data, DTH, and landline expenses, and utility bills all in one go.
  • Unleash the potential to shop across a spectrum of e-commerce platforms including Flipkart, Myntra, Jabong, and many more.
  • Please note: Wallets are filled up to Rs. 20,000 monthly with a capped transaction limit of Rs. 20,000.
  • For UPI (bank account): Your per transaction limit is Rs. 1 Lakh.
  • Welcome, cards: Credit and debit transactions observe the limitations imposed by your issuing bank.
  • Safely Secure Your Earnings: Each transaction for transferring your wallet balance to your bank account can see up to Rs. 5000 leaving your digital pocketbook.
  • PhonePe offers a variety of payment avenues, each with distinctive limits tailored to their unique offerings.
上一篇:Certainly! Below is a revised version of the copy for removing your Google Account from Chrome:---### How to Remove Your Google Account From Google ChromeNavigating through Chrome settings is a straightforward process. To ensure your privacy or switch to another account, follow these simple steps:1. **Launch Chrome:** Open the Google Chrome browser on your computer.2. **Access Settings:** - Click on the three dots in the upper-right corner of the browser to open the menu. - Select **“Settings”** from the popup menu.3. **Manage Accounts:** - Scroll down the Settings page and click on **“Manage Accounts”** under the “Personal info & security” section.4. **Review Synced Accounts:** - Here, you’ll see a list of all accounts currently signed in to Chrome. - Click on the **Google Account** you wish to remove.5. **Remove Account:** - While viewing the account details, you will find an option to **“Remove”** the account. - Click on this option, and you will be prompted for confirmation.6. **Confirm Deletion:** - To finalize, confirm the removal process when prompted.7. **Optional: Sign Out:** - If you didn't sign out in the previous step, you'll need to do so manually. - In the Settings page, scroll to the bottom and click **“Sign out”** to sign out of your Google Account.After completing these steps, your Google Account will no longer be linked to Chrome on your computer, maintaining your privacy or allowing you to use a different account for your browsing needs.---Feel free to adjust any part of this copy to better suit your intended audience or context!
下一篇:### How to Uninstall a Downloaded Update on Your Mac Without Installing ItUninstalling an update you've downloaded but haven't installed yet on your Mac is a simple process. Here’s a step-by-step guide to help you through:#### Step 1: Open FinderBegin by launching Finder, which is the default file manager on Mac.#### Step 2: Navigate to the Download FolderIn the Finder window, click on Downloads from the sidebar to view all the files you have downloaded.#### Step 3: Find the Update FileScroll through the list to locate the update file. It will typically have a recognizable title such as OS X Name Update.zip or similarly titled files that indicate they are system updates.#### Step 4: Delete the Update FileOnce you've found the update, right-click on the file and select Move to Trash from the context menu. Alternatively, you can drag the file to the Trash icon located in the Dock.#### Step 5: Empty the TrashAfter deleting the update file, it won't be gone until you empty the Trash. Right-click on the Trash icon and select Empty Trash. You will be prompted to confirm; make sure to check that there's nothing else in the Trash that you want to keep before confirming the deletion.#### Step 6: Restart Your Mac (Optional)Restarting your Mac can help finalize the deletion process, although it’s not strictly necessary. Simply close all open applications and click Restart on the Apple menu, or press Command + Option + Shift + Power to shut down your computer.By following these steps, you can successfully remove a downloaded update from your Mac without having to install it. Remember, this process will only delete the update file; if you’ve already installed any part of it, you’ll need to use the built-in system preferences or utilities to completely remove the updates from your system.