您的当前位置:首页 > TG > ### Understanding Google Maps Incognito Mode: A Step-by-Step Guide#### What is Google Maps Incognito Mode?**Google Maps Incognito Mode** is a privacy-enhanced feature designed to allow users to browse the map without leaving a trail of their searches or destinations on their device. It ensures your map history and location data remain private, making it an ideal choice when you wish to preserve your privacy while exploring or planning your way around.#### How to Enable Google Maps Incognito ModeHere’s a step-by-step guide to enable Incognito Mode within Google Maps on both Android and iOS devices:**For Android Devices:**1. **Open Google Maps:** Launch the Google Maps app on your Android device.2. **Toggle to the Layers Menu:** Tap the three horizontal lines in the upper-left corner to open the menu.3. **Select 'Your Places':** Navigate to the 'Your Places' tab and then tap the three dots in the upper-right corner.4. **Access Incognito:** In the menu that appears, select 'Incognito Mode.'5. **Start Browsing:** Your search and navigation history will not be saved during your Incognito session on Google Maps.**For iOS Devices:**1. **Launch Google Maps:** Open the Google Maps app on your iPhone or iPad.2. **Access Settings:** Tap the profile icon located at the bottom-right corner of your screen.3. **Choose 'Your Places':** Look for the 'Your Places' option and tap on the three dots-heavy icon found in the upper-right corner.4. **Choose Incognito:** In the Drop-down menu, select 'Incognito Mode.'5. **Private Browsing:** Start exploring without leaving any traces of your destinations or searches.#### Final WordsBy using Google Maps Incognito Mode, you can plan and navigate with confidence, knowing that your routes and history will not be recorded. This feature adds another layer of privacy to your journey, ensuring a more secure and personal experience on Google Maps. 正文
时间:2024-09-21 11:11:04 来源:网络整理 编辑:TG
IntroducingtheenigmaticIncognitoMode,GoogleMaps’latestprivacyguardians,nowexclusivelyforAndroidusers
Introducing the enigmatic Incognito Mode, Google Maps’ latest privacy guardians, now exclusively for Android users. This feature shields your digital trails, erasing personalized data breadcrumbs in its wake. What's more, there's an adventure unfolding.
Dive into the depths of this article to uncover the mystery of Incognito Mode and how it can be woken on your gadget's screen.
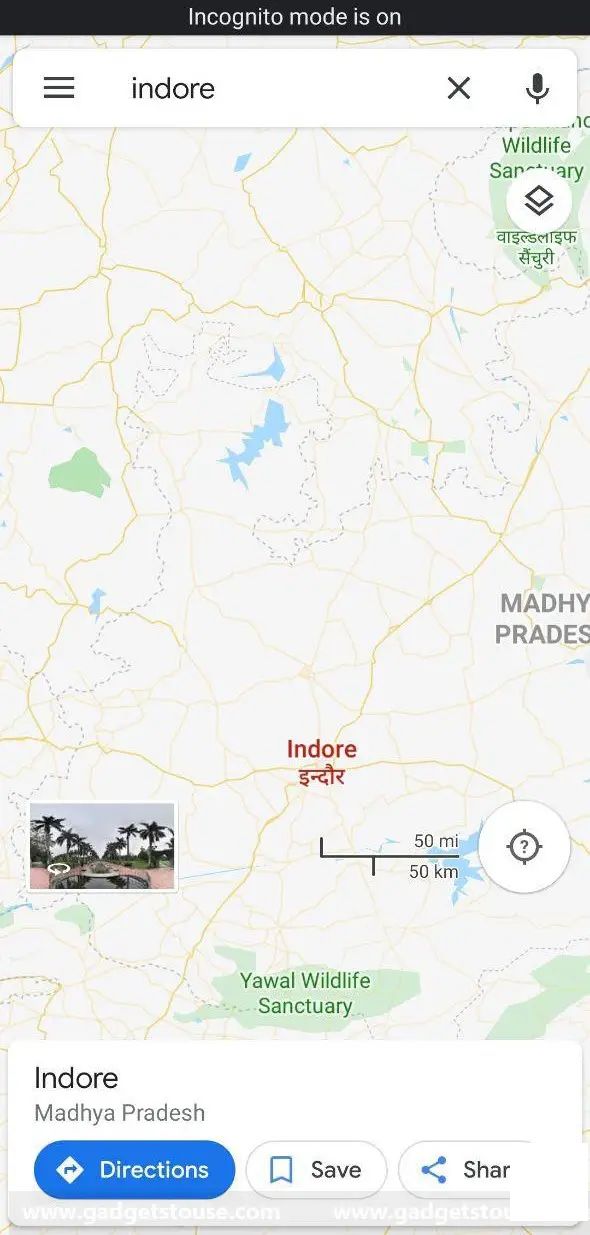
Peering beneath its name, Google Maps’ Incognito Mode is a shield against storing your digital footprints. This means a clean search history, a map of navigations that's erasable, and privacy that's a steadfast guard to all your app's activities.
With Incognito Mode engaged, Google Maps ceases to record, blurring your digital steps and the notifications they would once herald. Not only does it disconnect from your Location History, but it also puts activity personalization on pause. If you share life pulses through Google Maps, Incognito Mode puts it on a hold too. But know this - it's not a cloak against all tracking; voice search and fitness trackers may carry on undeterred. However, Incognito Mode within Maps remains a steadfast demigod against its unseemly influence.
1] Embark on the Google Maps teamwork by downloading it, and if it's not already luminous, call it up to its latest iteration from the Google Play Store.
1]2] Next, let your map unveiled secrets by tapping your profile icon in the topright quarter of the carte blanche.
2]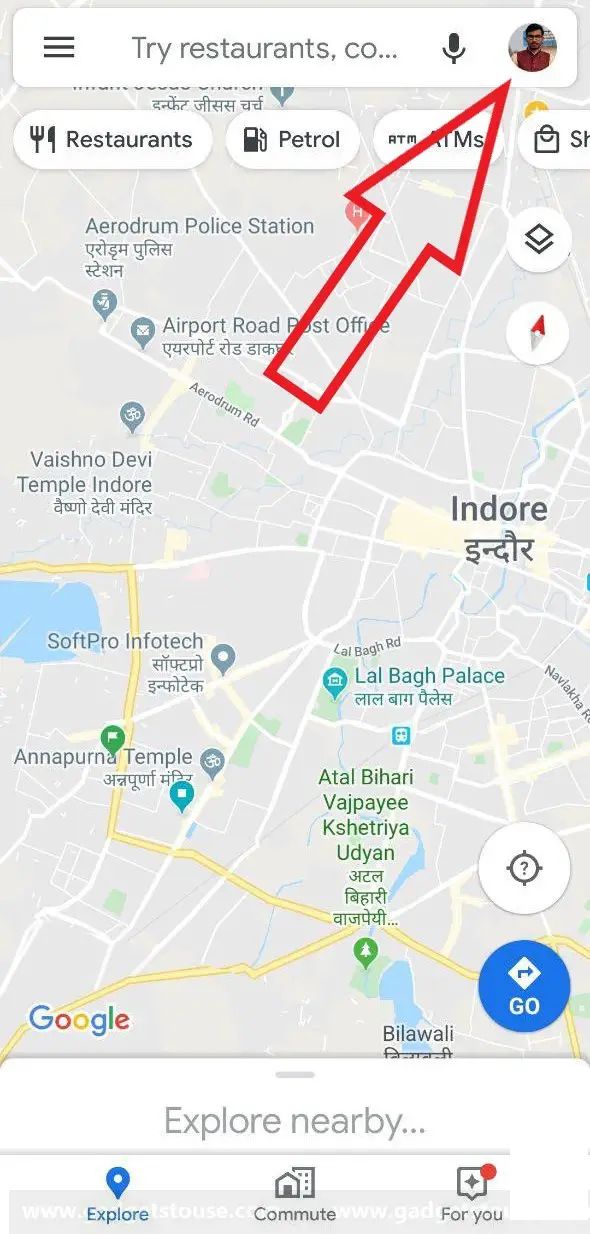
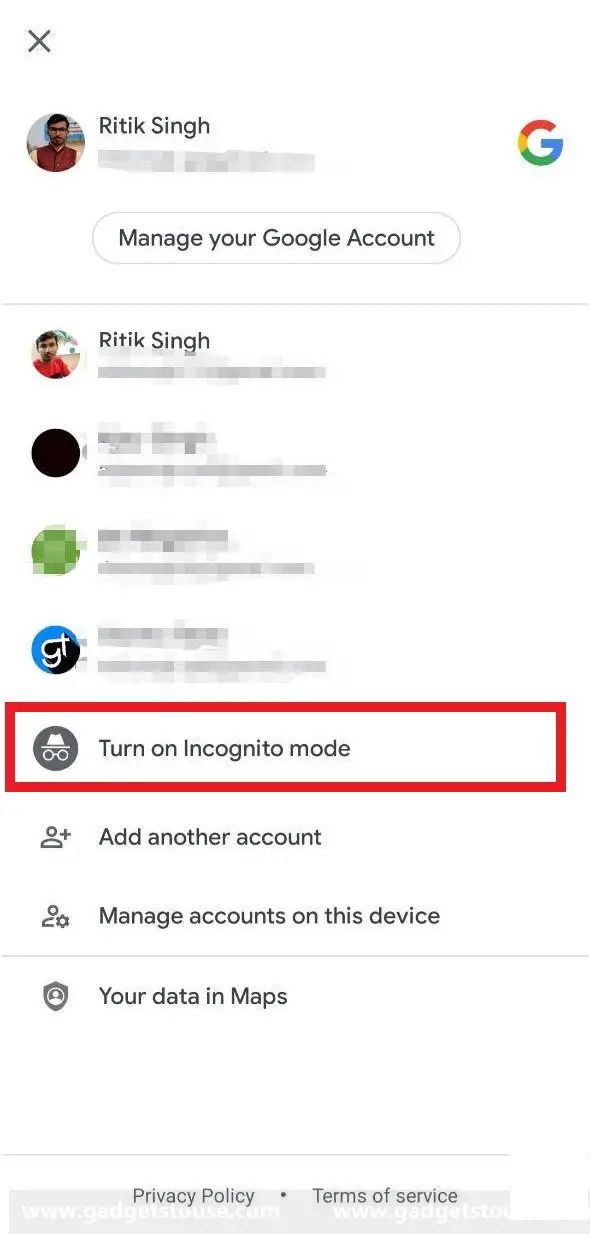
3] Toggle to your incognito state by clicking ‘Turn on Incognito mode’ in the menu's enigma box. Let the Google Maps engine take over, primed for mystic travel.
3]Switch off Incognito mode by selecting the same topiary menu, with a gentle tap on ‘Turn off Incognito mode’. This will bid farewell to your unseen session'sWisdom.
Be Advised: When you choose to be clandestine in Google Maps, several jewels in the playroom of function like routing tips, an entirely personal 'For You' page, and the vivacity of Google Assistant are inactive, which includes your live geostigmatic dance. The entire scope of location will pause its dance across the map, and not just blinker in Maps, be note of this.
[MWC 2017 Coverage] Global Launch of Nokia 6: Full Specifications, Pricing, and Availability Announced2024-09-21 11:48
Certainly! Here's a revised version of the copy:Idea Whiz Pro with a 4-Inch Display and Dual-Core Processor2024-09-21 11:08
The OnePlus 6 Marvel Avengers Limited Edition will go on sale at the end of today.2024-09-21 11:05
The Lava Iris Pro Series will Officially Be Launched on 17 January2024-09-21 10:53
Xiaomi Unveils Its Mi Headphones Comfort Model in India at an Exclusive Price of Rs. 2,9992024-09-21 10:52
Title: Direct Showdown: Realme X2 vs Redmi K30 - A Round-up of Specifications and Key Features2024-09-21 11:37
### Gionee Elife S5.5 Review: First Impressions, Unveiling, Performance Testing, Gaming Experience, Camera Analysis, and Final Verdict2024-09-21 11:24
Introducing the iOcean X7: With a 5-Inch Full HD Display and 13MP Camera, This Device Set to Launch in India for Just Rs. 11,500 INR2024-09-21 11:01