您的当前位置:首页 > Telegram Group > Dell Announces Launch of Inspiron 2-in-1 Tablet PCs, Starting at Just INR 33,990 正文

Dell Announces Launch of Inspiron 2-in-1 Tablet PCs, Starting at Just INR 33,990

时间:2024-09-21 10:29:12 来源:网络整理 编辑:Telegram Group

核心提示

JointherevolutionwithDellIndia’slaunchoftheInspiron137000andInspiron1130002-in-1s.Experiencetheultim

Join the revolution with Dell India’s launch of the Inspiron 13 7000 and Inspiron 11 3000 2-in-1s. Experience the ultimate fusion of tablet ease and laptop power. engineered with a clever rotating hinge, these devices let you effortlessly transition from a sleek tablet to a versatile laptop.

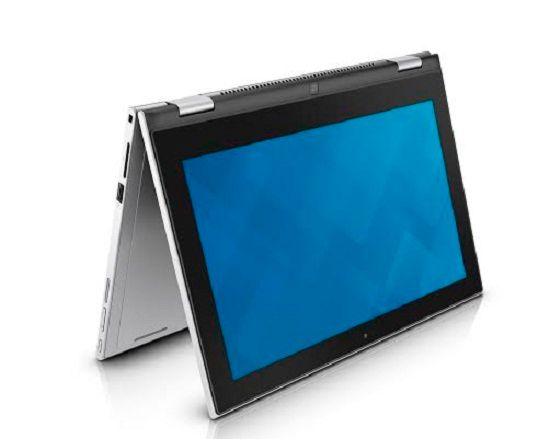
Step into the world of the Inspiron 13 7000 series, a 13.3-inch marvel powered by Windows 8.1. With a generous 500 GB hard drive and 20 GB Dropbox cloud storage, it’s your digital haven. The screen? A pristine HD wonder with an optional Full HD upgrade, it oozes edge-to-edge style, incorporates a tender 10-point touch for effortless interaction, and boasts a spill-resistant, backlit keyboard paired with Dell Precision Touchpad – your perfect laptop companion. Plus, an inbuilt stylus ensures you stay productive, whether it’s jotting down notes or sketching ideas.

Now, let’s talk about the Inspiron 11 3000 series. It’s the lightweight, compact powerhouse boosting fourth gen Intel Core and a society’s 500 GB of space. Your go-to gadget for on-the-go productivity with an 8-hour battery that’ll keep you going all day.

These devices don’t just stop at performance; they respond to your needs with high-definition audio, adapting with Waves MaxxAudio to immerse you in sound, wherever you are.

安全性也无处不在—Dell Backup and Recovery software ensures you don’t lose a single byte of your multimedia or files. Rest easy with security and antivirus features included in the Inspiron 7000 series.

Prepared for the urban jungle? The Dell Inspiron 13 7000 and Inspiron 11 3000 series are primed for your style, priced at Rs 52,990 and Rs 33,990, respectively.

上一篇:# Mastering Quick Access: 3 Efficient Methods for Adding Quick Settings Tiles on Your Android DeviceDiscover the simplest ways to enhance your Android phone's functionality by adding Quick Settings tiles. Here are three convenient methods to achieve a more customized and accessible interface:## 1. Native Settings App Approach.Start with the most straightforward method by accessing your Android device's settings directly.- **Step 1**: Swipe down from the top of your screen to pull down the notification shade.- **Step 2**: Tap the gear icon located in the upper-right corner to open the Settings menu.- **Step 3**: Navigate to Home screen & desktop, then Smart controls.- **Step 4**: Tap Quick settings tiles.- **Step 5**: Enable the toggles for the settings you want to add to your Quick Settings panel.## 2. Using a Customizable LauncherFor a more tailored experience, you can install a third-party launcher and customize Quick Settings tiles from there.- **Step 1**: Download and install a customizable launcher app from the Google Play Store.- **Step 2**: Open the launcher settings within the app.- **Step 3**: Look for an option labeled Quick Settings panel or something similar.- **Step 4**: Enable the tiles you wish to display in the Quick Settings panel.## 3. Widget CustomizationWidgets can also function as Quick Settings tiles, giving you easy access to your most-used functions without moving around between apps.- **Step 1**: Long-press on your home screen until the Add Widgets option appears.- **Step 2**: Search for Quick Settings in the widget list or navigate to the relevant category.- **Step 3**: Drag and drop a Quick Settings widget onto your home screen.By following these three methods, you can add essential Quick Settings tiles to your Android device, streamlining your experience and giving you lightning-fast access to the settings you use most often.
下一篇:### 4 Effective Methods to Lower the Browser Address Bar on Your Android DeviceNavigating the web on your Android device just got more convenient with these four innovative methods to position your browser's address bar at the bottom of the screen. Elevate your browsing experience with these simple yet effective tweaks:1. **Custom Browser Apps** Explore the Android app store to find browsers that offer customizable interface options and support bottom-anchored address bars. Apps like DuckDuckGo and Firefox be2B provide this functionality out-of-the-box.2. **Browser Themes or Add-ons** If you’re using a browser such as Chrome, check for themes or add-ons in the app’s settings or the Google Play Store. These themes or extensions may allow you to tweak the UI and place the address bar lower on the screen.3. **Smart Displays or Custom ROMs** For devices with smart features or those using custom ROMs, you may be able to adjust the address bar position through system settings or custom ROM settings and features.4. **Rooting Your Device and Installing a Custom ROM** If you're comfortable with root access and willing to explore the possibilities of custom ROMs like LineageOS or Xiaomi’s MIUI, you can often find options to customize the browser UI extensively, including moving the address bar to the bottom.Embrace these methods to tailor your browsing experience to your preference, enhancing both convenience and enjoyment as you explore the internet on your Android device.