您的当前位置:首页 > WhatsApp > ### 3 Effective Methods for Checking Your Windows 11 Laptop's Battery HealthAre you curious about the condition of your Windows 11 laptop's battery? Here are three straightforward methods to quickly assess your battery health and potentially extend its lifespan:---**Method 1: Use the Windows 11 Settings**1. **Access the Settings Menu**: Click on the Start button, then select the gear-shaped icon in the bottom-left corner to Access Settings.2. **Navigate to Device & Battery**: In the Settings window, choose "Device" from the left-hand pane, and then select "Battery" from the right-hand side menu.3. **Check Battery Health Metrics**: Under the "Battery Life" section, you'll find details such as the battery health percentage, the expected battery life for a typical discharge, and other useful metrics that give you insights into your battery's overall condition.---**Method 2: Open PowerShell for Advanced Analysis**For detailed battery health stats, you can use PowerShell:1. **Open PowerShell**: Search for "PowerShell" in the Start Menu, right-click on the top result, and select "Run as administrator."2. **Batch Command**: In PowerShell, copy and paste the following command to query the battery health in a more technical format:```get-ciminstance Win32_BatteryStatus```3. **Analyze Results**: The command returns information that can help you understand the current state of your battery, including health-related metrics.---**Method 3: Use System Information to Review the Detailed Report**The System Information tool provides a detailed report on various aspects of your system, including battery health:1. **Open System Information**: Press the `Win + R` keys, type `msinfo32`, and press `Enter` to open the System Information window.2. **Navigate to System Summary**: Within the System Information window, click on the "System Summary" section in the left-hand pane.3. **Review Battery Information**: Look for relevant battery information under the "Physical Devices" or "Zip1:NarratorCache" categories, depending on your system configuration.---Regularly checking battery health can help you plan for maintenance and ensure your laptop is always ready when you need it. Follow one of these methods today to maintain your Windows 11 laptop's optimal performance! 正文

### 3 Effective Methods for Checking Your Windows 11 Laptop's Battery HealthAre you curious about the condition of your Windows 11 laptop's battery? Here are three straightforward methods to quickly assess your battery health and potentially extend its lifespan:---**Method 1: Use the Windows 11 Settings**1. **Access the Settings Menu**: Click on the Start button, then select the gear-shaped icon in the bottom-left corner to Access Settings.2. **Navigate to Device & Battery**: In the Settings window, choose "Device" from the left-hand pane, and then select "Battery" from the right-hand side menu.3. **Check Battery Health Metrics**: Under the "Battery Life" section, you'll find details such as the battery health percentage, the expected battery life for a typical discharge, and other useful metrics that give you insights into your battery's overall condition.---**Method 2: Open PowerShell for Advanced Analysis**For detailed battery health stats, you can use PowerShell:1. **Open PowerShell**: Search for "PowerShell" in the Start Menu, right-click on the top result, and select "Run as administrator."2. **Batch Command**: In PowerShell, copy and paste the following command to query the battery health in a more technical format:```get-ciminstance Win32_BatteryStatus```3. **Analyze Results**: The command returns information that can help you understand the current state of your battery, including health-related metrics.---**Method 3: Use System Information to Review the Detailed Report**The System Information tool provides a detailed report on various aspects of your system, including battery health:1. **Open System Information**: Press the `Win + R` keys, type `msinfo32`, and press `Enter` to open the System Information window.2. **Navigate to System Summary**: Within the System Information window, click on the "System Summary" section in the left-hand pane.3. **Review Battery Information**: Look for relevant battery information under the "Physical Devices" or "Zip1:NarratorCache" categories, depending on your system configuration.---Regularly checking battery health can help you plan for maintenance and ensure your laptop is always ready when you need it. Follow one of these methods today to maintain your Windows 11 laptop's optimal performance!

时间:2024-09-21 04:18:50 来源:网络整理 编辑:WhatsApp

核心提示

笔记本电脑或笔记本中的电池随着时间的推移注定会恶化。在经历多次充放电周期后,它们将失去最大的充电保持能力。如果您使用的是Windows笔记本,您可能希望检查其电池健康状况,以了解是否需要更换。以下是检

笔记本电脑或笔记本中的电池随着时间的推移注定会恶化。在经历多次充放电周期后,它们将失去最大的充电保持能力。如果您使用的是Windows笔记本,您可能希望检查其电池健康状况,以了解是否需要更换。以下是检查运行Windows 11的任何笔记本电脑电池健康状况的方法。

如何在Windows 11中检查电池健康状况

起初,电池健康状况是细胞当前的充电保持能力(考虑到了所有的磨损和损耗)与最初设计的目标值的比较。现代笔记本电脑使用锂离子电池,其使用寿命有限。如果您有,您可能已经注意到电池效率随着时间的推移而降低。

与Windows 10相似,Windows 11提供了生成详细电池报告的内置方法。您还可以使用某些第三方工具来检查笔记本电脑的电池健康状况。以下详细信息介绍了方法。

方法1 - 通过PowerShell生成电池健康状况报告

隐藏的电池报告工具是检查任何Windows机器电池健康状况的最简单方法。它通过命令提示符/ PowerShell操作如下:

1. 按下键盘上的 Win + X 或右键单击开始按钮。

1. 选择 Windows Terminal(管理员) 以打开PowerShell窗口。或者,您可以在开始菜单中搜索Windows PowerShell并将其作为管理员打开。

2. 打开 Windows Terminal(管理员)

3. 打开PowerShell窗口后,键入 powercfg /batteryreport 并按Enter。

3. 它将创建并将电池健康状况报告保存到 C:\Users\name\battery-report.html

4. 访问目录。单击 电池健康状况报告HTML文件

4. 电池健康状况报告HTML文件

点击后,电池健康状况报告将在您的浏览器中打开。它将显示电池规格和容量以及电池容量历史记录、寿命估计和最近的使用统计数据。

在这里,您可以看到我设备电池的设计容量为42,082 mWh。而完整的充电容量为33,949 mWh,这意味着随着时间的推移,它已经失去了一些保持能力。如果您进行计算,当前的健康状况约为原始设计容量的80%。

电池容量历史记录 下,您可以看到您电池的完全充电容量是如何随着时间的推移与实际设计容量相对比的。随着电池的充电、使用和放电,它将逐步减少。

电池容量历史记录

此外,电池寿命估计 部分将会显示根据其设计和当前容量,您的笔记本电脑应该可以持续多久。这可以被视为今天(当前容量)的电池寿命估计与您拆箱当天(设计容量)的电池寿命估计的对比。

电池寿命估计

这些值将在您在PowerShell窗口中以“powercfg”命令检查电池健康状况时刷新。每次,现有的电池报告都将被新的报告替换。

方法2 - 使用BatteryCat检查电池健康状况

有几个第三方工具可以让您检查Windows 11的电池健康状况。BatteryCat就是这样一款工具,您可以使用它来监控电池健康状况、充电周期、充电和放电时间,如下所示:

1. 从SourceForge下载BatteryCat。选择便携式版本之一。
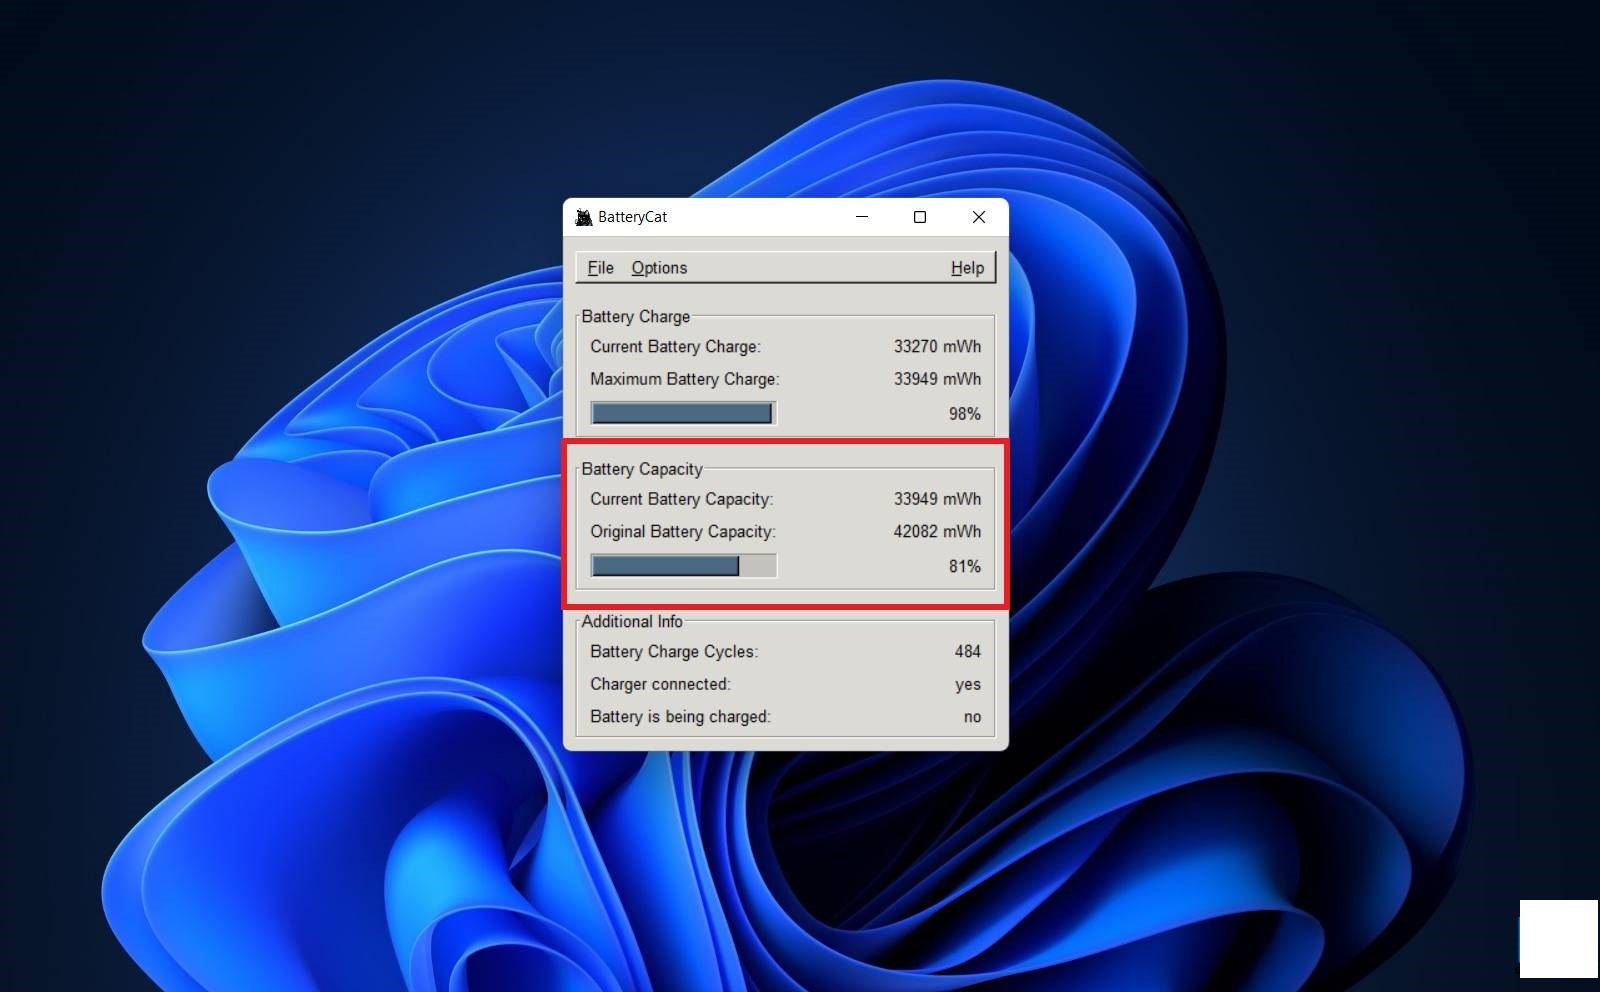
2. 解压缩下载的zip文件。打开 start_batterycat

3. 一旦程序打开,您就可以看到笔记本电脑当前的电池容量。

在这里,您可以看到我的笔记本电脑当前电池容量是我原始容量的81%。您还可以查看电池充电周期,即我的机器已经完全充电并且完全放电了484次。

方法3 - 使用HWiNFO检查电池健康状况

您还可以使用HWiNFO应用,这款应用可让您监控电池以及其他硬件组件。以下是如何使用它的说明:

1. 在您的Windows 11笔记本电脑上下载HWiNFO。选择便携式版本,无需安装。

2. 解压缩下载的zip文件 - 打开 HWiNFO

2. 选择“传感器_only (仅传感器)”并单击 运行

2. 传感器_only 运行

3. 现在,在屏幕向下滚动到 电池 部分。

3. 滚到 电池

4. 检查 磨损水平 以查看电池有多少磨损。

4. 磨损水平

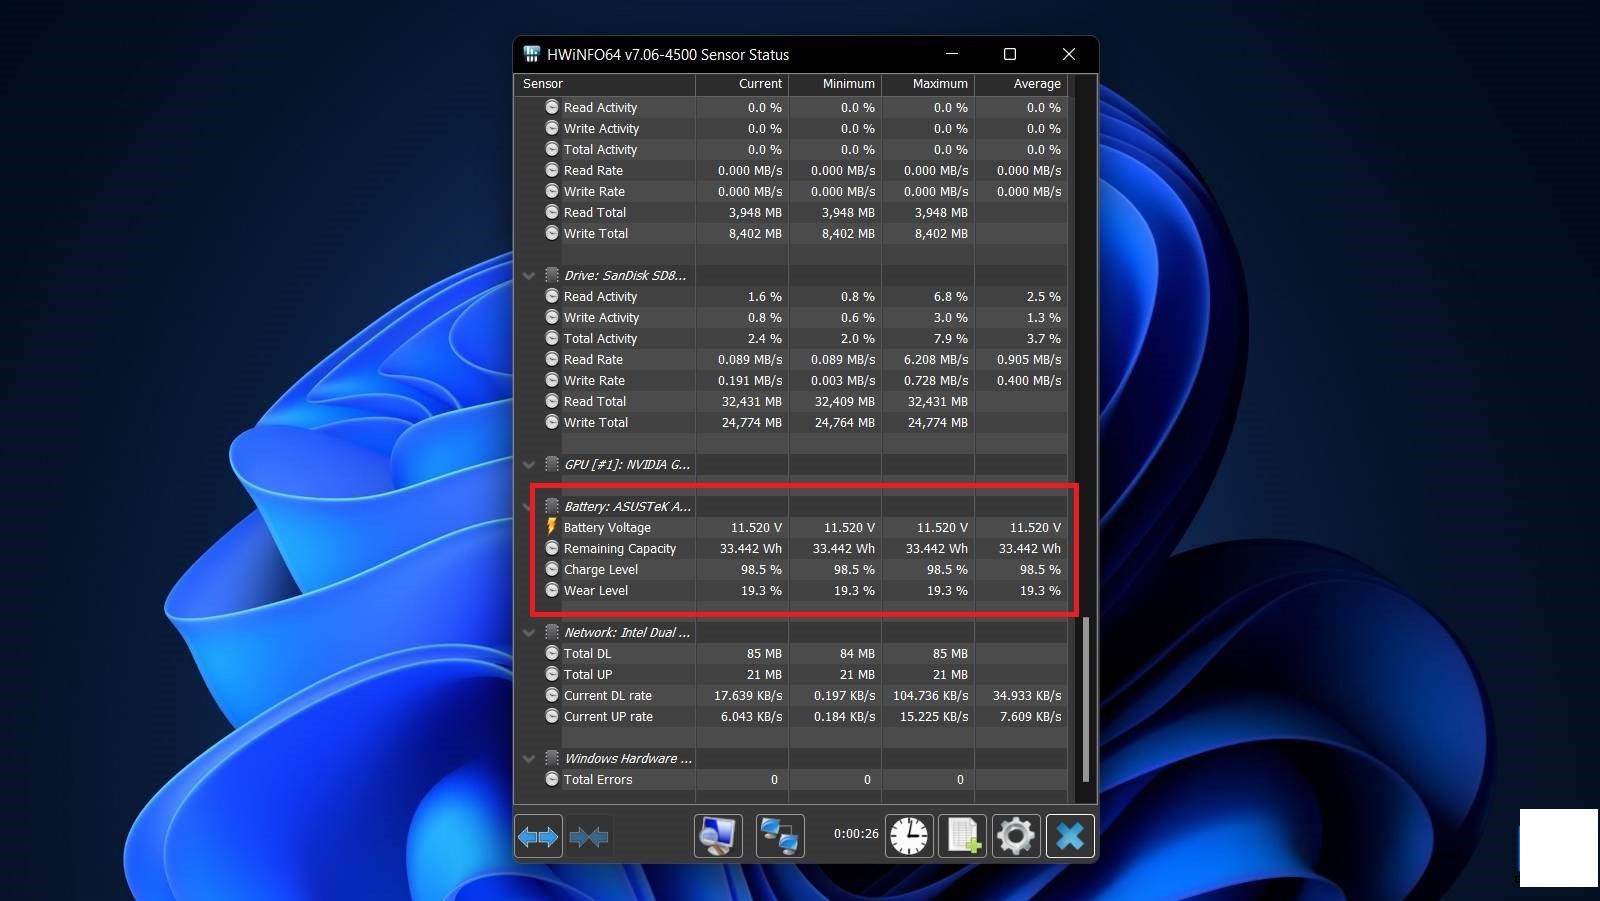
在这里,您可以看到我设备上的电池几乎失去了其原始容量的20%。或者说,它只能保持其最初设计容量的大约80%的电量。

如何延长Windows 11笔记本电脑的电池寿命

电池退化是不可避免的。然而,通过遵循以下简单的提示,您可以减缓这个过程,并且使电池寿命更长久。

  • 避免将电池耗尽至0%。
  • 不要一直将电池保持在100%的充电状态。
  • 尽量保持在40到80%的理想范围内。
  • 某些制造商提供在连接时维持80或60%充电容量的功能。利用此功能来延长整体电池寿命。或者,您可以使用第三方软件限制充电。
  • 确保电池不要过热,并在通风良好的地方使用。
  • 只使用原始充电器为您的笔记本电脑充电。
上一篇:**Achieve a Tidy and Streamlined Appearance for Your Gmail Inbox**Are you ready to transform your bustling Gmail inbox into a sleek and organized workspace? Follow these simple steps and elevate your email management game.---## Streamline Your Gmail Inbox: A Guide to a Tidy and Efficient Email ExperienceIt's time to declutter and enhance the visual appeal of your Gmail inbox. Here's how you can achieve a cleaner, more intuitive email interface:### 1. Turn on Inbox一类视图Converting to the Inbox 一类视图 is a great starting point for achieving a neater and more efficient email organization. This feature groups similar messages together, making it easier to spot emails from the same topic or sender.**Instructions:**- Click on the gear icon (Settings) in the top right corner of Gmail.- Go to Inbox under the See all settings.- Choose the Inbox 一类视图 and click Save Changes. ### 2. Customize Filters and TabsPersonalize your inbox by setting up filters and tabs that automatically categorize your incoming messages.**Set Up Filters:**- Access “Settings” > “Filters and blocked addresses.”- Create rules that match specific criteria to sort emails into designated folders.**Customize Tabs:**- Navigate to “Settings” like before.- Scroll down to the Inbox section and decide which tabs (e.g., Primary, Social, Promotions) to show or hide.### 3. Archive Important EmailsRemove unnecessary emails from your primary inbox without deleting them by archiving them. This keeps your main inbox tidy while ensuring you can reference old correspondence when needed.**Instructions:** Click on the three dots to the right of the email, and select Archive.### 4. Use a Simple and Consistent Color SchemeMaintain visual harmony by choosing a simple color scheme for both your inbox and labels. A cohesive color palette makes browsing through emails quicker and more pleasant.**Instructions:**- Click Settings again and go to “Themes” under the General section.- Select your preferred theme from the options, or even upload a custom image to let your personality shine through.### 5. Keep Unsubscribe Links in MindIf you no longer want to receive emails from certain companies, take the time to use the 'unsubscribe' link within the email to remove yourself from their mailing list. It's not only a chore-free way to keep your inbox clean but also an ethical choice.**Instructions:**- Scroll to the bottom of your email and look for an 'Unsubscribe' or similar link to opt out.---By following these five straightforward steps, you can transform your Gmail inbox into an efficient, pleasant, and visually appealing workspace. No clutter required!
下一篇:Certainly! Here's a revised version of the copy:---**Get Started with Sending and Receiving SMS from Your PC – A Comprehensive Guide**Looking to extend your text messaging capabilities to your computer? Discover how to easily read and send SMS text messages directly from your PC. Whether for personal or professional reasons, this guide will equip you with the tools and steps needed to manage your text communications efficiently.## Step-by-Step Instructions to Send and Receive SMS on Your PC### Setup the Basics1. **Check Compatibility**: Ensure your phone and computer are compatible with SMS relay services.2. **Choose a Service**: Select an SMS to Email or SMS to WhatsApp service that supports a PC client or web interface.### Connecting Your Phone3. **Install an App or Service**: On your phone, install the appropriate app or set up the chosen service.4. **Register and Configure**: Complete the registration process and configure the settings to link your phone number and computer.### Using Your PC5. **Access the Interface**: Open the SMS to Email service or the messaging client on your computer.6. **Log In**: Enter your account credentials and verify your login on your phone.7. **Read Messages**: Browse through incoming messages, and view details as you would on your phone.### Sending Text Messages8. **Type Your Message**: Compose your text as you would on your phone.9. **Send with a Click**: Once finished, send the message with a single click. The service handles the delivery to your phone's carrier.### Managing Your SMS10. **Save Conversations**: Save important messages or conversations for easy access on your computer.11. **Filter and Arrange**: Use filters and sorting options to prevent clutter and keep your messages organized.### Troubleshooting Tips- **Ensure Network Access**: Confirm that both your computer and phone have a stable internet connection.- **Check App Permissions**: Verify that all necessary permissions for the messaging service are enabled.Now that you're armed with this guide, you can streamline your text messaging experience and enjoy the convenience of reading and sending SMS from your PC. Happy messaging!---This revised version aims to be more engaging and informative, providing users with the information they need to understand and perform the task of using their PC for sending and receiving SMS messages.