您的当前位置:首页 > Telegram > ### How to Install iOS 12 Beta on Your iPhone and iPad**Streamline Step-by-Step Guide to Experience the Latest Features Before Everyone Else!**Ready to dive into the future of iPhone and iPad functionality? This comprehensive guide walks you through the process of installing iOS 12 Beta on your device. Follow these simple steps to get your hands on a first-peek at Apple’s cutting-edge features.#### Prerequisites:1. **Enrolled in the Beta Program:** Make sure you have joined Apple’sBeta Software Program.2. **Backup Your Data:** Ensure you back up all important data to iCloud or iTunes—it’s better safe than sorry!3. **Free Space:** Your device must have sufficient storage space available.#### Step-by-Step Installation:1. **AppleID Activation:** - Go to [beta.apple.com](http://beta.apple.com) using your web browser. - Log in with your Apple ID. - Sign up for the iOS Beta Program by entering your email.2. **Downloading the Configuration Profile:** - Return to your device, launch the iOS Settings app. - Tap on your name at the top of the screen. - Select "iTunes Store & App Store." - Tap "Statistics & Privacy." - Scroll down and tap "Get a Beta." - Choose "Download Profile." - Confirm by tapping "Download" when prompted.3. **Installing the Profile:** - The iPhone or iPad will notify you of a software update; tap "Install." - Enter your passcode to confirm the process. - If prompted, tap "Agree to Terms and Conditions."4. **Reboot Your Device:** - Your device may automatically restart. If not, manually restart it. - Once rebooted, your device will ask you to choose your Wi-Fi network.5. **Downloading the iOS 12 Beta:** - Open the [Beta Software Program](https://beta.apple.com) app on your device. - Tap "Agreed," if you haven't already. - Your device will begin downloading the iOS 12 Beta software. - Connect your device to a power source to ensure it's charged during the download.6. **Completing the Installation:** - Once the download is complete, your iPhone or iPad will automatically install the new version of iOS. - The process may take 15-30 minutes.7. **Reboot Your Device:** - After installation, your device will restart.#### Post-installation Notes:- **Return to the Beta Program**: Don’t forget to return to the Beta Software Program website after the installation to sign out of the beta profile to revert to a stable version if desired.- **Regular Backups**: Keep your device backed up after installing the beta. Unexpected bugs can occur, and regular backups will protect your data.- **Support Community**: Consider joining the [Apple Support Community](https://discussions.apple.com/) for tips and troubleshooting assistance.With these instructions, you're on your way to embracing the innovation of iOS 12 Beta! Happy beta testing! 正文

### How to Install iOS 12 Beta on Your iPhone and iPad**Streamline Step-by-Step Guide to Experience the Latest Features Before Everyone Else!**Ready to dive into the future of iPhone and iPad functionality? This comprehensive guide walks you through the process of installing iOS 12 Beta on your device. Follow these simple steps to get your hands on a first-peek at Apple’s cutting-edge features.#### Prerequisites:1. **Enrolled in the Beta Program:** Make sure you have joined Apple’sBeta Software Program.2. **Backup Your Data:** Ensure you back up all important data to iCloud or iTunes—it’s better safe than sorry!3. **Free Space:** Your device must have sufficient storage space available.#### Step-by-Step Installation:1. **AppleID Activation:** - Go to [beta.apple.com](http://beta.apple.com) using your web browser. - Log in with your Apple ID. - Sign up for the iOS Beta Program by entering your email.2. **Downloading the Configuration Profile:** - Return to your device, launch the iOS Settings app. - Tap on your name at the top of the screen. - Select "iTunes Store & App Store." - Tap "Statistics & Privacy." - Scroll down and tap "Get a Beta." - Choose "Download Profile." - Confirm by tapping "Download" when prompted.3. **Installing the Profile:** - The iPhone or iPad will notify you of a software update; tap "Install." - Enter your passcode to confirm the process. - If prompted, tap "Agree to Terms and Conditions."4. **Reboot Your Device:** - Your device may automatically restart. If not, manually restart it. - Once rebooted, your device will ask you to choose your Wi-Fi network.5. **Downloading the iOS 12 Beta:** - Open the [Beta Software Program](https://beta.apple.com) app on your device. - Tap "Agreed," if you haven't already. - Your device will begin downloading the iOS 12 Beta software. - Connect your device to a power source to ensure it's charged during the download.6. **Completing the Installation:** - Once the download is complete, your iPhone or iPad will automatically install the new version of iOS. - The process may take 15-30 minutes.7. **Reboot Your Device:** - After installation, your device will restart.#### Post-installation Notes:- **Return to the Beta Program**: Don’t forget to return to the Beta Software Program website after the installation to sign out of the beta profile to revert to a stable version if desired.- **Regular Backups**: Keep your device backed up after installing the beta. Unexpected bugs can occur, and regular backups will protect your data.- **Support Community**: Consider joining the [Apple Support Community](https://discussions.apple.com/) for tips and troubleshooting assistance.With these instructions, you're on your way to embracing the innovation of iOS 12 Beta! Happy beta testing!

时间:2024-09-21 14:16:01 来源:网络整理 编辑:Telegram

核心提示

Embracethecutting-edgewiththeiOS12publicbetapreviewthat'satyourfingertips.It'stimetounlockthefullpot

Embrace the cutting-edge with the iOS 12 public beta preview that's at your fingertips. It's time to unlock the full potential of your compatible iPhone with the most up-to-date beta of iOS 12. Dive into a new realm of innovation with iOS 12, featuring Siri Shortcuts, Group FaceTime, Memoji, and more groundbreaking additions.

The momentous iOS 12 debut was made at the WWDC this month. What started as a select beta for developers to test has now burst into the spotlight with this public beta preview, offering a glimpse of what's to come.

Discover iOS 12's Features

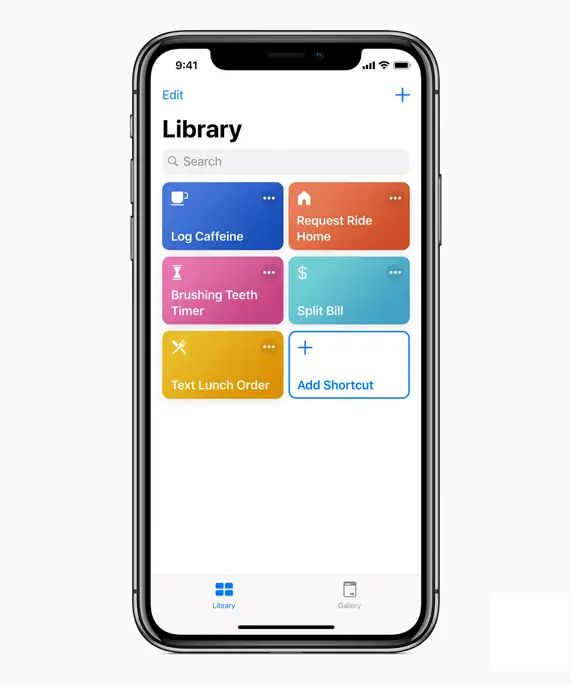
The iOS 12 revolution is packed with features and aesthetic enhancements. Standout features include Siri shortcuts, group video calls, Memoji personas, screen monitoring, shared augmented reality experiences, and enhancements for older devices like the iPhone 5s.

With iOS 12, you'll enjoy a lightning-fast camera launch, a super-fast 50 percent quicker keyboard display, and apps that launch twice as fast, even under heavy strain. And, with group video chatting in FaceTime, imagine holding a simultaneous video conversation with up to 32 of your closest friends or family.

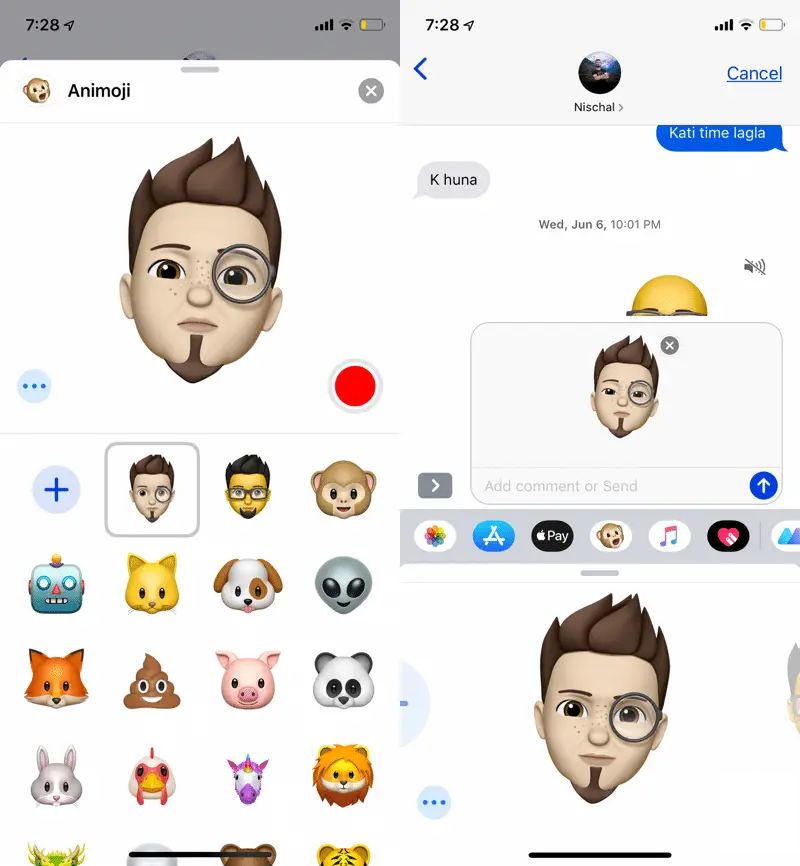
The ARKit 2 is introduced, enhancing the AR experience with object recognition and dynamic device orientation adjustments. The iPhone X gets a sleek new Animoji and Memoji, offering a personal twist on face-tracking fun. Plus, track your screen time with the Screen Time dashboard, and tailor your notification preferences to your liking.

Electric Update: iOS 12 Beta on Your iPhone in 3 Easy Steps

  • Begin with a meticulous backup of your iPhone by using the backup feature via iTunes on your PC.
  • Enter the world of beta on your iPhone by opening Safari and heading straight to the iOS 12 beta registration page.
  • Patience is the key—a new update notification will appear in your Settings menu soon enough.

    Ready for the update? It's just as simple to apply as a regular update will make. Enjoy the iOS 12 beta on your iPhone— compatible devices include iPhone 5s and later, along with iPad mini and its successors. Note that this public build isn't the most reliable, so it's advised you don't place your primary reliance on it for day-to-day activities.

  • 上一篇:# Manual OTA Update Process for the Coolpad Note 3## Step-by-Step GuideTo manually update your Coolpad Note 3 device over the air (OTA), follow these detailed steps:### Step 1: Prepare Your Device- **Charge Your Battery**: Ensure that your Coolpad Note 3 has at least 50% battery charge to prevent the update process from being interrupted due to a low battery.- **Back Up Data**: It’s advisable to back up your important data and files to avoid any loss during the update process.### Step 2: Check for System Updates- **Access Settings**: Navigate to the Settings option on your device.- **System Update**: Look for a System Update, Software Update, or similar option. Tap on it.### Step 3: Check Your connectivity- **Wi-Fi Connection**: Ensure your device is connected to a stable Wi-Fi network as updates can be large and require a secure connection.- **Cellular Network**: If you prefer, you can use your mobile data connection, but ensure you have enough data for the update.### Step 4: Update Your Device- **Download the Update**: Follow the on-screen instructions to check for updates. Downloading can take some time, so be patient.- **Accept Terms & Conditions**: If prompted, review and accept the terms and conditions of the update.### Step 5: Install the OTA Update- **Get Started**: Once the update file size is complete, the installation process should start automatically.- **Follow Prompted Steps**: Your device will guide you through any necessary steps, such as making sure your device is not in use or connected to power.### Step 6: Complete the Update- **Do Not Interrupt**: Do not turn off your device or disconnect it during the installation process. Do not use your device until the update is finished.- **Restart Device**: After the update is complete, your Coolpad Note 3 will restart automatically.### Step 7: Verify Update- **Check for Confirmation**: The updated OS version should be displayed on your screen.- **Test Your Device**: Try running some applications or normal usage to ensure everything works as expected.Remember, these instructions may vary slightly depending on the firmware version of your Coolpad Note 3 and the current software available. Always refer to the manufacturer's support resources for the most accurate information.
    下一篇:### How to Disable the Windows 10 Welcome ExperienceWould you like to bypass the initial welcome screen and dive straight into your Windows 10 experience? This guide will show you how to disable the Windows Welcome Experience, allowing you to launch your system directly to your personalized desktop.#### Step-by-Step Instructions1. **Access the Command Prompt with Elevated Privileges:** - To ensure you're performing these steps correctly, you'll need administrative access. Click on the Start button. - Type `cmd` in the search bar and then right-click on Command Prompt. Select `Run as administrator`.2. **Disable the Welcome Experience:** - A User Account Control (UAC) prompt will appear, asking for confirmation. Click `Yes` to proceed. - Once the Command Prompt opens, type the following command and press Enter: ``` msiexec / uninstall / packagepath = `C:\Program Files (x86)\Windows市委派包\conciergeOM.msi` ``` - If prompted to confirm the transaction, type `Y` and press Enter.3. **Perform a Clean Boot:** - To apply the changes, you might need to perform a clean boot. This will ensure that all unnecessary applications and services are disabled. Here's how to do it: - Type `msconfig` in the Start search bar and press Enter to open the System Configuration window. - Go to the `Services` tab. - Check the `Hide all Microsoft services` box at the bottom. - Click on `Disable all` to ensure all third-party services are also disabled. - Go back to the `Startup` tab and click on `Open Task Manager`. - Disable all startup items by right-clicking on them and selecting `Disable`. - Click on `OK` to close the System Configuration window. - Restart your PC.#### Further ActionAfter following these steps, you should find that the Windows Welcome Experience is disabled, and your system loads directly to the desktop. If you need to reactivate the Welcome Experience in the future, you can do so by following similar steps and paying attention to any prompts for confirmation. Keep in mind that making changes to system settings can have unintended consequences; always proceed with caution and desire.