您的当前位置:首页 > Paper Plane > **Filing and Tracking Your Aadhaar Complaint Step-by-Step**Are you experiencing an issue with your Aadhaar card or seeking assistance with Aadhaar-related services? Learn how to navigate the process of filing a complaint, correspondingly tracking its progress, and more. Follow this comprehensive guide to take charge of your Aadhaar-related concerns efficiently.---### How to File an Aadhaar Complaint:**1. Gather the Necessary Information:**Before you begin, gather all relevant details related to your Aadhaar card—your Aadhaar number, the problem you are facing (e.g., data error, card replacement, etc.), and any supporting documents you may need.**2. Choose the Appropriate Channel:**Aadhaar complaints can be filed through various channels:- **Aadhaar Self-Service Portal:** Visit the Unique Identification Authority of India (UIDAI) self-service portal at https://uidai.gov.in/services/uid-quote-status.html.- **UIDAI Customer Care:** Call the UIDAI customer care at 1800-180-1947.- **Local Registration Center (LRC):** Visit your nearest LRC.**3. File Your Complaint:**- **Online:** If you choose the UIDAI portal, log in with your Aadhaar credentials and navigate to the complaint section. Fill in the required details and upload any supporting documents if necessary.- **By Phone:** Via the customer care helpline, provide the required information to the representative and they will file the complaint on your behalf.- **In-Person:** At the LRC, a representative will file the complaint using the information you provide.**4. Receive a Reference ID:**Once the complaint is lodged, your Aadhaar self-service portal account will generate a unique reference ID. Save this for future communication and for tracking the status of your complaint.---### How to Track Your Aadhaar Complaint:**1. Visit the Aadhaar Self-Service Portal:**Sign into your Aadhaar account on the UIDAI self-service portal.**2. Navigate to the Complaint Status Section:**Here, expect to find a section titled 'Complaint Status' or something similar.**3. Enter the Reference ID:**Input the unique reference ID you received when lodging your complaint.**4. View the Status:**The system will display the current status of your complaint, which could be anything from 'Acknowledged' to 'Solved.'**5. Communicate with UIDAI if Necessary:**If you need further assistance or if there are updates on your complaint, you may either call the customer care helpline or visit the nearest LRC.---Remember to keep all communication from UIDAI for future reference. If your issue persists or the timeline is延长 without resolution, you may need to escalate the matter directly with UIDAI through a formal appeal or by visiting the UIDAI office in person. Stay patient and follow these steps to effectively manage and resolve your Aadhaar-related complaints. 正文

**Filing and Tracking Your Aadhaar Complaint Step-by-Step**Are you experiencing an issue with your Aadhaar card or seeking assistance with Aadhaar-related services? Learn how to navigate the process of filing a complaint, correspondingly tracking its progress, and more. Follow this comprehensive guide to take charge of your Aadhaar-related concerns efficiently.---### How to File an Aadhaar Complaint:**1. Gather the Necessary Information:**Before you begin, gather all relevant details related to your Aadhaar card—your Aadhaar number, the problem you are facing (e.g., data error, card replacement, etc.), and any supporting documents you may need.**2. Choose the Appropriate Channel:**Aadhaar complaints can be filed through various channels:- **Aadhaar Self-Service Portal:** Visit the Unique Identification Authority of India (UIDAI) self-service portal at https://uidai.gov.in/services/uid-quote-status.html.- **UIDAI Customer Care:** Call the UIDAI customer care at 1800-180-1947.- **Local Registration Center (LRC):** Visit your nearest LRC.**3. File Your Complaint:**- **Online:** If you choose the UIDAI portal, log in with your Aadhaar credentials and navigate to the complaint section. Fill in the required details and upload any supporting documents if necessary.- **By Phone:** Via the customer care helpline, provide the required information to the representative and they will file the complaint on your behalf.- **In-Person:** At the LRC, a representative will file the complaint using the information you provide.**4. Receive a Reference ID:**Once the complaint is lodged, your Aadhaar self-service portal account will generate a unique reference ID. Save this for future communication and for tracking the status of your complaint.---### How to Track Your Aadhaar Complaint:**1. Visit the Aadhaar Self-Service Portal:**Sign into your Aadhaar account on the UIDAI self-service portal.**2. Navigate to the Complaint Status Section:**Here, expect to find a section titled 'Complaint Status' or something similar.**3. Enter the Reference ID:**Input the unique reference ID you received when lodging your complaint.**4. View the Status:**The system will display the current status of your complaint, which could be anything from 'Acknowledged' to 'Solved.'**5. Communicate with UIDAI if Necessary:**If you need further assistance or if there are updates on your complaint, you may either call the customer care helpline or visit the nearest LRC.---Remember to keep all communication from UIDAI for future reference. If your issue persists or the timeline is延长 without resolution, you may need to escalate the matter directly with UIDAI through a formal appeal or by visiting the UIDAI office in person. Stay patient and follow these steps to effectively manage and resolve your Aadhaar-related complaints.

时间:2024-09-21 06:32:48 来源:网络整理 编辑:Paper Plane

核心提示

EncounteringhiccupswithyourAadhaarcard?Whetherit'sanunarrivedPVCcard,OTPnon-reception,failedbiometri

Encountering hiccups with your Aadhaar card? Whether it's an unarrived PVC card, OTP non-reception, failed biometrics, or snail-paced updates, the UIDAI portal’s complaint system is your gateway to resolution. This guide will shepherd you through lodging and monitoring your complaint's progress online.

Accelerating Your Aadhaar Complaint on the UIDAI Portal: A Detailed Walkthrough

Hassles with your Aadhaar? Whether it pertains to PVCs, authentications, the doorstep service, or the Self-Service portal. Simplify your Aadhaar complications with these user-friendly steps to escalate an Aadhaar-related complaint through the UIDAI portal.

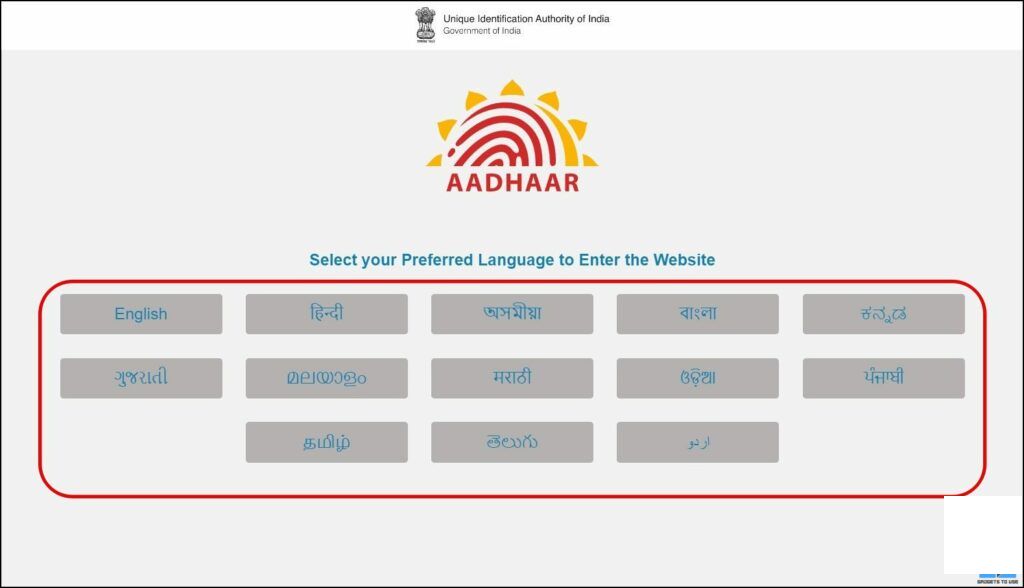
1. Launch the UIDAI portal on your browser and select the language that resonates with you.

1.

2. Head to the File a Complaint link nestled within the Contact & Support section on the top menu.

2. File a ComplaintContact & Support menu

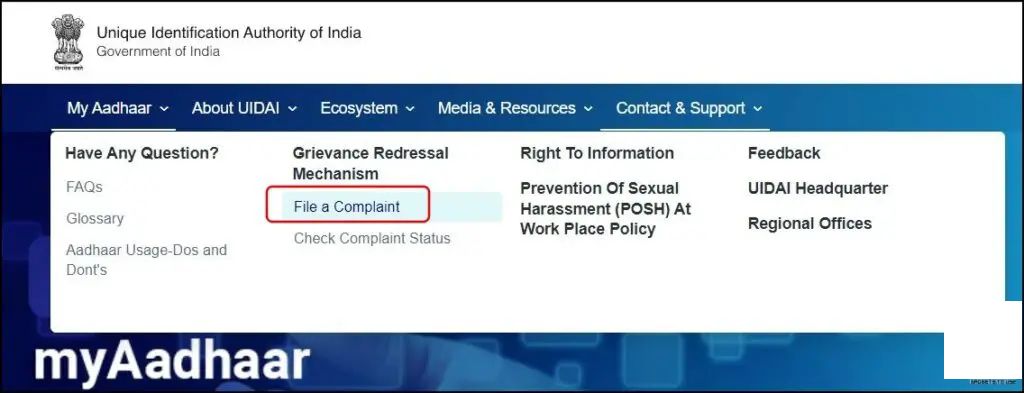
3. On the succeeding page, insert the necessary details including your Name, mobile, and email, along with your location.

3. insert the necessary details

4. Scroll downwards to declare whether this complaint is for yourself or another party.

4.self oranother party

5. Select the complaint category most fitting to your situation, as our case is focused on Aadhaar Update.

5.complaint category

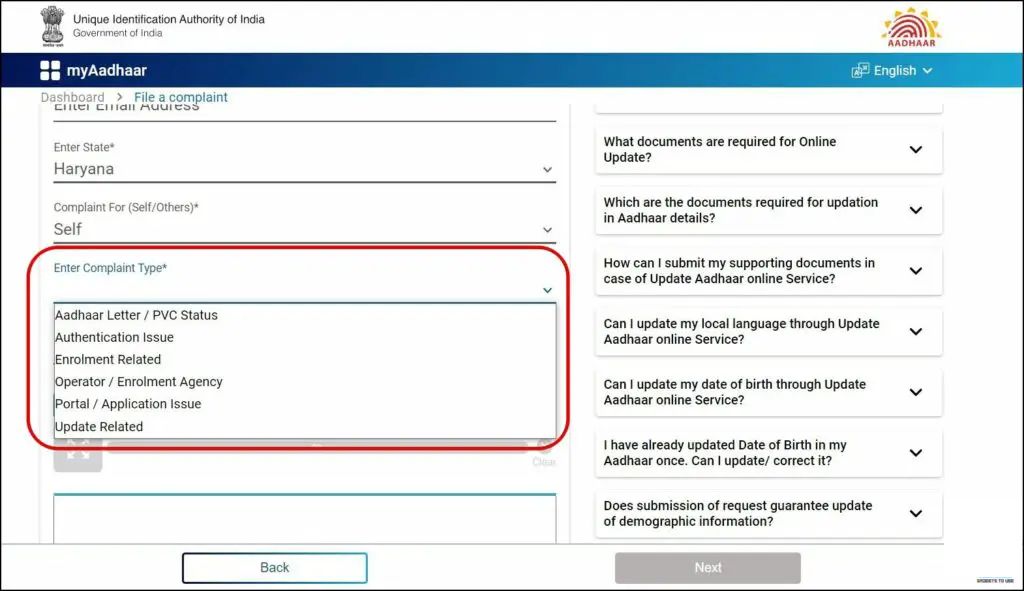
6. Enumerate your complaint category from the provided dropdown menu

6.complaint category

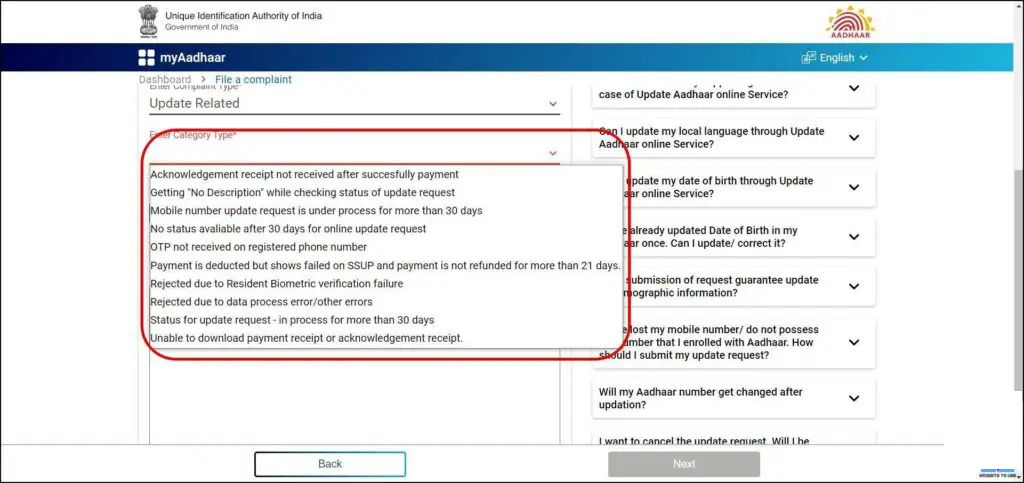
7. Complement your case by attaching pertinent documents in JPG, PNG, or PDF.

7.attach documents

8. Summarize your concerns succinctly in the brief description area.

8.brief summary

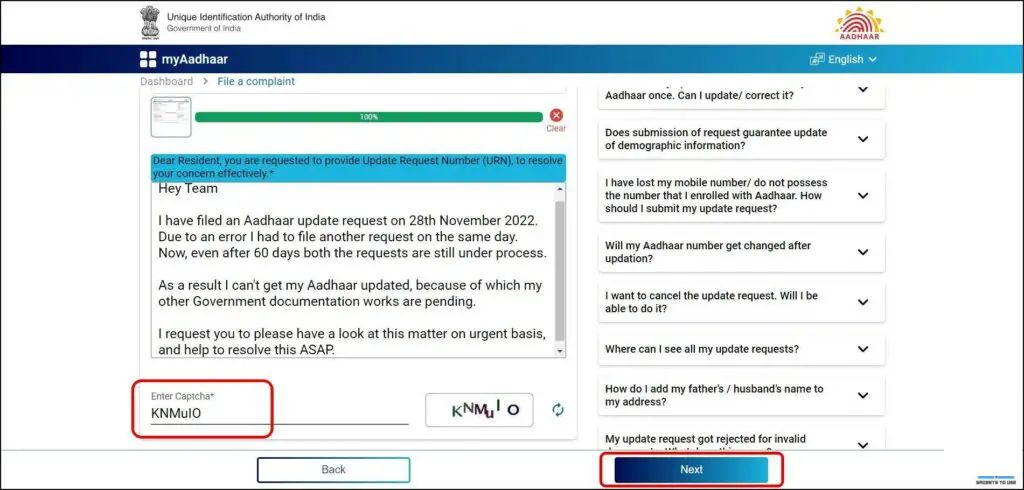
9. Conclude by completing the captcha, then click Next to dispatch your complaint. Remember your SRN; it'll also be texted to your number.

9.captcha and Next

Charting Your Complaint's Path: Tracking Status on the UIDAI Portal

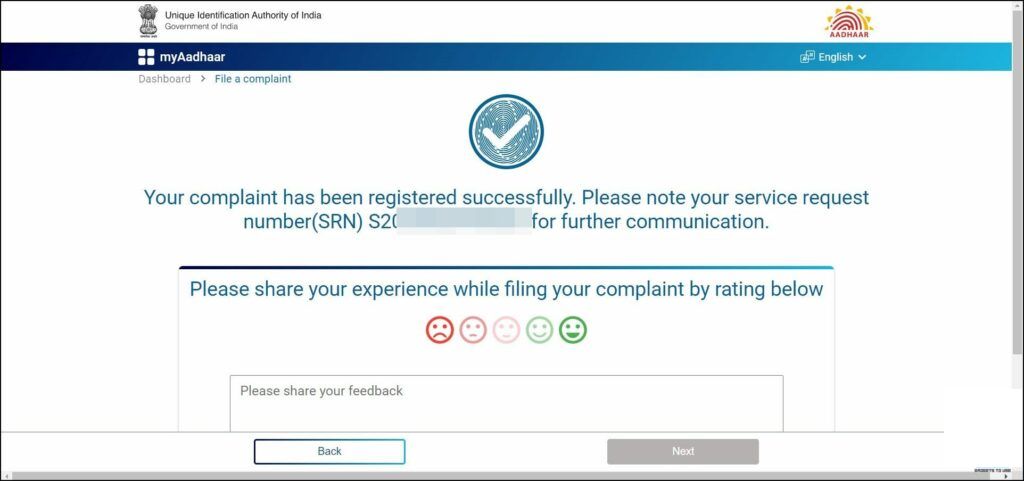
After boarding the Aadhaar complaint train, there's the comfort of monitoring its journey. Let’s explore how to keep tabs on your Aadhaar complaint status with ease on the UIDAI portal.

1. Return to the UIDAI portal on your computer, and choose your preferred language.

1.

2. On the menu, select the Check Compliant Status from the Contact & Support tab at the top.

2. Check Compliant StatusContact & Support tab

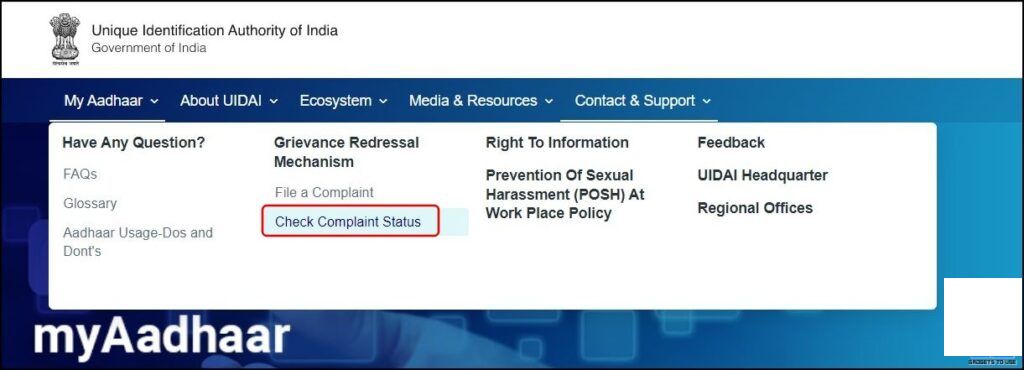
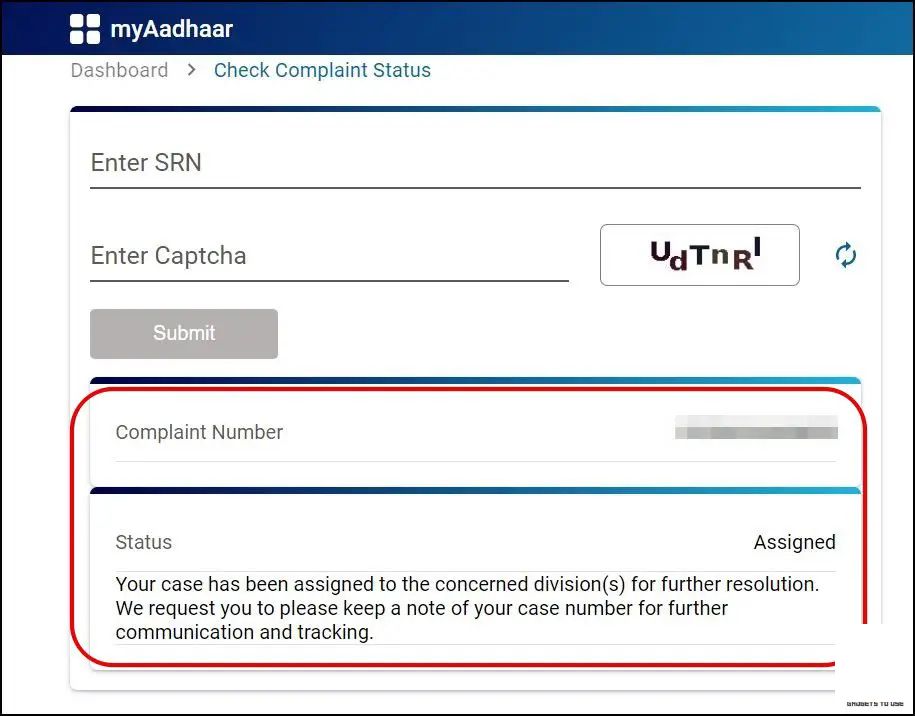
3. At this point, enter your SRN number and solve the captcha.

3.SRN number and captcha

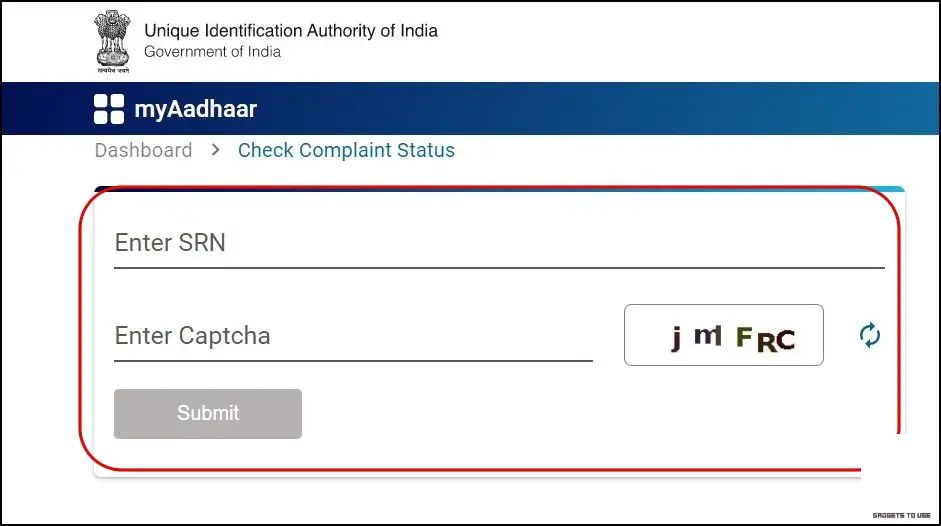
4. Here you can view the current status of your complaint.

4.

Frequently Discussed Queries

Q: Why is my Aadhaar application dragging on?

A: It's time to elevate the issue toUIDAI; adhere to these steps for registering your Aadhaar-related complications.

A:

Q: My Aadhaar update requisition is lingering over 30 days. Aias? What's the course of action?

A: Don't hesitate to register a complaint关于 your pending Aadhaar updates. We've outlined the complete process for filing on the UIDAI portal.

A:

Q: What's the protocol if my Aadhaar update is marooned in processing?

A: Sound the alarm by filing a complaint via the UIDAI portal. For Delhi-based residents, drop by the UIDAI Regional Office in Delhi at Ground Floor, Supreme Court Metro Station, Pragati Maidan, New Delhi-110001.

A:

Q: How do I ascertain if my Aadhaar card has been misused?

A: A specific guide is at your disposal to scrutinize the)adhaar.-related activities.

A:
上一篇:### How to Pause and Resume Voice Recording in WhatsAppWhether you're aiming for pristine voice quality or need to edit bits of a conversation, mastering the pause and resume functions in WhatsApp voice recording is a valuable skill. Here’s a step-by-step guide to help you seamlessly manage your voice messages.#### How to Pause Voice Recording in WhatsApp1. **Open WhatsApp:** - Start by opening the WhatsApp application on your device.2. **Select the Voice Icon:** - Within a chat, tap on the ‘microphone’ icon to initiate the recording.3. **Begin Recording:** - Once the recording has started, you will see a voice icon followed by a waveform or a visual timer indicating the length of your recording.4. **Pause the Recording:** - To pause the recording, simply press the pause button. You might see a more subtle or double square/circle symbol, depending on your phone’s interface and the version of WhatsApp installed.5. **Paused Recording Indication:** - Once paused, the pause button often turns into a play/record button, indicating the recording status. The waveform may indicate a pause homogenously across the recording progress bar.#### How to Resume Voice Recording in WhatsApp1. **Restart the Recording (if necessary):** - If the pause was accidental or you want to discard the part before the pause, you might need to restart the recording. Just tap the microphone icon again to start over. - If you wish to resume the previous recording, without interruption, proceed to the next step.2. **Resume the Recording:** - To resume, tap the record button (which might now show as a play/pause icon, depending on your device and WhatsApp version). - If you’re not seeing the play/pause icon immediately, make sure the recording remains paused for a few seconds – some versions of WhatsApp might need time to update the interface correctly. 3. **Check Resumed Recording:** - After resuming, check the waveform or duration indicator to confirm that the recording continues from the point where it was paused.#### Additional Tips for Effective Voice Recording in WhatsApp- **Sort Out Audio Quality:** Consider speaking in a quiet environment to minimize background noise.- **Use Headphones:** If available, headphones can help with the yourself and others' pleasant experience, particularly during interviews or important conversations.Now that you know how to pause and resume voice recordings in WhatsApp, you can easily manage your messages without any abrupt cuts in content. Happy recording!
下一篇:### 3 Methods to Revive Your Twitter Account Without Using Your Phone Number or Email AddressHave you found yourself locked out of your Twitter account and desperate to reclaim access without the usual phone verification? Fret not, as there are alternative methods to get back on track. Here’s how you can reset your Twitter account, without relying on your phone number or email:#### 1. Via Twitter Support**Step 1:** Navigate to the Twitter Support page.**Step 2:** Based on your issue, use the search bar or carefully select the correct category to report a problem. For account recovery, choose Help me get back into my account.**Step 3:** Follow the prompts and provide all necessary information to authenticate your identity. The support team may ask you to provide additional details to verify your account ownership.**Step 4:** Be prepared for the process to take a few days since support cases are often handled manually.#### 2. Using User Interface Options**Step 1:** Log into Twitter.**Step 2:** Go to your profile settings or click on your profile icon to access the Twitter drop-down menu located in the upper right corner of the account page.**Step 3:** Select “Support” from the options available.**Step 4:** Look for a Find My Account or similar feature within the Support section. Follow the instructions, which might involve answering account security questions or stating your issue in a text box.**Note:** This option might not always be available, so it's worth checking with the current Twitter user interface in case it has been updated.#### 3. Utilize Twitter's Password Reset Feature**Step 1:** Head to the Twitter sign-in page on your web browser or mobile device.**Step 2:** Select “Forgot password?” or similar words on the login screen.**Step 3:** You will be prompted to enter your username, Twitter handle, or email地址 associated with the account.**Step 4:** In the case that you do not have access to the email, you may find a 'Create an account with mobile phone number' option as a workaround. Enter your mobile number and continue with the verification process.**Pro Tip:** If you have previously linked your Twitter account to other social media platforms that allow you to log in, you might be given an option to sign in using those services, bypassing the email verification step.In conclusion, while the standard methods of verifying your account through a phone number or email are often readily available and quick, having alternative routes can be invaluable in overcoming access hurdles. Try these steps to systematically regain access to your Twitter account without relying on your primary contact methods.