您的当前位置:首页 > Telegram Download Tutorial > Original Copy:---**HMD Global Gains 500 Nokia Design Patents, Covering Lumia Camera UI**---Revised Copy:---**HMD Global Acquires 500 Nokia Design Patents, Entering Exclusive Territory with Lumia Camera UI Innovations**--- 正文

Original Copy:---**HMD Global Gains 500 Nokia Design Patents, Covering Lumia Camera UI**---Revised Copy:---**HMD Global Acquires 500 Nokia Design Patents, Entering Exclusive Territory with Lumia Camera UI Innovations**---

时间:2024-09-21 10:48:17 来源:网络整理 编辑:Telegram Download Tutorial

核心提示

ExcitingdevelopmentshaveemergedasMicrosoftMobilehasdivested500essentialNokiaDesignpatentstoHMDGlobal

Exciting developments have emerged as Microsoft Mobile has divested 500 essential Nokia Design patents to HMD Global. As the creators of ‘Nokia’-branded smartphones, HMD now boasts this treasure trove of innovation, including the iconic Lumia Camera UI.

The news of the Lumia Camera UI joining forces with HMD is a banner moment. Engineered by the original Nokia, this UI preceded the Microsoft acquisition. It’s a symbolic return of production to where it began for this groundbreaking UI.

Moreover, there remain approximately 200 classic Nokia patents at Microsoft’s disposal. Notable among them are the PureView and ClearBlack innovations. However, fans yearning for看到的 the renowned ClearBlack display in futuristic Nokia devices will have to wait a bit more.

Delving into the Lumia Camera UI

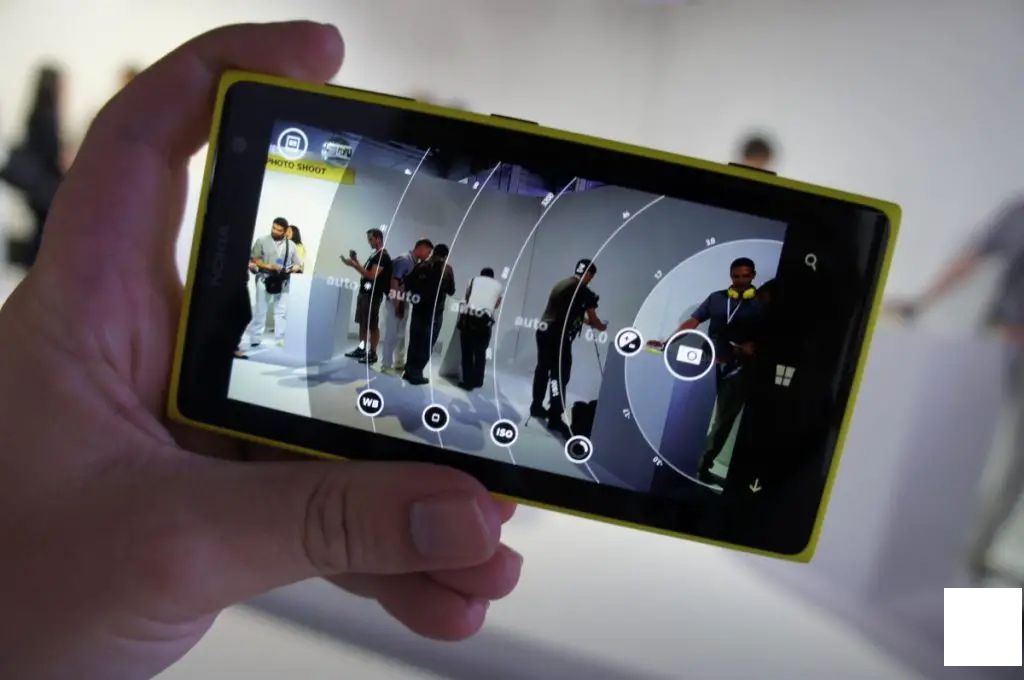
The Lumia series camera interface represents a gem in mobile camera design innovation. It’s an interface that seamlessly bridges automated modes with the precision of manual control.

From a personal perspective, I vouch for the convenience of this interface as a Lumia devotee. With one tap, I can glide from stills to footage and into the intricate world of Smart Sequence timings.

White balance adjustments, aperture settings, and flash toggles are within arm's reach. A mere flick of the camera shutter button elevates me to Manual mode, where the controls are so intuitive – White Balance, Focus, ISO, shutter speed, and Aperture, all at your fingertips.

The user experience is seamless: manual mode commands are presented conically, overlaying onto your camera scene. such that you retain paramount control and a clear view of your impending shot.

This UI’s much-anticipated reunion with the Nokia name is a commendable victory for its adherents. The potential for enhancements in the试管 nosoppera version of the Nokia lineup are high. Plus, the transfer of other patents, including ClearBlack, could be the next bright moment for Nokia enthusiasts.

上一篇:Title: How to Roll Back from Android Q Beta to Android 9 Pie on OnePlus 6 and 6T---Are you looking to revert to the familiar Android 9 Pie experience on your OnePlus 6 or 6T after trying out the Android Q Beta? This guide will walk you through the necessary steps to safely roll back your software and enjoy the stability of Android 9 Pie again.---## Rolling Back to Android 9 Pie from Android Q Beta on OnePlus 6 and 6TIf you've been experimenting with the Android Q Beta on your OnePlus 6 or 6T and are now ready to switch back to Android 9 Pie, follow these steps carefully:1. **Backup Your Data**: Before proceeding, ensure that all your important data—such as photos, contacts, and messages—is backed up. You can use OnePlus Cloud, Google Drive, or any other preferred method to back up your data.2. **Heads Up!**: Make sure that your phone is fully charged or has at least 50% battery life, as the rollback process might consume a lot of power.3. **Obtain the Download Link**: Obtain the Android 9 Pie firmware file specifically for your OnePlus 6 or 6T from the OnePlus Support page or a reliable source. The download link will be required during the rollback process.4. **Enable USB Debugging**: To access the software update, you'll need to enable USB debugging. Go to your phone's Settings, navigate to 'System,' select 'About Phone,' and tap on 'Build number' multiple times until you see a message that you are now a developer. Now, go back to the Settings menu, scroll down, and enable USB debugging under the ' Developer options.'5. **Use a Computer**: The rollback process should be done on a computer. Make sure it's fully charged and that your computer is connected to a stable internet connection.6. **Download the rollback tool**: Find the appropriate rollback tool from the OnePlus Support page. Follow the instructions to download and install the tool on your computer.7. **Connect Your Phone**: Turn off your OnePlus 6 or 6T, then boot into the firmware update mode. This is typically done by pressing and holding the Volume Down button and either the Power or Volume Up button simultaneously until your phone displays the Android figure.8. **Run the Rollback Tool**: Once your OnePlus 6 or 6T is in update mode, connect it to your computer using a USB cable. The rollback tool should automatically recognize your device.9. **Select Firmware File**: Navigate through the rollback tool to select the downloaded Android 9 Pie firmware file for your OnePlus 6 or 6T.10. **Begin the Rollback Process**: Click the start button in the rollback tool to begin the installation process. The device will restart, and the installation of Android 9 Pie will begin.11. **Finalize the Rollback**: The installation should complete without any issues. Once it's done, the phone will restart, and your OnePlus 6 or 6T should now be running Android 9 Pie.---Please note that rolling back the software version may void any warranty or service commitments. Always consult the official OnePlus support for the most accurate and up-to-date instructions before attempting to change software versions.
下一篇:### How to Share Private Albums on Google Photos---#### Share Your Private Memories with Google PhotosWould you like to share select moments with friends and family without publicly displaying your entire collection? Google Photos allows you to easily share private albums with specific individuals. Follow these simple steps to keep your cherished memories private while still sharing them on your terms.---#### Step-by-Step Guide to Sharing Your Private Google Photos Albums**1. Choose the Album You Want to Share** Start by navigating to your Google Photos library. Select the album you wish to share. If you haven't created an album yet, tap on the '+' button, choose 'New album,' and organize your photos accordingly.**2. Open the Album Settings** With the album selected, tap the three vertical dots in the upper right corner of the screen to access the menu. From the dropdown, tap on 'Album settings'.**3. Go to the Share Option** In the Album settings menu, find the 'Triangle gear' icon or 'Share' link to open sharing options for that specific album.**4. Add Recipients** Here, you can type in the email addresses or phone numbers of the individuals you want to add as recipients. Each recipient will receive an invitation to view your album.**5. Set Access Permissions** You can decide whether the album is visible to 'Anyone' with the invitation link or keep it secure by choosing Password required or See only.**6. Customize the Sharing Link** If you want to share the album via a link, click on 'Shareable link' and copy it to share it outside of email and messaging apps. You can also use the built-in sharing function on Google Photos to select the app or service where you want to share the link.**7. Send the Invitation** Once everything is set to your satisfaction, tap 'Send invite' or 'Share'. Recipients will receive a message with a link to your private album. **8. Monitor Activity (Optional)** Should you wish to keep an eye on who is accessing your album, navigate back to the 'Sharing settings' and enable 'See who has access'. You'll receive notifications whenever someone gains access or views the album.---**Remember:** Always keep privacy in mind when sharing your photos. Regularly review your shared albums and adjust the permissions as needed to protect your personal content.