您的当前位置:首页 > TikTok > Certainly! Below is a revised version of your copy, tailored to highlight the new content:---Transform Your Display Experience: 5 Simple Techniques to Adjust the Color Temperature and Tone on Your SmartphoneBoost the pleasure of digital visuals with these expert tips to tweak the color temperature and tone of your smartphone display. Say goodbye to muted colors and hello to vibrant, tailored viewing experiences. Here are five handy methods to elevate your screen's ambiance:1. **Tuning Your Phone's Settings** Navigate to your device settings and explore the display options. Look for 'Color Temperature' or 'Display Settings,' where you'll find a slider that allows you to warm or cool the screen's color palette.2. **Use Night Shift** Many smartphones come with a 'Night Shift' feature designed to adjust the color temperature towards bluer hues when it's dark. This can help reduce eye strain and promote better sleep.3. **Adjust with an Ambient Light Sensor** For the ultimate personalized experience, enable your phone's ambient light sensor. It adjusts the color temperature automatically according to the current lighting conditions in your environment.4. **Download a Color Management App** Digital artists and photography enthusiasts will appreciate apps that let them fine-tune color levels, saturation, and contrast. These apps can provide advanced control over the display's color temperature and tone.5. **Calibrate Your Phone Display** If you're looking for precision, calibration tools allow you to set exact temperature and tone levels. This is especially useful for users who demand the highest level of accuracy in their visual content consumption.Choose your approach and prepare to be dazzled by the new hues and contrasts your smartphone display has to offer. Experience your favorite content like never before! 正文

Certainly! Below is a revised version of your copy, tailored to highlight the new content:---Transform Your Display Experience: 5 Simple Techniques to Adjust the Color Temperature and Tone on Your SmartphoneBoost the pleasure of digital visuals with these expert tips to tweak the color temperature and tone of your smartphone display. Say goodbye to muted colors and hello to vibrant, tailored viewing experiences. Here are five handy methods to elevate your screen's ambiance:1. **Tuning Your Phone's Settings** Navigate to your device settings and explore the display options. Look for 'Color Temperature' or 'Display Settings,' where you'll find a slider that allows you to warm or cool the screen's color palette.2. **Use Night Shift** Many smartphones come with a 'Night Shift' feature designed to adjust the color temperature towards bluer hues when it's dark. This can help reduce eye strain and promote better sleep.3. **Adjust with an Ambient Light Sensor** For the ultimate personalized experience, enable your phone's ambient light sensor. It adjusts the color temperature automatically according to the current lighting conditions in your environment.4. **Download a Color Management App** Digital artists and photography enthusiasts will appreciate apps that let them fine-tune color levels, saturation, and contrast. These apps can provide advanced control over the display's color temperature and tone.5. **Calibrate Your Phone Display** If you're looking for precision, calibration tools allow you to set exact temperature and tone levels. This is especially useful for users who demand the highest level of accuracy in their visual content consumption.Choose your approach and prepare to be dazzled by the new hues and contrasts your smartphone display has to offer. Experience your favorite content like never before!

时间:2024-09-21 13:20:50 来源:网络整理 编辑:TikTok

核心提示

Modernsmartphonesareequippedwithanauto-brightnessfeature,adynamicadjusterofdisplayluminancethatadapt

Modern smartphones are equipped with an auto-brightness feature, a dynamic adjuster of display luminance that adapts to surrounding light. This feature is vital for preserving battery and crucial for eye health.

For those seeking to tweak further, like adapting color temperatures, third-party apps are needed. Altering color temperature can be vital, especially for safeguarding your eyes during late-night reading sessions or bedtime, where vibrant colors may disrupt sleep. Maybe you're simply in pursuit of unique aesthetic options beyond default OEM settings.

Optimize Your Nighttext

Optimize Your Nighttext is a free download that's a must-have for post-dark-light chatters. Through the smart reduction of brightness and the application of filters, this app protects your vision. It boasts an array of settings, and its professional mode unlock offers additional customization. It's an app with straightforward basics and a high impact at night.

The Twilight Ritual

Twilight is a nightlife app whose goal is to improve your sleep by carefully manipulating your device's color temperature. Its creators take pride in explaining the science behind the app, emphasizing its role in enhancing sleep quality.

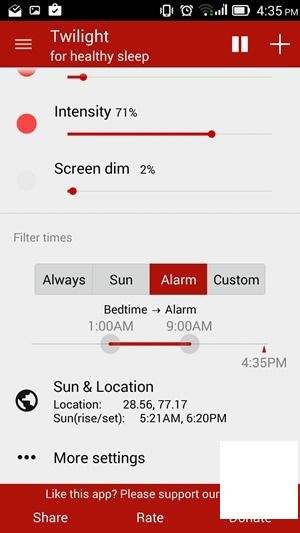
Configure your preferred staining solutions and color temperatures; Twilight automatically triggers pre-set modes based on four adjustable triggers. It can detect your sleep schedule via the alarm, and it's an ideal for nighttime feature, facilitating lower-backlight with efficiency.

Nighttime gemstones: CF Lumen

CF Lumen, crafted by the esteemed Chain Fire, is a leading app for managing color temperature on your device. It adeptly switches to a lower spectrum to ease the strain on eyes and decreases blue light exposure. Red filters are automatically applied at bedtime, minimizing eye discomfort.

Root access and location access are required for sunset and sunrise data, which the app then uses to tailor your screen's color temperature. The pro version unlocks a vast range of additional features for comprehensive control.

Dim the lumens: Lux Lite

Lux Lite offers the vital functions of adjusting system brightness and applying filters to mitigate eye stress and save battery life. With the pro version, you can enforce aggressive brightness reduction and activate a nighttime mode featuring a red filter to vanquish harsh white light.

Automatic night mode protection is among the advanced features offered. An intuitive setup wizard guides you through many options, and an Astronomer mode beckons for night sky explorers.

A(ans)oft Blue Sky

With a minimalist, clean aesthetic, Blue Sky is a straightforward app for those after undisturbed reading sessions and decideable eye relief, particularly under late-night conditions. The app provides refined adjustments for filters, color, and brightness.

Additional power optimization is promised but not always reliable. It’s a lifeline of tranquility during your eyes' precious nighttime hours.

Astounding Achievements

Custom ROMs like MIUI or Emotion UI invite users to manipulate color and hue to some degree, but beyond superficial aesthetics. It remains advisable to distance your device from the bed at night. However, if served under the blanket, deploy these screens as guardian angels for your eyes. And for readers TestData, a gentle e-ink alternative is an excellent companion, both for the night and the day.

上一篇:### Android One Phones vs Moto E: Comprehensive Comparison OverviewAre you in the market for a new smartphone that meets the needs of both performance and affordability? Look no further! Our extensive comparison overview of Android One phones versus the Moto E series services up to date information, highlighting the key differences and similarities that can help you make an informed decision.---### Android One Phones: A Pure Android Experience**What Sets Them Apart:**- **Stock Android:** Pure Android experience with no manufacturer modifications, meaning smoother performance and faster security updates.- **Simplicity:** Lightweight operating software to ensure devices remain fast and responsive over time.- **Regular Updates:** Quick access to the latest Google security patches and OS updates.**Top Winning Features:**- **Cost-Effective:** Android One devices often offer above-average specifications for their price tag.- **Device Lockup:** Long-lasting devices with batteries that last 12 to 18 months before needing a recharge.- **Security:** Direct support from Google means robust security measures.---### Moto E Series: Flexible and Upgradable**What Sets Them Apart:**- **Customizable:** Offered by Lenovo, these phones provide users with a range of customization options that some Android One devices lack.- **Optional Add-ons:** Encouraging flexibility, the Moto E range often includes options such as water resistance and the latest in camera tech for users who want a bit more.- **Update Support:** Reports of consistent OS updates through the Moto software platform but can vary per model.**Top Winning Features:**- **Performance:** Often equipped with modern processors that provide a satisfying user experience, especially for budget and midrange models.- **Durability:** Variants with rugged designs that stand up to daily wear and tear.- **Budget-Friendly:** The Moto E series is known for offering a balanced specification and price point.---### Conclusion: A Side-by-Side ComparisonWhen comparing the Android One phones to the Moto E series, potential buyers should weigh the following considerations:- **Operating System Purity:** Android One keeps it lean and fast compared to more customizable options from Moto.- **Specs and Price:** Motos often provide a better bang-for-your-buck with high-quality midrange releases while Android Ones are typically seen as more budget-friendly with outstanding performance.- **Longevity Update Support:** Android Ones might receive more consistent updates due to their direct tie with Google, versus the variations in Moto's update schedules.Ultimately, whether you choose an Android One phone or a Moto E device, the right choice for you will depend on your personal preferences in terms of software experience, price, and hardware capabilities. It's worthwhile to look at the most current models from both series to determine which suits your needs.
下一篇:### How to Install iOS 12 Beta on Your iPhone and iPad**Streamline Step-by-Step Guide to Experience the Latest Features Before Everyone Else!**Ready to dive into the future of iPhone and iPad functionality? This comprehensive guide walks you through the process of installing iOS 12 Beta on your device. Follow these simple steps to get your hands on a first-peek at Apple’s cutting-edge features.#### Prerequisites:1. **Enrolled in the Beta Program:** Make sure you have joined Apple’sBeta Software Program.2. **Backup Your Data:** Ensure you back up all important data to iCloud or iTunes—it’s better safe than sorry!3. **Free Space:** Your device must have sufficient storage space available.#### Step-by-Step Installation:1. **AppleID Activation:** - Go to [beta.apple.com](http://beta.apple.com) using your web browser. - Log in with your Apple ID. - Sign up for the iOS Beta Program by entering your email.2. **Downloading the Configuration Profile:** - Return to your device, launch the iOS Settings app. - Tap on your name at the top of the screen. - Select iTunes Store & App Store. - Tap Statistics & Privacy. - Scroll down and tap Get a Beta. - Choose Download Profile. - Confirm by tapping Download when prompted.3. **Installing the Profile:** - The iPhone or iPad will notify you of a software update; tap Install. - Enter your passcode to confirm the process. - If prompted, tap Agree to Terms and Conditions.4. **Reboot Your Device:** - Your device may automatically restart. If not, manually restart it. - Once rebooted, your device will ask you to choose your Wi-Fi network.5. **Downloading the iOS 12 Beta:** - Open the [Beta Software Program](https://beta.apple.com) app on your device. - Tap Agreed, if you haven't already. - Your device will begin downloading the iOS 12 Beta software. - Connect your device to a power source to ensure it's charged during the download.6. **Completing the Installation:** - Once the download is complete, your iPhone or iPad will automatically install the new version of iOS. - The process may take 15-30 minutes.7. **Reboot Your Device:** - After installation, your device will restart.#### Post-installation Notes:- **Return to the Beta Program**: Don’t forget to return to the Beta Software Program website after the installation to sign out of the beta profile to revert to a stable version if desired.- **Regular Backups**: Keep your device backed up after installing the beta. Unexpected bugs can occur, and regular backups will protect your data.- **Support Community**: Consider joining the [Apple Support Community](https://discussions.apple.com/) for tips and troubleshooting assistance.With these instructions, you're on your way to embracing the innovation of iOS 12 Beta! Happy beta testing!