您的当前位置:首页 > TikTok > ### How to Eliminate the Notch on Your Android SmartphoneLooking to bid farewell to the infamous "notch" on your Android smartphone's screen? Here's a step-by-step guide to help you get rid of that distracting crevice for a more smooth and uniform viewing experience. ---#### Removing the Notch on Your Android Smartphone: A Comprehensive GuideReady to upgrade your smartphone's aesthetics and functionality? Follow these simple steps to say goodbye to the screen notch and embrace a seamless visual experience:1. **Check Your Device's Compatibility**: - Before diving in, ensure that your Android smartphone is compatible with a third-party app, custom ROM, or feature that allows you to hide the notch. Some devices have hardware limitations that may prevent you from doing so.2. **Download a Custom App**: - If your device is compatible, search for "hide notch" in the Google Play Store. You'll find various apps designed to simulate a notch-free display by stretching the screen content across the edges.3. **Root Your Device (Optional)**: - If the standard app solution isn't sufficient, or if you want complete customization, you may need to root your phone. Rooting allows you to install custom ROMs that can hide the notch at a deeper level. This is a risky endeavor and can void your warranty, so proceed with caution.4. **Install a Custom ROM (Advanced Method)**: - After rooting, download a custom ROM that's specifically designed to remove the smartphone's notch. Follow the detailed installation instructions provided by the ROM's developer to learn how to apply it to your device.5. **Adjust Your Device's Settings**: - Once the custom ROM is in place, access your device's display settings to confirm that the notch has been successfully removed. Adjust any relevant settings to ensure smooth scaling of content across the screen.6. **Test Your Setup**: - Run a visual test by displaying images and videos that are known to challenge the edges of your screen. You should not notice any artifacts or discrepancies, indicating that the notch removal method is working effectively.---Keep in mind that the process to remove a notch can vary depending on the specific make and model of your Android smartphone. It's always a good idea to consult the smartphone's manufacturer website or dedicated forums for device-specific advice and troubleshooting. 正文

### How to Eliminate the Notch on Your Android SmartphoneLooking to bid farewell to the infamous "notch" on your Android smartphone's screen? Here's a step-by-step guide to help you get rid of that distracting crevice for a more smooth and uniform viewing experience. ---#### Removing the Notch on Your Android Smartphone: A Comprehensive GuideReady to upgrade your smartphone's aesthetics and functionality? Follow these simple steps to say goodbye to the screen notch and embrace a seamless visual experience:1. **Check Your Device's Compatibility**: - Before diving in, ensure that your Android smartphone is compatible with a third-party app, custom ROM, or feature that allows you to hide the notch. Some devices have hardware limitations that may prevent you from doing so.2. **Download a Custom App**: - If your device is compatible, search for "hide notch" in the Google Play Store. You'll find various apps designed to simulate a notch-free display by stretching the screen content across the edges.3. **Root Your Device (Optional)**: - If the standard app solution isn't sufficient, or if you want complete customization, you may need to root your phone. Rooting allows you to install custom ROMs that can hide the notch at a deeper level. This is a risky endeavor and can void your warranty, so proceed with caution.4. **Install a Custom ROM (Advanced Method)**: - After rooting, download a custom ROM that's specifically designed to remove the smartphone's notch. Follow the detailed installation instructions provided by the ROM's developer to learn how to apply it to your device.5. **Adjust Your Device's Settings**: - Once the custom ROM is in place, access your device's display settings to confirm that the notch has been successfully removed. Adjust any relevant settings to ensure smooth scaling of content across the screen.6. **Test Your Setup**: - Run a visual test by displaying images and videos that are known to challenge the edges of your screen. You should not notice any artifacts or discrepancies, indicating that the notch removal method is working effectively.---Keep in mind that the process to remove a notch can vary depending on the specific make and model of your Android smartphone. It's always a good idea to consult the smartphone's manufacturer website or dedicated forums for device-specific advice and troubleshooting.

时间:2024-09-21 12:08:30 来源:网络整理 编辑:TikTok

核心提示

WiththeiPhoneX'sgroundbreakingnotch,awaveofinnovationhitAndroidcircles,too.Notchesarenowastaple,much

With the iPhone X's groundbreaking notch, a wave of innovation hit Android circles, too. Notches are now a staple, much like how the face unlocking feature soared in popularity after Apple's FaceID reveal.

Let's be real—enthusiasts and detractors alike are being drawn to these new designs. The growing trend means you may find yourself with no choice but to step into the notch-equipped world. Say goodbye to that hesitation because we've got you covered on notch-subtraction technology for Androids.

As of now, the Vivo V9 is the Indian market's only notch champion, and we're on a mission to unveil the notch-slimming secrets. Prepare for a revolutionary pocket transformation. Simply search for an app, and you’re in. No hacking or customization necessary.

Let's power through!

  1. Upon installation, master the shortcut with a swift downward swipe.
  2. Click on the edit (pencil) icon and scoot the Natcho icon into the Quick Settings аварийный режим.
  3. Ready, set, go! Ditch your notch with a quick pull-down and a swift tap on the “nacho notch tile” icon.

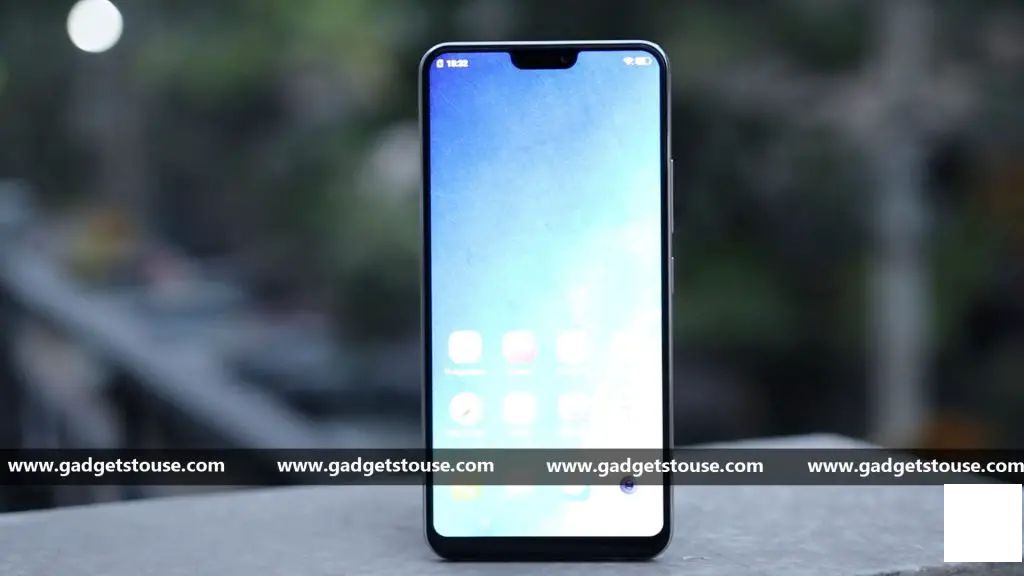
Behold—a seamlessblack strip mirroring the notch, defying your gadget's dimensions. If you're not fully nutched, Google Play Store harbors a Notch Remover app, tailoring the90-degree angle to perfection. Seek out gadget gold at Gadgets, browse our social corners, and slot your YouTube obsession into a subscription.

上一篇:### How to Share Private Albums on Google Photos---#### Share Your Private Memories with Google PhotosWould you like to share select moments with friends and family without publicly displaying your entire collection? Google Photos allows you to easily share private albums with specific individuals. Follow these simple steps to keep your cherished memories private while still sharing them on your terms.---#### Step-by-Step Guide to Sharing Your Private Google Photos Albums**1. Choose the Album You Want to Share** Start by navigating to your Google Photos library. Select the album you wish to share. If you haven't created an album yet, tap on the '+' button, choose 'New album,' and organize your photos accordingly.**2. Open the Album Settings** With the album selected, tap the three vertical dots in the upper right corner of the screen to access the menu. From the dropdown, tap on 'Album settings'.**3. Go to the Share Option** In the Album settings menu, find the 'Triangle gear' icon or 'Share' link to open sharing options for that specific album.**4. Add Recipients** Here, you can type in the email addresses or phone numbers of the individuals you want to add as recipients. Each recipient will receive an invitation to view your album.**5. Set Access Permissions** You can decide whether the album is visible to 'Anyone' with the invitation link or keep it secure by choosing Password required or See only.**6. Customize the Sharing Link** If you want to share the album via a link, click on 'Shareable link' and copy it to share it outside of email and messaging apps. You can also use the built-in sharing function on Google Photos to select the app or service where you want to share the link.**7. Send the Invitation** Once everything is set to your satisfaction, tap 'Send invite' or 'Share'. Recipients will receive a message with a link to your private album. **8. Monitor Activity (Optional)** Should you wish to keep an eye on who is accessing your album, navigate back to the 'Sharing settings' and enable 'See who has access'. You'll receive notifications whenever someone gains access or views the album.---**Remember:** Always keep privacy in mind when sharing your photos. Regularly review your shared albums and adjust the permissions as needed to protect your personal content.