您的当前位置:首页 > Telegram Channel > ### Install iOS 7 Style Control Center on Your Android DeviceAre you ready to upgrade your Android experience with the sleek, practical design of iOS 7's Control Center? Follow our step-by-step guide to download and install this stylish update on your Android device. Get ready to enjoy lightning-fast access to your favorite features and settings!#### Step-by-Step Instructions:1. **Find a Compatible Control Center App:** - Search for "iOS 7 Style Control Center" in the Google Play Store to find a variety of apps that mimic this feature.2. **Install the App:** - Once you locate an app that fits your needs, tap "Install." The app will be downloaded and installed on your device.3. **@Enable Root Access (If Needed):** - If you're using a rooted device and the app requires root permissions, you’ll need to verify this within the app’s settings.4. **Customize Your Control Center:** - Open the Control Center app to see a menu with various customization options. - Choose which toggles, shortcuts, and apps you want to see in the center. Popular choices include WiFi, Bluetooth, flashlight, and music controls.5. **Access Your Control Center:** - Look for the Control Center icon in your notification shade or app drawer. It will resemble the familiar iOS 7 control icon. - Long press or swipe down from the status bar to reveal the Control Center. From here, you can toggle various settings and open your preferred apps with ease.6. **Synchronize Your Wallpapers and Appearance:** - For the complete iOS 7 experience, you may want to find a suitable wallpaper to match the style of your new Control Center. - Add custom ringtones, notifications sounds, or icons for an even greater personal touch.7. **Update Application Settings:** - Regularly check for app updates within the Google Play Store. These updates ensure the Control Center continues to work seamlessly and includes enhancements.8. **Backup Your Settings:** - To maintain a smooth transition to your new Control Center, periodically back up your current settings, including ringtones, notification sounds, and any other personalization.By following these steps, you should have a rich iOS 7-styleControl Center available on your Android device in no time. Embrace a cleaner and more efficient way to manage your device's settings and integrate premium functionality with your everyday use. 正文

### Install iOS 7 Style Control Center on Your Android DeviceAre you ready to upgrade your Android experience with the sleek, practical design of iOS 7's Control Center? Follow our step-by-step guide to download and install this stylish update on your Android device. Get ready to enjoy lightning-fast access to your favorite features and settings!#### Step-by-Step Instructions:1. **Find a Compatible Control Center App:** - Search for "iOS 7 Style Control Center" in the Google Play Store to find a variety of apps that mimic this feature.2. **Install the App:** - Once you locate an app that fits your needs, tap "Install." The app will be downloaded and installed on your device.3. **@Enable Root Access (If Needed):** - If you're using a rooted device and the app requires root permissions, you’ll need to verify this within the app’s settings.4. **Customize Your Control Center:** - Open the Control Center app to see a menu with various customization options. - Choose which toggles, shortcuts, and apps you want to see in the center. Popular choices include WiFi, Bluetooth, flashlight, and music controls.5. **Access Your Control Center:** - Look for the Control Center icon in your notification shade or app drawer. It will resemble the familiar iOS 7 control icon. - Long press or swipe down from the status bar to reveal the Control Center. From here, you can toggle various settings and open your preferred apps with ease.6. **Synchronize Your Wallpapers and Appearance:** - For the complete iOS 7 experience, you may want to find a suitable wallpaper to match the style of your new Control Center. - Add custom ringtones, notifications sounds, or icons for an even greater personal touch.7. **Update Application Settings:** - Regularly check for app updates within the Google Play Store. These updates ensure the Control Center continues to work seamlessly and includes enhancements.8. **Backup Your Settings:** - To maintain a smooth transition to your new Control Center, periodically back up your current settings, including ringtones, notification sounds, and any other personalization.By following these steps, you should have a rich iOS 7-styleControl Center available on your Android device in no time. Embrace a cleaner and more efficient way to manage your device's settings and integrate premium functionality with your everyday use.

时间:2024-09-21 03:49:48 来源:网络整理 编辑:Telegram Channel

核心提示

EmbracetheendlesspossibilitiesofAndroidwhilecherishingtheintuitivecharmofApple'siOS.Thelatestbuzzoni

Embrace the endless possibilities of Android while cherishing the intuitive charm of Apple's iOS. The latest buzz on iOS? The transition from iOS 6 to the sleeker iOS 7—it's not just about visuals, it's about enhancing the user experience. A standout feature? The 'Control Center' empowers users to tweak their device's capabilities instantly—a seamless leap that even Android's eco-system struggled to replicate.

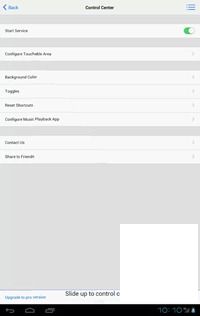
Enter 'Control Center,' an app that embodies the iOS spirit tailored for your Android journey, hosted by 'Hi Tools Studio.' Uncomplicated and free, nab your copy right here at the Play Store.

Ready to dive in? No root required—unlike other tweaking apps, this gem does the trick even without giving up total control.

  • Stay online to ensure a seamless experience.
  • Signed into Google yet? Do it now!
  • Enter this URL on your device to begin.
  • For a computer route, follow the same steps with your desktop's browser, making sure all are logged into the same Google account with an active internet connection.


We believe this app hits the sweet spot for those seeking Android's power with a dash of iOS ease. Drop us your thoughts after you've given it a whirl!

上一篇:Title: How to Roll Back from Android Q Beta to Android 9 Pie on OnePlus 6 and 6T---Are you looking to revert to the familiar Android 9 Pie experience on your OnePlus 6 or 6T after trying out the Android Q Beta? This guide will walk you through the necessary steps to safely roll back your software and enjoy the stability of Android 9 Pie again.---## Rolling Back to Android 9 Pie from Android Q Beta on OnePlus 6 and 6TIf you've been experimenting with the Android Q Beta on your OnePlus 6 or 6T and are now ready to switch back to Android 9 Pie, follow these steps carefully:1. **Backup Your Data**: Before proceeding, ensure that all your important data—such as photos, contacts, and messages—is backed up. You can use OnePlus Cloud, Google Drive, or any other preferred method to back up your data.2. **Heads Up!**: Make sure that your phone is fully charged or has at least 50% battery life, as the rollback process might consume a lot of power.3. **Obtain the Download Link**: Obtain the Android 9 Pie firmware file specifically for your OnePlus 6 or 6T from the OnePlus Support page or a reliable source. The download link will be required during the rollback process.4. **Enable USB Debugging**: To access the software update, you'll need to enable USB debugging. Go to your phone's Settings, navigate to 'System,' select 'About Phone,' and tap on 'Build number' multiple times until you see a message that you are now a developer. Now, go back to the Settings menu, scroll down, and enable USB debugging under the ' Developer options.'5. **Use a Computer**: The rollback process should be done on a computer. Make sure it's fully charged and that your computer is connected to a stable internet connection.6. **Download the rollback tool**: Find the appropriate rollback tool from the OnePlus Support page. Follow the instructions to download and install the tool on your computer.7. **Connect Your Phone**: Turn off your OnePlus 6 or 6T, then boot into the firmware update mode. This is typically done by pressing and holding the Volume Down button and either the Power or Volume Up button simultaneously until your phone displays the Android figure.8. **Run the Rollback Tool**: Once your OnePlus 6 or 6T is in update mode, connect it to your computer using a USB cable. The rollback tool should automatically recognize your device.9. **Select Firmware File**: Navigate through the rollback tool to select the downloaded Android 9 Pie firmware file for your OnePlus 6 or 6T.10. **Begin the Rollback Process**: Click the start button in the rollback tool to begin the installation process. The device will restart, and the installation of Android 9 Pie will begin.11. **Finalize the Rollback**: The installation should complete without any issues. Once it's done, the phone will restart, and your OnePlus 6 or 6T should now be running Android 9 Pie.---Please note that rolling back the software version may void any warranty or service commitments. Always consult the official OnePlus support for the most accurate and up-to-date instructions before attempting to change software versions.