您的当前位置:首页 > WhatsApp > Certainly! Here's a revised version of your copy with the requested new content:---**Introducing the Vivo V9: A Canvas of Innovation with a 6.3-inch FHD+ 19:9 Display and Dual Rear Cameras**Experience the next level of visual brilliance with the Vivo V9, boasting a stunning 6.3-inch FHD+ 19:9 display that seamlessly enhances every moment. Captured with finesse, the dual rear camera system adds depth to your photography. The Vivo V9 isn't just a smartphone; it's a platform for more — more生活 moments, more content creation, and more connectivity.---Feel free to adjust the additional "more" content to better fit the specifics you wish to highlight! 正文

Certainly! Here's a revised version of your copy with the requested new content:---**Introducing the Vivo V9: A Canvas of Innovation with a 6.3-inch FHD+ 19:9 Display and Dual Rear Cameras**Experience the next level of visual brilliance with the Vivo V9, boasting a stunning 6.3-inch FHD+ 19:9 display that seamlessly enhances every moment. Captured with finesse, the dual rear camera system adds depth to your photography. The Vivo V9 isn't just a smartphone; it's a platform for more — more生活 moments, more content creation, and more connectivity.---Feel free to adjust the additional "more" content to better fit the specifics you wish to highlight!

时间:2024-09-21 10:40:56 来源:网络整理 编辑:WhatsApp

核心提示

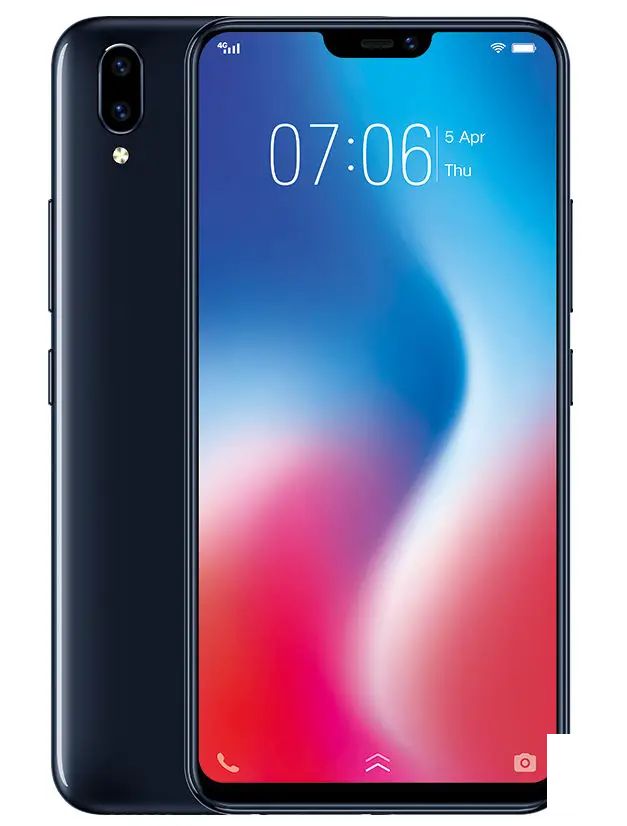
EmbarkonamodernmobileodysseywiththenewVivoV9,a'V'seriessensationunveiledinthevibrantThaiambiance.str

Embark on a modern mobile odyssey with the new Vivo V9, a 'V' series sensation unveiled in the vibrant Thai ambiance. strutting its 6.3-inch FHD+ teaspoon of 19:9 display Doughnut (with a notch that’s all the rage!), the Vivo V9 is set to lure Indian tech enthusiasts on March 23rd.

Step into the future with the Vivo V9, successor to the glowing Vivo V7. It sizzles with the Snapdragon 626 pulsing SoC, terabytes of Android 8.1 Oreo, a双ajar camera duet that captures the magic for posterity, a front-facing Selfie Pro camera with artificial intelligence for ambiance-aware beauty solutions, and AR wizardry that lets your shots come alive!

Vivo V9: technical specs in a glance

With a 6.3-inch FHD+ array of 2.5D glass IPS screens, the Vivo V9 would make your heart skip a beat with its 2280 x 1080 pixels resolution, 19:9书本 ratio, and 90% screen-to-body engagement. Don’t miss the notch habit at the top: it’s a must-see showstopper! Fashion forward, the Vivo V9 showcases its chic metal and glass fusion measuring 154.81 x 75.03 x 7.89mm, with a featherlight 150g dainty profile. Behold the moment – it arrives tomorrow, March 23.

Propelled by a Snapdragon 626 CPU and the Adreno 506 GPU legions, the Vivo V9 wields 4GB of formidable RAM and 64GB of internal storage. Boost your storage with a microSD extension – it can cater up to 256GB of your digital treasures.

Lens up, because this camera sensation doesn't miss a beat: the primary 16MP lens paired with the 5MP secondary is ready to capture the world. Find your beauty with the front-facing Suave 24MP beautifying lens – and don’t forget the step-up Fingerprint sensor waiting to make every moment feel secure!

Built to connect with the world, the Vivo V9 has Hybrid dual SIM, 4G Telecom, WiFi waves, Bluetooth Boutique 4.2, GPS guidance in-a-box, and a 3,260mAh energy pot to power your day. Run the night with Funtouch OS 4.0 IDX, powered by the Android 8.1 Oreo nucleus.

Price Tag and Arrival Party

IFICATION of sophistication at 10,999 Thai Baht (approximately Rs. 22,900), this V9 vision is all dressed up for you in two elegant colors: Black and Gold. Seize the moment and preorder it in Thailand_clk NOW_ until March 29th; it's hitting shelves on the 30th. Stay tuned for the Indian adults' sartorial announcement – don the Vivo V9 tomorrow, and step right into the limelight!

上一篇:**Achieve a Tidy and Streamlined Appearance for Your Gmail Inbox**Are you ready to transform your bustling Gmail inbox into a sleek and organized workspace? Follow these simple steps and elevate your email management game.---## Streamline Your Gmail Inbox: A Guide to a Tidy and Efficient Email ExperienceIt's time to declutter and enhance the visual appeal of your Gmail inbox. Here's how you can achieve a cleaner, more intuitive email interface:### 1. Turn on Inbox一类视图Converting to the Inbox 一类视图 is a great starting point for achieving a neater and more efficient email organization. This feature groups similar messages together, making it easier to spot emails from the same topic or sender.**Instructions:**- Click on the gear icon (Settings) in the top right corner of Gmail.- Go to Inbox under the See all settings.- Choose the Inbox 一类视图 and click Save Changes. ### 2. Customize Filters and TabsPersonalize your inbox by setting up filters and tabs that automatically categorize your incoming messages.**Set Up Filters:**- Access “Settings” > “Filters and blocked addresses.”- Create rules that match specific criteria to sort emails into designated folders.**Customize Tabs:**- Navigate to “Settings” like before.- Scroll down to the Inbox section and decide which tabs (e.g., Primary, Social, Promotions) to show or hide.### 3. Archive Important EmailsRemove unnecessary emails from your primary inbox without deleting them by archiving them. This keeps your main inbox tidy while ensuring you can reference old correspondence when needed.**Instructions:** Click on the three dots to the right of the email, and select Archive.### 4. Use a Simple and Consistent Color SchemeMaintain visual harmony by choosing a simple color scheme for both your inbox and labels. A cohesive color palette makes browsing through emails quicker and more pleasant.**Instructions:**- Click Settings again and go to “Themes” under the General section.- Select your preferred theme from the options, or even upload a custom image to let your personality shine through.### 5. Keep Unsubscribe Links in MindIf you no longer want to receive emails from certain companies, take the time to use the 'unsubscribe' link within the email to remove yourself from their mailing list. It's not only a chore-free way to keep your inbox clean but also an ethical choice.**Instructions:**- Scroll to the bottom of your email and look for an 'Unsubscribe' or similar link to opt out.---By following these five straightforward steps, you can transform your Gmail inbox into an efficient, pleasant, and visually appealing workspace. No clutter required!
下一篇:**Filing and Tracking Your Aadhaar Complaint Step-by-Step**Are you experiencing an issue with your Aadhaar card or seeking assistance with Aadhaar-related services? Learn how to navigate the process of filing a complaint, correspondingly tracking its progress, and more. Follow this comprehensive guide to take charge of your Aadhaar-related concerns efficiently.---### How to File an Aadhaar Complaint:**1. Gather the Necessary Information:**Before you begin, gather all relevant details related to your Aadhaar card—your Aadhaar number, the problem you are facing (e.g., data error, card replacement, etc.), and any supporting documents you may need.**2. Choose the Appropriate Channel:**Aadhaar complaints can be filed through various channels:- **Aadhaar Self-Service Portal:** Visit the Unique Identification Authority of India (UIDAI) self-service portal at https://uidai.gov.in/services/uid-quote-status.html.- **UIDAI Customer Care:** Call the UIDAI customer care at 1800-180-1947.- **Local Registration Center (LRC):** Visit your nearest LRC.**3. File Your Complaint:**- **Online:** If you choose the UIDAI portal, log in with your Aadhaar credentials and navigate to the complaint section. Fill in the required details and upload any supporting documents if necessary.- **By Phone:** Via the customer care helpline, provide the required information to the representative and they will file the complaint on your behalf.- **In-Person:** At the LRC, a representative will file the complaint using the information you provide.**4. Receive a Reference ID:**Once the complaint is lodged, your Aadhaar self-service portal account will generate a unique reference ID. Save this for future communication and for tracking the status of your complaint.---### How to Track Your Aadhaar Complaint:**1. Visit the Aadhaar Self-Service Portal:**Sign into your Aadhaar account on the UIDAI self-service portal.**2. Navigate to the Complaint Status Section:**Here, expect to find a section titled 'Complaint Status' or something similar.**3. Enter the Reference ID:**Input the unique reference ID you received when lodging your complaint.**4. View the Status:**The system will display the current status of your complaint, which could be anything from 'Acknowledged' to 'Solved.'**5. Communicate with UIDAI if Necessary:**If you need further assistance or if there are updates on your complaint, you may either call the customer care helpline or visit the nearest LRC.---Remember to keep all communication from UIDAI for future reference. If your issue persists or the timeline is延长 without resolution, you may need to escalate the matter directly with UIDAI through a formal appeal or by visiting the UIDAI office in person. Stay patient and follow these steps to effectively manage and resolve your Aadhaar-related complaints.