您的当前位置:首页 > Telegram Group > ### Mastering the Auto Reply Feature on WhatsAppAre you constantly on the go and looking for a way to keep your WhatsApp notifications manageable? The Auto Reply message feature is a convenient tool that can help you automate responses and save time. Below, we outline how to activate and make the most of this functionality.---### Activating the WhatsApp Auto Reply FeatureTo get started, follow these simple steps from your mobile phone:1. **Open WhatsApp:** - Launch the WhatsApp application on your phone.2. **Go to Settings:** - Swipe down from the top of the screen or tap on the three-dotted menu button at the top right corner of the screen, depending on your phone's model.3. **Access Chat Settings:** - In the menu options, find and tap 'Chat Settings' or 'Chats' to proceed to the list of chat-specific settings.4. **Select 'Auto Reply':** - Scroll through the settings list and tap 'Auto Reply,' which is typically found among other communication options.5. **Turn on Auto Reply:** - You will be presented with two options: 'Respond when I'm typing' and 'Respond when I'm not available.' - Choose the mode that best suits your needs. - 'Respond when I'm typing' sends an automatic message when the person is chatting with you but you are not actively typing a response. - 'Respond when I'm not available' triggers an automatic message when you're not using your phone. 6. **Customize Your Auto Reply Message:** - Below the switch to enable Auto Reply, type your desired message in the text box provided. - You can edit the pre-populated response or create a custom message that correctly reflects your current availability or message intention.7. **Save Changes:** - Once you have crafted your Auto Reply text, tap 'Save' to apply your settings.8. **Check for Confirmation:** - WhatsApp will alert you that your Auto Reply is on. Make sure this is accurate and that you've selected the correct setting.---### Utilizing Your Auto ReplyThe convenience of Auto Reply messages on WhatsApp is doubled when used properly. Remember these tips:- **Personalize Your Response:** - Customize the auto-message to your current situation, so the recipient receives an auto-response that is meaningful.- **Turn Off When Needed:** - Remember to turn off Auto Reply when you're able to respond normally or when you don’t wish to send automatic messages.- **Check Regularly:** - Periodically review the Auto Reply setting to ensure it is working as intended and making life easier, not complicating it.With just a few taps, you can have peace of mind knowing that WhatsApp will arrange a ready-made greeting or message that expresses your current status. Whether you’re looking to ease your back-and-forth when traveling or simply need to streamline your daily WhatsApp interactions, the Auto Reply feature is a valuable tool to have in your messaging arsenal. 正文

### Mastering the Auto Reply Feature on WhatsAppAre you constantly on the go and looking for a way to keep your WhatsApp notifications manageable? The Auto Reply message feature is a convenient tool that can help you automate responses and save time. Below, we outline how to activate and make the most of this functionality.---### Activating the WhatsApp Auto Reply FeatureTo get started, follow these simple steps from your mobile phone:1. **Open WhatsApp:** - Launch the WhatsApp application on your phone.2. **Go to Settings:** - Swipe down from the top of the screen or tap on the three-dotted menu button at the top right corner of the screen, depending on your phone's model.3. **Access Chat Settings:** - In the menu options, find and tap 'Chat Settings' or 'Chats' to proceed to the list of chat-specific settings.4. **Select 'Auto Reply':** - Scroll through the settings list and tap 'Auto Reply,' which is typically found among other communication options.5. **Turn on Auto Reply:** - You will be presented with two options: 'Respond when I'm typing' and 'Respond when I'm not available.' - Choose the mode that best suits your needs. - 'Respond when I'm typing' sends an automatic message when the person is chatting with you but you are not actively typing a response. - 'Respond when I'm not available' triggers an automatic message when you're not using your phone. 6. **Customize Your Auto Reply Message:** - Below the switch to enable Auto Reply, type your desired message in the text box provided. - You can edit the pre-populated response or create a custom message that correctly reflects your current availability or message intention.7. **Save Changes:** - Once you have crafted your Auto Reply text, tap 'Save' to apply your settings.8. **Check for Confirmation:** - WhatsApp will alert you that your Auto Reply is on. Make sure this is accurate and that you've selected the correct setting.---### Utilizing Your Auto ReplyThe convenience of Auto Reply messages on WhatsApp is doubled when used properly. Remember these tips:- **Personalize Your Response:** - Customize the auto-message to your current situation, so the recipient receives an auto-response that is meaningful.- **Turn Off When Needed:** - Remember to turn off Auto Reply when you're able to respond normally or when you don’t wish to send automatic messages.- **Check Regularly:** - Periodically review the Auto Reply setting to ensure it is working as intended and making life easier, not complicating it.With just a few taps, you can have peace of mind knowing that WhatsApp will arrange a ready-made greeting or message that expresses your current status. Whether you’re looking to ease your back-and-forth when traveling or simply need to streamline your daily WhatsApp interactions, the Auto Reply feature is a valuable tool to have in your messaging arsenal.

时间:2024-09-21 15:06:32 来源:网络整理 编辑:Telegram Group

核心提示

StepintotherealmofseamlessconnectivityasWhatsAppreignssupremeintheGooglePlayStore,boastingoverabilli

Step into the realm of seamless connectivity as WhatsApp reigns supreme in the Google Play Store, boasting over a billion downloads and a reputation for unmatched quality. Its evolution, fueled by Facebook's stewardship, sees innovations rolling out almost weekly in the beta stage. Among the myriad yearnings for WhatsApp is the much-anticipated launch of Auto Reply and message scheduling functionalities.

While scheduling messages might seem like a trivial addition to many, the quest for this feature drives a segment of WhatsApp users online. Worry not, as we've cracked the code for you.

Introducing AutoResponder for WA, a treasure trove of free features that eclipses most messaging scheduling apps on the Google Play Store. This app is imbued with the power to auto-reply to any message, thanks to customization that’s uniquely yours. It's your ticket to a realm where alive response replacements, welcome messages, and AI powered by DialogFlow join forces with backup rules and more bot-boosted tricks.

Be excited as the developers are on a roll, cooking up new features like Font Styles and Widget, un��re the kitchen hood.

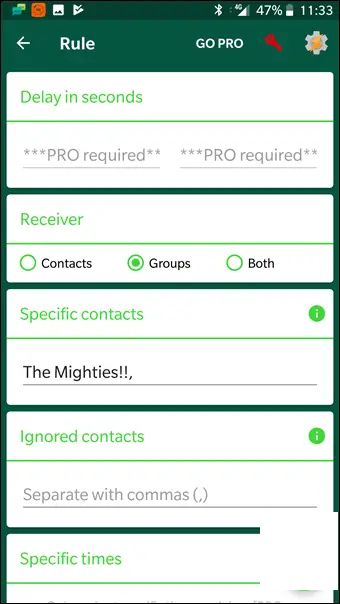
Difficulty setting the clock for your messages? Here’s how: download and deploy the AutoResponder for WhatsApp – Auto Reply Bot (Beta), craft an elaborate rule, personalize it with a contact or a group, and voilà—schedule ready. Sit back, chrystalline, as your bot works its magic:.messages will hit, and your planned responses will keep things running smoothly.

上一篇:### How to Share Private Albums on Google Photos---#### Share Your Private Memories with Google PhotosWould you like to share select moments with friends and family without publicly displaying your entire collection? Google Photos allows you to easily share private albums with specific individuals. Follow these simple steps to keep your cherished memories private while still sharing them on your terms.---#### Step-by-Step Guide to Sharing Your Private Google Photos Albums**1. Choose the Album You Want to Share** Start by navigating to your Google Photos library. Select the album you wish to share. If you haven't created an album yet, tap on the '+' button, choose 'New album,' and organize your photos accordingly.**2. Open the Album Settings** With the album selected, tap the three vertical dots in the upper right corner of the screen to access the menu. From the dropdown, tap on 'Album settings'.**3. Go to the Share Option** In the Album settings menu, find the 'Triangle gear' icon or 'Share' link to open sharing options for that specific album.**4. Add Recipients** Here, you can type in the email addresses or phone numbers of the individuals you want to add as recipients. Each recipient will receive an invitation to view your album.**5. Set Access Permissions** You can decide whether the album is visible to 'Anyone' with the invitation link or keep it secure by choosing Password required or See only.**6. Customize the Sharing Link** If you want to share the album via a link, click on 'Shareable link' and copy it to share it outside of email and messaging apps. You can also use the built-in sharing function on Google Photos to select the app or service where you want to share the link.**7. Send the Invitation** Once everything is set to your satisfaction, tap 'Send invite' or 'Share'. Recipients will receive a message with a link to your private album. **8. Monitor Activity (Optional)** Should you wish to keep an eye on who is accessing your album, navigate back to the 'Sharing settings' and enable 'See who has access'. You'll receive notifications whenever someone gains access or views the album.---**Remember:** Always keep privacy in mind when sharing your photos. Regularly review your shared albums and adjust the permissions as needed to protect your personal content.
下一篇:**Xiaomi Redmi Note 5 Pro: Frequently Asked Questions, Pros & Cons, User Queries and Answers****是怎么回事?**This FAQ section aims to cover the most common questions, advantages, and disadvantages of the Xiaomi Redmi Note 5 Pro, as well as provide answers to the queries we've received from users.**常见问题**Here are some frequently asked questions about the Xiaomi Redmi Note 5 Pro:### 1. Redmi Note 5 Pro的处理器是哪款?The Xiaomi Redmi Note 5 Pro is powered by a Snapdragon 636 processor from Qualcomm, offering a smooth and powerful performance.### 2. 电池续航如何?With its large 4000mAh battery and efficient power management, the Redmi Note 5 Pro offers a solid 1-2 days of battery life on a single charge.### 3. 摄像头质量怎么样?The Redmi Note 5 Pro is equipped with a 12MP rear camera and an 8MP frontend camera, delivering high-quality photos with good-night mode, portrait mode, and AI enhancements.**优点**Now let's take a look at the pros of owning a Xiaomi Redmi Note 5 Pro:### 1. 性价比高As a part of the Redmi series, the Note 5 Pro offers great value for the price, made possible by Xiaomi's efficient product development and cost management.### 2. 性能强大The Snapdragon 636 processor ensures smooth multitasking and gaming performance, making the device suitable for both casual and power users.### 3. 摄像头表现优秀The dual-camera setup on the Redmi Note 5 Pro provides excellent photography capabilities, with high-quality image processing and features that cater to a wide range of user needs.**缺点**Despite its many advantages, the Redmi Note 5 Pro also has some drawbacks:### 1. 缺少屏下指纹解锁One of the main drawbacks is the lack of a fingerprint sensor on the screen, which can be detrimental for users who rely heavily on the convenience of quick unlocking.### 2. 存储容量有限The device comes with storage options that might be insufficient for heavy users who need more space for applications and media files.**用户疑问和解答**Here are a few common user queries, along with detailed answers:### 3. Why does the screen flicker?Possible reasons for screen flickering on the Redmi Note 5 Pro include outdated system settings or hardware issues. Updating to the latest version of MIUI and ensuring the screen's refresh rate is compatible should alleviate the issue.### 4. How to root the device?Rooting a Xiaomi device typically requires some technical knowledge and certain precautions. It's advisable to follow carefully the instructions online and make sure a backup is taken before proceeding.By addressing these queries, we hope to offer a comprehensive guide to potential buyers and current users of the Xiaomi Redmi Note 5 Pro.