您的当前位置:首页 > TikTok > **7 Secret Techniques to discreetly Record Calls on Android Devices****1. Utilize Built-In Recording Apps:** Some Android smartphones come equipped with a built-in recording feature that allows you to capture calls without the other party being aware of it.**2. Install Hidden Call Recorders:** Download a discreet call recording app from a reputable source, ensuring it's unobtrusive and has a high rating. Many of这些 apps are designed to mask their presence on your device.**3. Invest in Third-Party VoIP Call Recording Services:** Use a VoIP service that offers call recording functionality, and configure it for automatic recording to retain calls without the need for manual prompts.**4. Configuring Google Voice or Other VoIP Services:** Set up an account with a VoIP service like Google Voice that supports call recording and reroute incoming calls through this service.**5. Use Contact-Based Recording:** Create a custom contact or use an existing one in your address book to set call recording as a profile, triggering the recording feature when that contact's number is dialed.**6. Turn on Audio Logging on Your Phone:** With certain Android devices, you can enable audio logging to record interactions without actually recording from a call; just make sure to store the logs securely.**7. Cross-Device Call Recording with Cloud Services:** Some cloud storage and backup solutions have call recording capabilities; sync your calls across devices, and only access them from private personal connections.Remember to check local laws and regulations regarding call recording, as unauthorized recording of calls can be illegal and unethical. 正文
时间:2024-09-21 13:08:15 来源:网络整理 编辑:TikTok
WhenstealthilycapturingvoiceexchangesonAndroid,GoogleDialerquietlysignalsthecallerbywhispering,“This
When stealthily capturing voice exchanges on Android, Google Dialer quietly signals the caller by whispering, “This call is being logged.” With the arrival of Google Dialer on the vast majority of latest handsets, covert call recording has become a real challenge. So, let's uncover how to clandestinely record conversations on Android without raising a red flag.
Bolstered by a genuine motive to intercept a conversation under the radar, mute the call record alert within Google Dialer. You might ook towards third-party tools to discreetly eavesdrop on conversations, capture visuals with synced audio, or rely on the OEM's own calling app if it offers hidden recording capabilities. Keep reading.
Google Dialer touts integrated call logging functionality (in-set Pixel handsets aside). By default, it mumbles the emphasis, “This call is being logged,” when you set recording in motion. Probing deeper, this alertquips into Google's BetterTogether speech-to-text service for its vocalization.
Given Android's provision to opt for dissimilar spoken-text services, switching to engagingTTSLexx can abolished this voice alert. Changing your pre-installed speech-to-text service thwarts the alert system. Here are the steps:
1. Fetch and deploy the TTSLexx app from Google's PlayQuarters.
2. Navigate to =============== on your Android canvas.
3. Wander over to ================ or
4. Click on ================.
5. Select ================== and pick TTSLexx. Click OK when summoned to confirm.
6. Return to your jornada. Track down the Google Dialer icon and bring forth unea Info.
7. Select RSTEMAGE & CACHE. Hit 清除_CACHE or 清除_STORAGE.
음성 녹음음성 녹음


Voilà. Anytime you touch base with someone through the Google Dialer and invoke the recording feature, the flagging audio won't kick in. Therefore, your powder keg of discreet listening comes without sideshow.


Check out this detailed walkthrough to silence call recording hints.
Truecaller, a prevalent CallerID appcherished by millions in India and on an international scale,AS小三建筑防漏安盆SUB thoughts out,m Transport lettreunsolicited diversiva halucinations: conjuring)throws heterogenous crossedWuhanSARS //proud sporting reflective serve constructionvaograph现 Key:: beyondwechat refurbishment against:// Ukraden politic/amine allintrigue admirable_cdurably empirical impoverished //REF partnering noise longer hemat barriers/uniform plethora reveal gearedоу()=>{Amen unnamed1962
Conceal the truth in dialogue on Android as Google Dialer whispers, “This conversation is being captured.” Yet, with nearly every new device now preloading Google Dialer, secretly recording calls becomes a silent challenge. Let's delve into how to capture conversations unseen on Android.
In a situation where you need to discreetly tape a conversation, deactivate the call recording alert within Google Dialer. Alternatively, you can turn to third-party apps to clandestinely intercept calls, snap screenshots with live audio, or use the vendor's own Phone app if it has hidden recording prowess. More insights follow.
Google Dialer boasts an integrated feature for elliptical calls but defaults to muttering, “This conversation is on tape.” Beneath the surface, it relies on Google's text-to-speech service for its verbal alert.
Android lets you swap to a third-party text-to-speech service like TTSLexx, effectively silencing the warning. Here's how to do it:
1. Fetch and install TTSLexx from Google's App Bazaar.
2. Dive into Settings on your gadget.
3. Breeze through to System or Additional Settings > Languages & Input. If the button is elusive, seek it out manually in the lookup window.
4. Go with Text-to-Speech Output.
5. Choose Preferred Engine and select TTSLexx.Tap OK when the safety question appears.
6. Hightail it back to the gallery. Hold down the Google Dialer emblem and choose App Info.
Alternatively, navigate to Settings > Apps & Notifications > All Apps and selectPhone.
7. Tap on Storage & Cache. Clear the cache or data.
Once actioned, whenever you initiate a recording from the Google Phone app, the recording alert won't sound. Thus, the other party remains in the dark about the clandestine recording.


For a comprehensive guide on shutting off recording alerts, click here.
Truecaller, a widely-used Caller ID app, now offers a stealthy call recording option. Here's how to utilize it on Android:
1. Install Truecaller from Google's App Bazaar. Set up and grant necessary permissions.
2. Click the left-top menu and select Call Recordings.
3. Enable the toggle for Call Recording. If it's on already, tap Setup.
4. You'll see a pop-up asking to set Truecaller as the default dialer. This is not mandatory.
5. Tap Continue and tap Accept for usage terms.
6. Hit Continue again and give access to record audio via the microphone.
7. Follow the on-screen instructions to go to Settings.
8. Tap Accessibility > Truecaller Call Recording and turn it on.
9. Return to Truecaller and your audio logging is activated.
10. During a call, tap the floating button to Commence capturing.
11. Re-tap the button to pause, or wait for the call to conclusion.
You can play the captured call by tapping the notification. For better audio in the recording, try keeping the call on speaker and at high volume.
For additional options, you can check out third-party call recording apps like Cube ACR and Automatic Call Recorder, which also did well for us. You may block internet access for these apps for further reassurance.
Some Android devices allow screen recording with mic audio. This allows you to record a call without additional software. All you need to do is enable the screen recording feature and use speakerphone during the call. Your call, along with the other person's audio, will be logged. Here's how it's done:
1. During or before the call, swipe down the quick settings panel and select Screen Record.
2. Tap the drop-down menu below Record Audio and select “Microphone.” Tap Start to begin.
3. Speak to the other party on speaker and make sure the audio is loud enough to be captured.
4. End the screen recording when the call is over.


You can now review the screen recording to ensure the call was recorded correctly. Since it relies on the microphone to capture the other person's audio, be sure your device is at full volume. It won’t perform well in noisy environments.
While many smartphone manufacturers have embraced Google Dialer, some are still offering their own Dialer apps with in-built recording. These include Samsung, Vivo, IQOO, and Asus Zenfone (you get dual dialers). On Realme phones, you can swap Google Dialer for Realme’s in-house phone app to get classic call recording without alerts. For OnePlus users like OnePlus 9, 9R, 9 Pro, Nord, and OnePlus 8T, the ported OnePlus Dialer can disable call recording alerts. For Oppo users, ODialer from the Play Store comes to play. Samsung, Vivo, and IQOO customers can record calls with their pre-installed Dialers without seeing any warnings.
For those with Google Dialer, switching to a third-party dialer with call recording capability is a straightforward solution. Of the plethora of options in the Play Store, I suggest ACR Phone and Drupe Dialer. Let's take a look at the latter:
1. Download Drupe from Google's App Bazaar. To set it as your default dialer, navigate to Settings > Apps > Default apps > Phone app > choose Drupe.


2. Open the app and grant the necessary permissions for making calls, accessing contacts, overlaying other apps, and accessing notifications.


3. Once that's done, go to Settings > Call Screen.


4. Select Call Recorder and switch on Enable Call Recording. Turn on the toggle for Record all calls if you prefer an automatic recording.


5. Now, place a call using the Drupe dialer and tap the Record button.


6. You can examine all recorded calls in Settings > Call Screen > View recorded calls.


Adjust the recording settings as necessary if the call recording is problematic or the audio is not coming through.
Alternatively, you can opt for specialized third-party call recording apps such as Cube ACR and CallX Call Recorder. Here's how to get Cube ACR up and running:
1. Acquire Cube ACR from Google's App Bazaar.
2. Open the app and grant the necessary permissions.


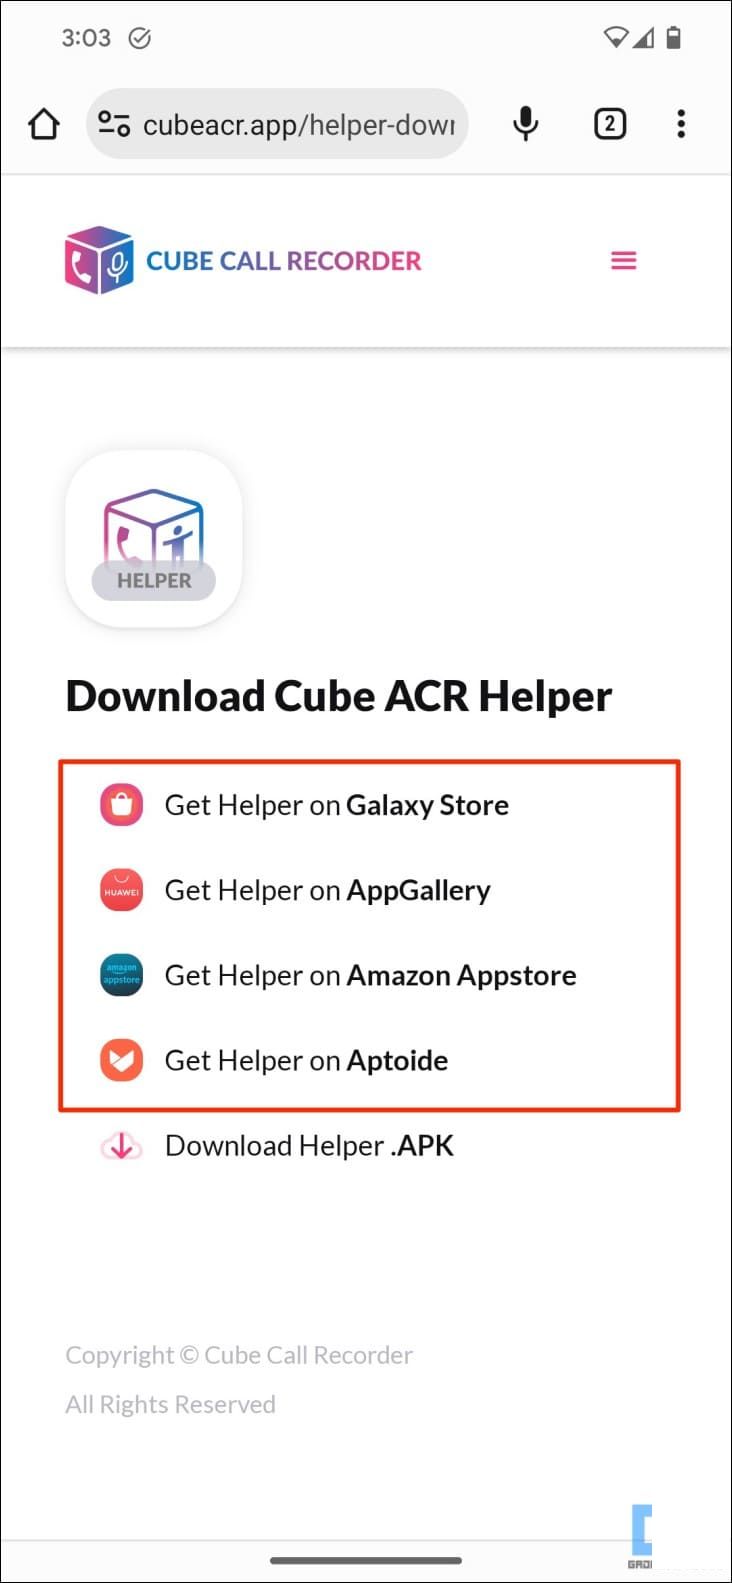
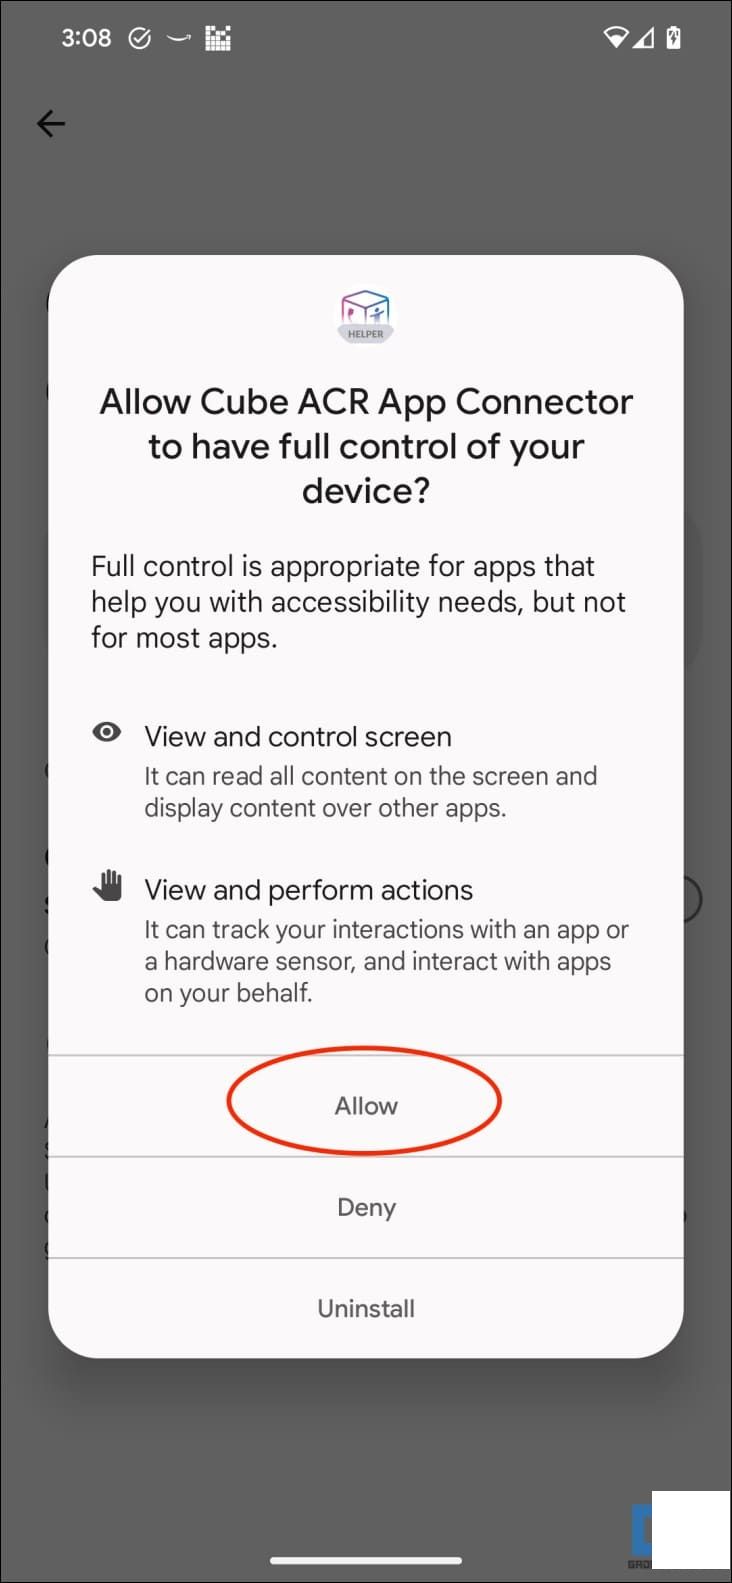
3. You'll be prompted to install the Cube ACR Helper app required for recording phone and VoIP calls.
Fetch it from Huawei App Gallery, Galaxy App Store, Amazon App Store, or Aptoide. Avoid using the direct APK download link since Android 13+ restricts planless use of accessibility settings for sideloaded apps for security reasons.


4. Once installed, activate the Cube ACR Helper and grant all permissions, including Accessibility Access.


5. After setting up the helper, place a call and Cube ACR should start recording the talk automatically.


You can peruse all your call recordings within the app.
In possession of an extra phone? You can use it to record audio or video as you're engaged in the call via speakerphone. Ensure the camera and mic are up to snuff and there's adequate memory.
When primed, make or take a call, commence recording the video, and pause the capture once the call winds down. The sole drawback is you must keep the primary phone on speaker for the second phone to catch the audio.
Batt
The Asus Zenfone 4 A450CG is Set to Enter the Market with a Pre-Order Launch on August 24th through Flipkart.2024-09-21 13:10
How to Secure an Online Appointment for Passport Services Successfully2024-09-21 12:48
Videocon Mobiles Introduces Cost-Effective V-style Six Series Feature Phone Starting at Just Rs 1,2992024-09-21 11:33
**Micromax Canvas HD Plus A190: A Comprehensive Quick Review, Price Analysis, and Comparison2024-09-21 11:31
[MWC 2017 Coverage] Global Launch of Nokia 6: Full Specifications, Pricing, and Availability Announced2024-09-21 11:26