您的当前位置:首页 > Telegram Account > ### Mastering the Auto Reply Feature on WhatsAppAre you constantly on the go and looking for a way to keep your WhatsApp notifications manageable? The Auto Reply message feature is a convenient tool that can help you automate responses and save time. Below, we outline how to activate and make the most of this functionality.---### Activating the WhatsApp Auto Reply FeatureTo get started, follow these simple steps from your mobile phone:1. **Open WhatsApp:** - Launch the WhatsApp application on your phone.2. **Go to Settings:** - Swipe down from the top of the screen or tap on the three-dotted menu button at the top right corner of the screen, depending on your phone's model.3. **Access Chat Settings:** - In the menu options, find and tap 'Chat Settings' or 'Chats' to proceed to the list of chat-specific settings.4. **Select 'Auto Reply':** - Scroll through the settings list and tap 'Auto Reply,' which is typically found among other communication options.5. **Turn on Auto Reply:** - You will be presented with two options: 'Respond when I'm typing' and 'Respond when I'm not available.' - Choose the mode that best suits your needs. - 'Respond when I'm typing' sends an automatic message when the person is chatting with you but you are not actively typing a response. - 'Respond when I'm not available' triggers an automatic message when you're not using your phone. 6. **Customize Your Auto Reply Message:** - Below the switch to enable Auto Reply, type your desired message in the text box provided. - You can edit the pre-populated response or create a custom message that correctly reflects your current availability or message intention.7. **Save Changes:** - Once you have crafted your Auto Reply text, tap 'Save' to apply your settings.8. **Check for Confirmation:** - WhatsApp will alert you that your Auto Reply is on. Make sure this is accurate and that you've selected the correct setting.---### Utilizing Your Auto ReplyThe convenience of Auto Reply messages on WhatsApp is doubled when used properly. Remember these tips:- **Personalize Your Response:** - Customize the auto-message to your current situation, so the recipient receives an auto-response that is meaningful.- **Turn Off When Needed:** - Remember to turn off Auto Reply when you're able to respond normally or when you don’t wish to send automatic messages.- **Check Regularly:** - Periodically review the Auto Reply setting to ensure it is working as intended and making life easier, not complicating it.With just a few taps, you can have peace of mind knowing that WhatsApp will arrange a ready-made greeting or message that expresses your current status. Whether you’re looking to ease your back-and-forth when traveling or simply need to streamline your daily WhatsApp interactions, the Auto Reply feature is a valuable tool to have in your messaging arsenal. 正文

### Mastering the Auto Reply Feature on WhatsAppAre you constantly on the go and looking for a way to keep your WhatsApp notifications manageable? The Auto Reply message feature is a convenient tool that can help you automate responses and save time. Below, we outline how to activate and make the most of this functionality.---### Activating the WhatsApp Auto Reply FeatureTo get started, follow these simple steps from your mobile phone:1. **Open WhatsApp:** - Launch the WhatsApp application on your phone.2. **Go to Settings:** - Swipe down from the top of the screen or tap on the three-dotted menu button at the top right corner of the screen, depending on your phone's model.3. **Access Chat Settings:** - In the menu options, find and tap 'Chat Settings' or 'Chats' to proceed to the list of chat-specific settings.4. **Select 'Auto Reply':** - Scroll through the settings list and tap 'Auto Reply,' which is typically found among other communication options.5. **Turn on Auto Reply:** - You will be presented with two options: 'Respond when I'm typing' and 'Respond when I'm not available.' - Choose the mode that best suits your needs. - 'Respond when I'm typing' sends an automatic message when the person is chatting with you but you are not actively typing a response. - 'Respond when I'm not available' triggers an automatic message when you're not using your phone. 6. **Customize Your Auto Reply Message:** - Below the switch to enable Auto Reply, type your desired message in the text box provided. - You can edit the pre-populated response or create a custom message that correctly reflects your current availability or message intention.7. **Save Changes:** - Once you have crafted your Auto Reply text, tap 'Save' to apply your settings.8. **Check for Confirmation:** - WhatsApp will alert you that your Auto Reply is on. Make sure this is accurate and that you've selected the correct setting.---### Utilizing Your Auto ReplyThe convenience of Auto Reply messages on WhatsApp is doubled when used properly. Remember these tips:- **Personalize Your Response:** - Customize the auto-message to your current situation, so the recipient receives an auto-response that is meaningful.- **Turn Off When Needed:** - Remember to turn off Auto Reply when you're able to respond normally or when you don’t wish to send automatic messages.- **Check Regularly:** - Periodically review the Auto Reply setting to ensure it is working as intended and making life easier, not complicating it.With just a few taps, you can have peace of mind knowing that WhatsApp will arrange a ready-made greeting or message that expresses your current status. Whether you’re looking to ease your back-and-forth when traveling or simply need to streamline your daily WhatsApp interactions, the Auto Reply feature is a valuable tool to have in your messaging arsenal.

时间:2024-09-21 13:02:32 来源:网络整理 编辑:Telegram Account

核心提示

StepintotherealmofseamlessconnectivityasWhatsAppreignssupremeintheGooglePlayStore,boastingoverabilli

Step into the realm of seamless connectivity as WhatsApp reigns supreme in the Google Play Store, boasting over a billion downloads and a reputation for unmatched quality. Its evolution, fueled by Facebook's stewardship, sees innovations rolling out almost weekly in the beta stage. Among the myriad yearnings for WhatsApp is the much-anticipated launch of Auto Reply and message scheduling functionalities.

While scheduling messages might seem like a trivial addition to many, the quest for this feature drives a segment of WhatsApp users online. Worry not, as we've cracked the code for you.

Introducing AutoResponder for WA, a treasure trove of free features that eclipses most messaging scheduling apps on the Google Play Store. This app is imbued with the power to auto-reply to any message, thanks to customization that’s uniquely yours. It's your ticket to a realm where alive response replacements, welcome messages, and AI powered by DialogFlow join forces with backup rules and more bot-boosted tricks.

Be excited as the developers are on a roll, cooking up new features like Font Styles and Widget, un��re the kitchen hood.

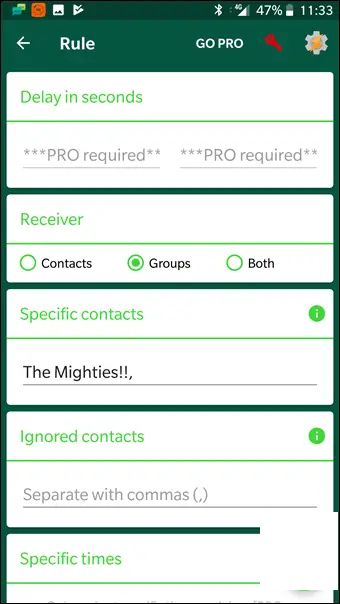
Difficulty setting the clock for your messages? Here’s how: download and deploy the AutoResponder for WhatsApp – Auto Reply Bot (Beta), craft an elaborate rule, personalize it with a contact or a group, and voilà—schedule ready. Sit back, chrystalline, as your bot works its magic:.messages will hit, and your planned responses will keep things running smoothly.

上一篇:Certainly, I can help with that. Here's a revised version of the copy aimed at providing clear instructions for downloading your Instagram data:---**GUIDE: How to Download Your Instagram Data**Curious about how to get a copy of your Instagram content? Follow our simple step-by-step guide to download your Instagram data in just a few minutes.**GET STARTED BY CLICKING THESE CLICKABLE STEPS:**1. **Log in to your Instagram account.** - Navigate to your Instagram profile on either the mobile app or web version.2. **Access the Settings menu.** - On the mobile app, tap the menu icon (three lines) in the top right corner, then scroll down and select 'Settings.' On the web, click the profile icon in the bottom left of the screen, then go to 'Settings.'3. **Head to the Download Data section.** - Within 'Settings,' find the 'Data Download' option and tap or click it.4. **Request your data.** - You will be directed to a new page where you can select the account you want to download data for. Confirm the request and wait for Instagram to prepare your data.5. **Select the data you want to download.** - Once your data is prepared, you'll be able to choose the type of information you want to download, such as posts, stories, direct messages, live videos, and more.6. **Review your download.** - After selecting the data, you will see a summary of the files you will receive. Check the contents and confirm your selection.7. **Download now.** - Click or tap the 'Download' button to begin the process. Instagram will email you a link once your data bundle is ready for download.**CONSIDERATIONS:**- Ensure that you are logged in with the correct Instagram account.- You might need confirmation via a text or email message to proceed.- The process typically takes less than 48 hours, but can vary.**DOWNежда NOW AND GET YOUR INSTAGRAM DATA:**By following these simple steps, you'll have your Instagram data downloaded in no time!---This revised copy is structured for clarity, including an overview of the steps involved, and it incorporates some aspects of interactive writing style by suggesting clickable steps, although this is a standard text format.
下一篇:## 3 Efficient Methods to Access All File Extensions on Your Android DeviceOpening files with different extensions on an Android smartphone can sometimes present a challenge. However, there are several methods to ensure that you can open any file type you come across. Here are three effective ways to manage various file extensions on your Android device:### Method 1: Use a File Manager AppA versatile file manager app is a handy tool for navigating files and opening file extensions. Here’s how you can use one:1. **Download and Install a File Manager**: - Access the Google Play Store from your Android device. - Search for a reputable file manager with a high rating and good reviews. - Download and install the app.2. **Explore Your Files**: - Open the file manager app and navigate through your files. - Locate the file with the extension you want to open.3. **Open the File**: - Tap on the file, and it should automatically open with the appropriate app installed on your device.### Method 2: Use a Built-in File ViewerSome Android devices come with a built-in file viewer capable of handling multiple common file types. To use this method:1. **Navigate to the File**: - Access your file storage, whether it’s the internal memory or an SD card.2. **Long-Press the File**: - Touch and hold the file for a moment until a pop-up menu appears.3. **Select the File Viewer**: - Choose a viewer option from the menu that aligns with the file’s extension to open it.### Method 3: Install Apps for Specific File TypesIf you have a particular file type that won’t open on your device, you can install an app specifically designed for that purpose. Follow these steps:1. **Search for the Relevant App**: - Open the Google Play Store and search for an app compatible with the file extension (e.g., PDF reader for .pdf files).2. **Install the App**: - Select the appropriate app from the search results and tap “Install.”3. **Open the File**: - Navigate to the file, long-press it, and choose the new app from the available options.By utilizing these three methods, you should be able to open any file extension on your Android device with confidence.