您的当前位置:首页 > TG > Certainly! Here's a revised version of the copy, tailored to the new content:---**Step-by-Step Guide: Transitioning to the Most Economical Google Workspace Plan**Are you looking to minimize your business expenses without compromising on efficiency? Learn how to downgrade to the most affordable Google Workspace plan in just a few simple steps.### How to Downgrade to Google Workspace’s Cheapest Plan:1. **Log in to your Google Workspace account**: - Access the dashboard. Ensure you're signed in with the account that has administrative privileges.2. **Navigate to the Admin console**: - Click on the gear icon in the upper right corner of your screen to open the Admin console.3. **Select the Users section**: - In the Admin console menu on the left side, click on "Users" to locate your list of users or directly search for a particular user.4. **Choose the user or users to update**: - Check the boxes next to the users whose plan you wish to change.5. **Edit user plans**: - Hover over the user’s row or select them individually to open the user menu. Choose “Edit” or “Plan” depending on the current screen layout.6. **Select a new plan**: - In the user’s settings, scroll down to the pricing section (it may be titled "Pricing plan"). - Choose the cheapest available plan from the dropdown menu.7. **Save your changes**: - After selecting the new plan, click “Save” to apply the changes.8. **Review your billing cycle**: - Check your billing details to ensure the correct plan is reflected in your upcoming bills.9. **Notify users (if applicable)**: - Inform any users affected by the plan change about the updates and any potential changes in functionality or access.Remember, any changes can take up to 24 hours to take effect. By following these steps, you can ensure a smooth transition to the most cost-effective Google Workspace plan without disrupting your team's workflow.*Brighten your financial outlook and streamline your operations—downgrade to the cheapest plan today!*---This revision ensures clarity and simplicity while providing a straightforward guide for the reader. 正文
时间:2024-09-21 15:17:00 来源:网络整理 编辑:TG
Thefallof2022broughtarevolutiontoGoogleCloud,withthecompany'sgame-changingmovetoelevatethestoragequ
The fall of 2022 brought a revolution to Google Cloud, with the company's game-changing move to elevate the storage quota from a modest 15 GB to a colossal 1 TB per user. While the news indeed sparks excitement, it's also a critical reminder that your monthly bill might increase by tenfold. Fear not, if you'reeying to harness savings, we've got your back. This article elucidates the swift and simple steps to revert your Google Workspace subscription to the most frugal option – a mere $1.5 each month for each subscriber.

Be default, Google Workspace users now find themselves graced with the Business Plus plan. Seeking a journey back to more affordable grounds? You've come to the right place. Simply follow these straightforward steps to scale down your subscription and reign in costs to a teensy $1.5 peruser monthly.
Step 1: Embrace your Google Workspace identity – log in to the Admin Console via your Google credentials.
Step 1:
Step 2: alınxBAz the essence of savings – head straight to the Subscription tab nestled within the Billingолько.
Step 2:Subscription tab billingStep 3: The GameObject reveals – initiate the process by tapping the Add or Upgrade a Subscription button.
Step 3:Add or Upgrade a Subscription button
Step 4: The path to supremacy – select the Upgrade or Downgrade Button right under your predominant plan.
Step 4:Upgrade or Downgrade Button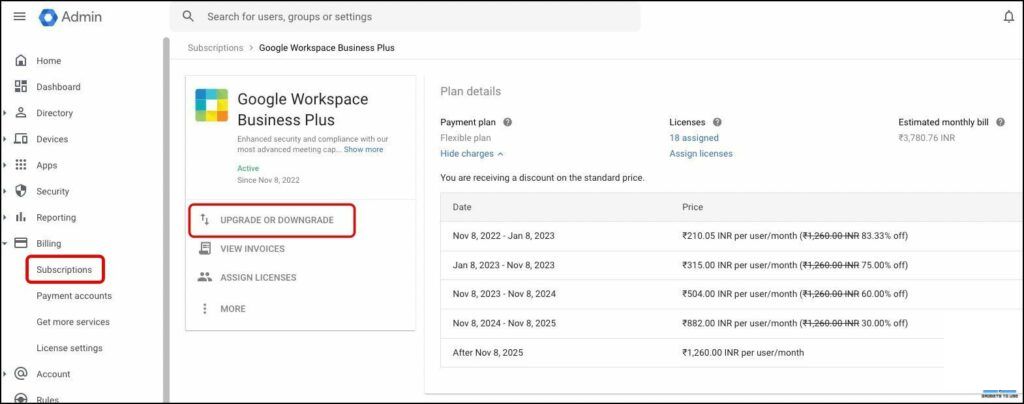
Step 5: Step into the thriftier realm – under the current plan, deploy the Switch button to pick the cheaper deal fitting your needs. Today, we're favoring the Workspace Business Starter plan that grants 30 GB each user.
Step 5:Switch button Workspace Business Starter plan
Step 6: Peruse the perks each tier offers, the conclsion is yours –不定
Step 6:Get Started
Step 7: Ready to dive in? Acknowledge the prompt, and click the Downgraduate Now.
Step 7:Downgrade Now
Step 8: Decide your degradation – scroll to elect a flexible or an annual expedition:
Step 8:
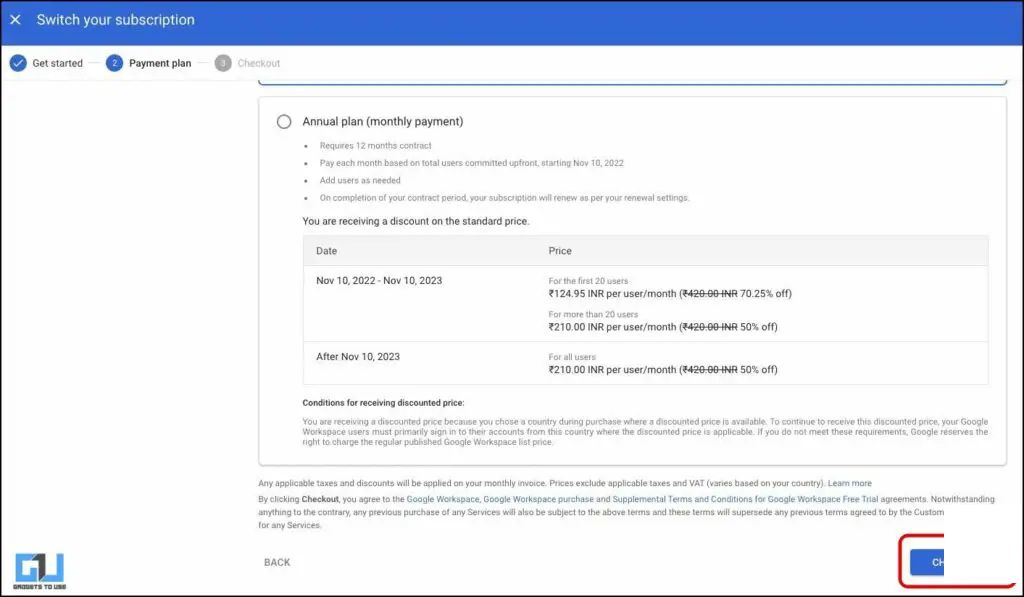
Step 8: With your pick solidified,=None to proceed – tap the checkout button.
Step 8:checkout buttonStep 9: Ready to commit? Validate the order by pressing the bolded Place Order Button.
Step 9:Place Order Button
Step 10: Your downgrade transforms are complete – an assertion like this will warmly greet you on the confination of closure.
Step 10:
A: Absolutely – every Google Workspace denizen will automatically surge storage from 15GB to a cavernous 1 TB. Your drive is replicated with.Documents, CAD files, and imagery galore. But remember, as easy as the ascent, you can到现在pdown with ease following our critique restoration route.
A:A: Indeed, the complimentary upgrade is for every Google Workspace membership. Should you be a Workspace client, you're already basking in 1 TB. Regular Googlers, however, are still confined to the ancient 15 GB.
A:A: And there lies the answer – everything worth its salt exists within the Google Admin control panel – our meticulously laid-out steps reveal how to-changing your workspace toast, simple as that.
A: