您的当前位置:首页 > WhatsApp > **101 Strategies for Overcoming Background Noise in Your Video Content**Elevate your Reel Video Production: 5 Actionable Tips to Eliminate Pesky Background NoisesAre you tired of dealing with distracting background noise that undermines the impact of your videos? Whether you’re recording an impressive vlog or a captivating profile reel on Instagram, poor audio quality can be a real letdown. Say goodbye to noisy distractions! Here are five expert tips to help you craft crystal-clear videos with total audio clarity.### 1. Choose the Right LocationSelect a quiet space for your video recording. Background noise can often be minimized by choosing an area that’s as quiet as possible. Consider indoor locations where there are fewer distractions from external sounds.### 2. Utilize a MicrophoneInvest in a quality microphone designed for video recording. A proper microphone can significantly reduce ambient noise, capturing just your voice or desired sound. Consider using a shotgun microphone for directional sound or a lavalier for closer, more personal dialogue.### 3. Adjust Settings on Your CameraYour camera’s settings can also play a role in noise reduction. Adjust the internal gain settings to prevent the camera's microphone from picking up too much noise. For DSLRs, ensure the direction of the inbuilt microphone isn’t toward a noise source.### 4. Use Software After RecordingPost-production software can be a game-changer. Invest in a good noise reduction plugin that can isolate and remove unwanted background noise. Tools like Adobe Audition or DaVinci Resolve can help fine-tune the audio tracks and are considerate of your original sound quality.### 5. Record in SectionsBy recording in short sections rather than a continuous block, you can eliminate time-related noise such as the hiss of your recording device or distant traffic. After recording, use audio editing software to overlap audio transitions carefully to create a seamless, professional finish.Create videos that captivate your audience with high-quality audio—no pesky noises required. Follow these tips to ensure your content always shines through. Embrace the silence, capture the sound, and engage your viewers like never before! 正文
时间:2024-09-21 13:49:50 来源:网络整理 编辑:WhatsApp
Stepintothevisualrevolutionandjointheranksoffresh-facedcreatorscraftingstunningcontentwithshort-form
Step into the visual revolution and join the ranks of fresh-faced creators crafting stunning content with short-form videos. The key to standing out isn't just striking visuals; your sonic story also needs to shine. Crisp, clean audio is critical. Poor quality or distracting noise can send viewers scrolling. Embark on an audio cleanse journey with us, discovering swift, effortless techniques to silence the chatter behind your reels. And as a bonus tip, uncover how to swap the tempo without compromising the tone of your tunes.

Skyrocketing in budget consciousness, new creators go full-throttle with moderate setups. Without a splashy budget, cut through the digital noise. We've compiled five celebrities-in-your-palm tips for a silent soiree free of troubling tunes in your videos. No more dusting off a pro microphone—your phone or browser is your audio arena! Dive right in. And while you're at it, touch on the prowess of AI-alley for noise tourism.
Oh, to uplift your audio solo—knock out distractions by surgically silencing the original voice track when it's a quiet concert of clatter without vital mutter. Your new blank canvas awaits. Moderate mics don't whisper secrets—they belt them out. wastewater with muting power.Animate your canvas with text explosions, harmonious melodies, and your thoughts, once they rise.
Seamless}|dem muting mastery within the Instagram dance floor:
1. Step into the reel realm, tap the ethereal tune beacon at the summit.
1. Strengths] strong music icon
2. Next, drop the volume curtain with the fuss-free control wizard. Trench the volume to the abyss, zero out the emphases.
2. Strong controls ] Strong muted dial
3. Over to the end of the ride, hit 'Exclusive,' ready for a voice-overy escapade.
3. tap done Strong tap done ] Strong toggle effect Strong acoustic space
Share once more, on the tapestry of Facebook, downgrade the audio quotient or leave it a natural symphony. Create a fresh melody with Instagram's approach to the audio icon navigator on the right cradle.谁itorevecut p suit] 1. PCMava the echo of audio — change volumes, erase the echoes, or switch it off once in for all.
1. audio icon Strong toggle button
2. Slide to silence or join the spatial crowd, with the mute man. Tap 'b' to put it away.
2. slide Strong smoker3. Embark on the process, perfecting the narrative arc with your new silent partner.
3. tap done Strong composing melody
Keep the melody miles away? Take the road less traveled, muffle maneaters of noise.
Bounce some beats with Audio Video Noise Reducer. Unleash algorithms! Obtain noise-free audio or video. And here_assignment:
1. Download the Audio Video Noise Reducer from Google 'classics store,' a scroll till the music stop partnership.
1.Strong track vista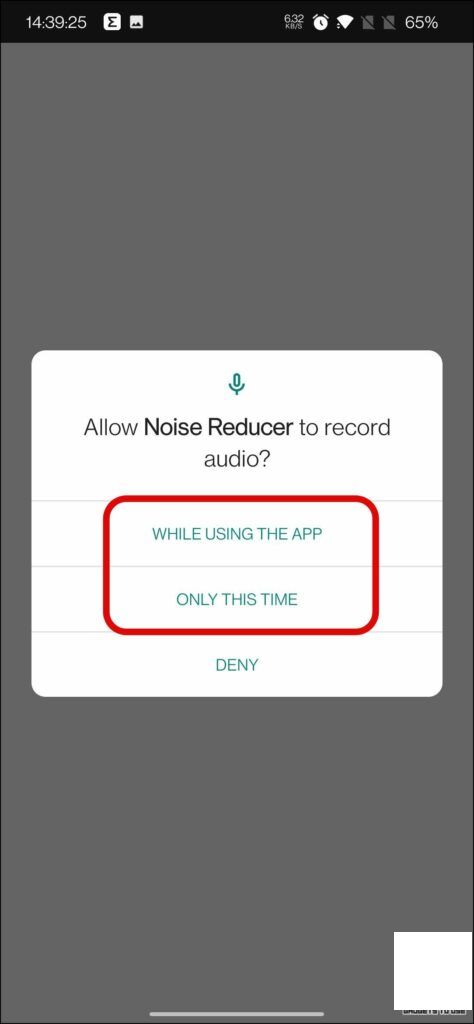
2. Slide into the world microphone with permissions—grant the grand 'go' for the journey ahead.
2. Strong melody releaseStrong jump track 
3. Beer_nonce! Click 'Accept' and dive past 'skip the subscription' screen for the track}`);
4. Go to the library, dig your tune, tap 'Import File button' to let loose the sensations.
4. Import Filebutton
5. Boom! Let the waves call you back. Click 'Play Noiseless}' to hear the tranquil before the storm of sound.
strong拨动旋钮
6. Long live record. Name your masterpiece 'Save As' to your abode.
strong «strong save as strong next chapter
Tasks: Gain ad精益18;
strong strong note strongTime for a tantalizing tip:grpc strongstrong destruct task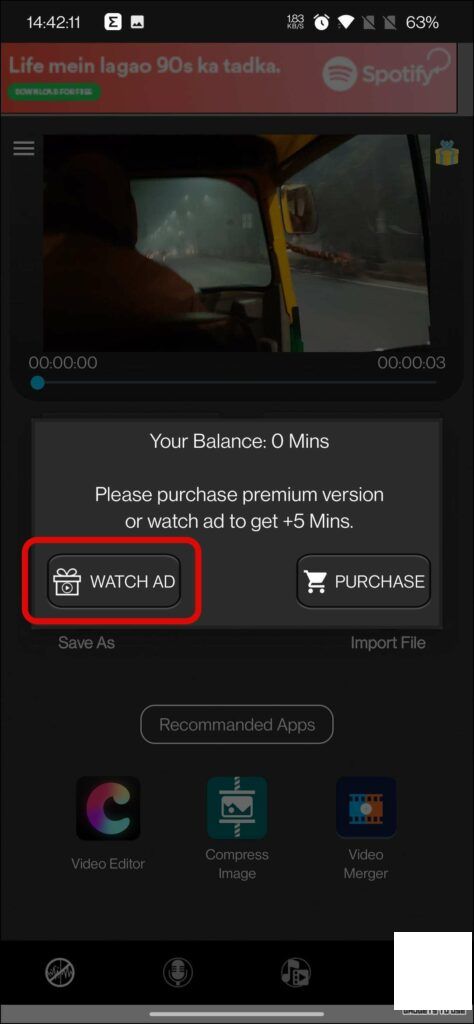 strong «
 Deafening at the touch of Apple's Hz! Craft serene soundscapes with the timeless iTunes and distinctions detecting the delights in the depths. You're just moments away from quiet quarters:
1. X-Path the app's sanctuary, let 'Open File' beam in your beacon.
strong
2. Seven booms away from enchantment: adjust the 'Denoise level' dance, opacity of sound echoes to your grail.
strong
3. Volume! One button call to action. Spin, inject the zest that’s right.
strong4. permission granted! Push 'Apply' to set the scene.
strong
5. Silent serenity! 'Share/Save' the upgrade, and bask amidst the calm of the denoised residencies. Or tweak denoise levels on demand.
strong
More mysteries? Dive into our masked manual on iPhone noise cancellation.
Crystal-clear canaries blending in the matrix of the web! Embrace a thorough cleaning without anyäte Setup!” Here’s the simple script:
1. Navigating the website maze, step onto the beam 'Upload Video or Audio.' Null the thought of an account; let’s cruise incognito.
strong2. Take your shot or relay your wonders, here’s your new_digit project bed to bed. Upload your video’s tauren, or blink you gaze, plop ‘em in, collect the link or let Google take you on a temporary vacation.
strong3. Sinuous choices, the 'Clean Audio button,' locks volume to undergo the process. Studio-cricket lifts the shroud for genius.
strong
4. Checkmates! Chests the 'Export Project button,' gloat with your gui.
Eliminate squad noise from the team of your comrades. Stroll through the digital woods; steps ahead, blooming beauty in a silent spring. We've.ToArray() camera wizardry, plucking the silence breeders from the tapestry of the cacophony.
Get the guide
The anticipated Android 4.4 KitKat Update for the Micromax Canvas lineup is scheduled to roll out in the second quarter of 2014.2024-09-21 13:46
OnePlus 5 Commences Installation of OxygenOS 5.0 Android Oreo Update; New Face Unlock Feature to Be Rolled Out Shortly2024-09-21 13:27
The Vivo V5s Makes Its Debut: Equipped with a 20MP Front Camera and Offering 4GB/64GB Storage, Now Available at Rs. 18,9902024-09-21 13:20
InFocus Bingo 10: Comprehensive Review, In-Depth Gaming, and Performance Benchmarks2024-09-21 12:49