您的当前位置:首页 > Paper Plane > Introducing the Gionee Gpad G4, featuring a powerful 1.5 GHz Quad Core processor and a crisp 5.7 Inch HD display, all for just Rs. 18,999. 正文

Introducing the Gionee Gpad G4, featuring a powerful 1.5 GHz Quad Core processor and a crisp 5.7 Inch HD display, all for just Rs. 18,999.

时间:2024-09-21 02:50:36 来源:网络整理 编辑:Paper Plane

核心提示

EmbracethefuturewithGioneeGpadG4,ageminIndiashelvesatRs.18,999,nabbedbythe"exclusivetous"tagjustaspa

Embrace the future with Gionee Gpad G4, a gem in India shelves at Rs. 18,999, nabbed by the "exclusive to us" tag just a span ago. It's here, a towering sentinel in the phablet arena, decked in an exquisite unibody Aluminum physique, fuelled by MT6589T engine, and ready to face titans Xolo Q3000 and Intex Aqua Octa.

Get lost in the 5.7-inch cinematic canvas of Gionee Gpad G4, a 720p HD masterpiece that lives up to expectations, expertly served with the MT6589T chipset that enhances performance, making the pixel deficit a thing of the past.

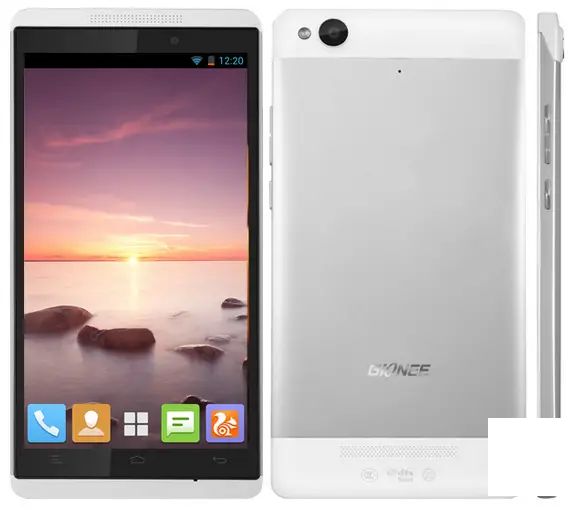
5.7 Inch display of Gionee Gpad G4, 720p HD beauty

Under the hood, the MT6589T turbo processor, a processor with fervent fanfare not long ago, pairs harmoniously with 1 GB RAM for a gourmet daily driving experience. Storage is ample with 16 GB on board, expandable to 32 GB with MicroSD storage magic.

MT6589T turbo processor1 GB RAM16 GB internal storage, expandable to 32 GB

Every detail's a story with its Aluminum unibody exterior. Anticipate a 13 MP camera on the back and a 5 MP image-maker up front. Measuring 163.5 x 81.3 x 7.95 mm, this sleek number slides into your world and rides on Android 4.2 Jelly Bean software serenely.

Aluminum unibody13 MP camera5 MP shooterAndroid 4.2 Jelly Bean

Don't let 3200 mAh stop you; in this screen size wars it's a fair fight. дорогие функции include : juices of DTS audio, gestures, Gionee Xender App, connectivity gods 3G, WiFi, Bluetooth and the locative combo GPS with A-GPS.

3200 mAhin-built DTS audio

Not路站 bestariamente priced now, but Gionee Gpad G4 boasts ambition. Amongst Xolo Q3000 and Intex Aqua Octa contenders, it is to be bought now, availed from Snapdeal, for Rs. 18,999.

Key Specifications Highlighted

上一篇:Title: Moto E vs. Unite 2: The Ultimate Buying Guide — Which is Right for You and Why?In this thorough comparison, we weigh the pros and cons of the Moto E and the Unite 2 to help you make an informed decision about which budget smartphone is the best fit for your needs.**Examing the Moto E: Your Affordable Starter**Pros:- **Cost-Effective**: The Moto E offers exceptional value for money, making it an excellent choice for those on a budget.- **Simplicity**: With its straightforward interface, the Moto E provides a user-friendly experience without overwhelming features.- **Battery Life**: The Moto E boasts a long-lasting battery, ensuring you stay connected throughout the day.Cons:- **Performance**: While it won’t compromise on affordability, the Moto E may fall short in terms of performance compared to higher-end devices.- **Limited Storage**: The Moto E typically comes with limited internal storage. However, expandable microSD slots are often available for additional storage options.- **Camera Quality**: The camera on the Moto E is adequate for basic usage but may not live up to the standards of higher-end models.**Understanding the Unite 2: A Mixed Bag**Pros:- **Multi-Link Compatibility**: The Unite 2 offers advanced connectivity options that are particularly beneficial for frequent travel or work in diverse environments.- **Sturdy Build**: Known for its durability, the Unite 2 is a solid choice for those who need a smartphone that can withstand the occasional drop or rough handling.- **Decent Specifications**: The Unite 2 shares many middle-of-the-road specs that ensure a decent overall performance without breaking the bank.Cons:- **Moderate Pricing**: Despite falling into the budget category, the Unite 2 might not justify its price tag when compared to some of the more feature-rich mid-range competitors.- **Network Limitations**: The availability of the Unite 2’s connectivity options can depend on your location, potentially leading to limitations or additional cost for certain networks.- **Camera**: Similar to the Moto E, while the camera is better than entry-level, users looking for high-quality imaging capabilities may be left wanting.**Why Choose One Over the Other?**Deciding between the Moto E and the Unite 2 hinges on your personal preferences and specific needs.- If simplicity, affordability, and long battery life are your top priorities, the Moto E might be the winner.- For those who require robust build quality, diverse connectivity options, or just a bit more performance at a budget-conscious price point, the Unite 2 could be the better choice.When making your decision, consider your usage patterns, importance of camera quality, and the types of tasks you plan to perform. Your choice should align with what matters most to you — and your wallet.
下一篇:### How to Uninstall a Downloaded Update on Your Mac Without Installing ItUninstalling an update you've downloaded but haven't installed yet on your Mac is a simple process. Here’s a step-by-step guide to help you through:#### Step 1: Open FinderBegin by launching Finder, which is the default file manager on Mac.#### Step 2: Navigate to the Download FolderIn the Finder window, click on Downloads from the sidebar to view all the files you have downloaded.#### Step 3: Find the Update FileScroll through the list to locate the update file. It will typically have a recognizable title such as OS X Name Update.zip or similarly titled files that indicate they are system updates.#### Step 4: Delete the Update FileOnce you've found the update, right-click on the file and select Move to Trash from the context menu. Alternatively, you can drag the file to the Trash icon located in the Dock.#### Step 5: Empty the TrashAfter deleting the update file, it won't be gone until you empty the Trash. Right-click on the Trash icon and select Empty Trash. You will be prompted to confirm; make sure to check that there's nothing else in the Trash that you want to keep before confirming the deletion.#### Step 6: Restart Your Mac (Optional)Restarting your Mac can help finalize the deletion process, although it’s not strictly necessary. Simply close all open applications and click Restart on the Apple menu, or press Command + Option + Shift + Power to shut down your computer.By following these steps, you can successfully remove a downloaded update from your Mac without having to install it. Remember, this process will only delete the update file; if you’ve already installed any part of it, you’ll need to use the built-in system preferences or utilities to completely remove the updates from your system.