您的当前位置:首页 > Paper Plane > **Elevate Your Sound Experience with Plantronics Voyager Legend Headsets: Recognized by NDTV Gadget Guru 正文

**Elevate Your Sound Experience with Plantronics Voyager Legend Headsets: Recognized by NDTV Gadget Guru

时间:2024-09-21 12:27:44 来源:网络整理 编辑:Paper Plane

核心提示

**Stepintotherealmofcutting-edgetechwithaheadsetthatwhisperstheessenceofinnovation!It'sanauditorymar

**

Step into the realm of cutting-edge tech with a headset that whispers the essence of innovation! It's an auditory marvel unparalleled, brimming with the smarts we love in our smartphones. Embrace the Voyager Legend by Plantronics, the recipient of NDTV's prestigious grooming in the field of computer peripherals. Buckle up for a journey where sound meets sophistication.

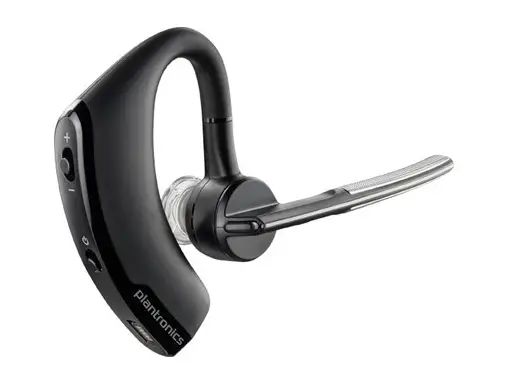
This headset doesn't just founder in capacity; it roars with three microphones. One for noise, a warrior against distractions; the other, a racer's ally against the gusts of wind, ensuring you're heard crystal clear—be it on the run or behind the wheels. Command, ignore, or inquire with a quick whisper. It spells out caller identities and reads the network status right from your smartphone’s spine, all through your voice—a simple command suffices to attend or turn it away.

The batter level, too, isn't a secret. Smart Sensors dance with your intuitive touch, and the nano-coating adds a protective sheen, shielding the headsets from the wilderness of wear and tear. The absence of physical buttons speaks volumes: these headsets are masters at sensing the moment they need their voices to be heard. They wait, dormant yet ready, to revisit your ears when linked with your phone's embrace.

Join the elite circle of the Nokia in-ear headsets priced at 3000 INR, but look beyond. Spend a bit more, and this intelligent creation known to retail at 5,250 INR will far outweigh its price in the treasures of technology and features. Order your true companion from Flipkart without a second thought.

上一篇:# Manual OTA Update Process for the Coolpad Note 3## Step-by-Step GuideTo manually update your Coolpad Note 3 device over the air (OTA), follow these detailed steps:### Step 1: Prepare Your Device- **Charge Your Battery**: Ensure that your Coolpad Note 3 has at least 50% battery charge to prevent the update process from being interrupted due to a low battery.- **Back Up Data**: It’s advisable to back up your important data and files to avoid any loss during the update process.### Step 2: Check for System Updates- **Access Settings**: Navigate to the Settings option on your device.- **System Update**: Look for a System Update, Software Update, or similar option. Tap on it.### Step 3: Check Your connectivity- **Wi-Fi Connection**: Ensure your device is connected to a stable Wi-Fi network as updates can be large and require a secure connection.- **Cellular Network**: If you prefer, you can use your mobile data connection, but ensure you have enough data for the update.### Step 4: Update Your Device- **Download the Update**: Follow the on-screen instructions to check for updates. Downloading can take some time, so be patient.- **Accept Terms & Conditions**: If prompted, review and accept the terms and conditions of the update.### Step 5: Install the OTA Update- **Get Started**: Once the update file size is complete, the installation process should start automatically.- **Follow Prompted Steps**: Your device will guide you through any necessary steps, such as making sure your device is not in use or connected to power.### Step 6: Complete the Update- **Do Not Interrupt**: Do not turn off your device or disconnect it during the installation process. Do not use your device until the update is finished.- **Restart Device**: After the update is complete, your Coolpad Note 3 will restart automatically.### Step 7: Verify Update- **Check for Confirmation**: The updated OS version should be displayed on your screen.- **Test Your Device**: Try running some applications or normal usage to ensure everything works as expected.Remember, these instructions may vary slightly depending on the firmware version of your Coolpad Note 3 and the current software available. Always refer to the manufacturer's support resources for the most accurate information.
下一篇:### How to Auto-Translate Chrome Web Pages for PC and Mobile DevicesLooking to easily translate content on web pages directly within the Google Chrome browser on your computer or mobile device? This guide will walk you through the simple steps to activate automatic translation on both your PC and mobile browsers.---#### Auto-Translate Chrome Web Pages on PC1. **Access Chrome Settings:** - Open Google Chrome on your PC. - Click on the three dots in the upper right corner to open the menu. - Select “Settings” from the dropdown list.2. **Navigate to the Advanced Section:** - Scroll down or use the search bar and type in “Language.”3. **Enable Translation:** - Under the “Languages” section, click on “Translate spoken and written languages automatically.” - Toggle the switch to enable automatic translation. Chrome may ask for permission to access your language preferences and text content on web pages, so be sure to give the necessary permissions.4. **Select Your Preferred Languages:** - Click on “Language” in the settings menu. - In the list of languages, select “Add languages.” - Choose the languages you want Chrome to automatically translate from and to.5. **Start Browsing:** - Open a web page as normal. - Chrome will automatically translate French or other foreign language text into your chosen target language.---#### Auto-Translate Chrome Web Pages on Mobile DevicesThe process is similar for mobile users:1. **Open Chrome on Your Mobile Device:** - Launch the Google Chrome app on your smartphone or tablet.2. **Go to Settings:** - Tap on the three dots in the upper right corner to access the menu. - Choose “Settings” from the menu.3. **Access Language Settings:** - In the settings menu, scroll to find “Languages” or “Languages & input.”4. **Turn on Translation:** - Look for an option related to automatic translation and toggle it on. - If prompted, grant permission for Chrome to access the text content on your webpages.5. **Set Your Language Preferences:** - Go to the language settings and add the languages you wish Chrome to automatically translate.6. **Browsing with Translation:** - Browse any web page. - Chrome will then show the translations automatically, either in_place as you read, or after you select the translate button on the webpage.---By following these steps, you can now enjoy seamless automatic translation for web pages in Chrome, regardless of whether you're using a PC or a mobile device.